13 tips to make your own headboard
Bed takes the most honorable place in the rest room, and headboard the beds serves as its main decoration, which is primarily paid attention to. But does it always look exactly as you would like? If you are disappointed with the choice of furniture stores, we suggest you figure out how tomake a headboard the beds do it yourself. This guarantees absolute exclusivity and matches your dreams. Moreover, beds with ready-made headboards are an order of magnitude higher than without them.
1. What style to choose for the headboard?
This is the first thing to start with. design future headboard. In no case should it contradict common room interior and the style of the bed itself. Consider the most popular styles:
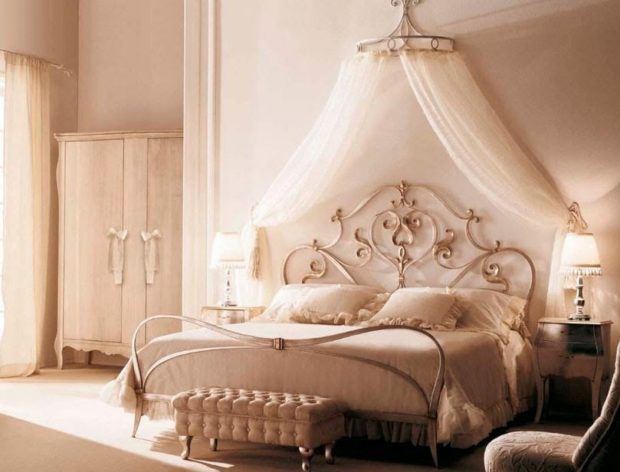
- Baroque. This style is preferred by people who want to emphasize their worth. It includes a lot of gilding, expensive luxurious fabric, art forging. The main atmosphere that this style creates is luxury, wealth, chic and pomposity. The soft headboard made of velvet, brocade or other beautiful fabric with golden buttons will perfectly fit into such an interior. Or mirror headboard in a wide beautiful carved frame, painted with gold paint, or the head-canopy of heavy, opaque fabric with gold garters with tassels at the ends. In general, everything that looks expensive, but by no means a rectangular wooden headboard.

- Provence. Highly easy and pleasant style originally from France. This is a beautiful combination of classic style with rustic elements. This style is often decorated rustic french houses. Salient features are using warm pastel shades, preference for natural materials with their natural texture, specially made elements of wooden furniture and lovely floral patterns. For such a style, wooden headboards with elements of antiquity or a headboard panel made of light, light fabrics with an unobtrusive floral pattern are perfect.
- Vintage. The main feature of this styles are clearly visible and pronounced elements of antiquity, and not just old things, but those that really belong to past eras, precisely from those materials that were used in those days. Collecting decorative elements for this style is sometimes difficult. Color spectrum neutral and includes “faded” shades. For material headboard a tree, in its natural form, an old mirror, or a soft headboard made of linen light fabric or specially aged velvet will do.
- Art Deco. This style is very easy to learn because of predominance in him lines, stripes, broken curved lines and trapezoidal objects. It is characterized by natural rough surfaces, mirrors, stained glass. For a bedroom in the Art Deco style, it is preferable to use a large mirror, because this style implies many of space and light. It can also be used as a headboard. The colors of this style can be colorful, but always muted. Preferred shades brown, white or metallic.Furniture in color should contrast with the color of the walls, and one of its elements must be of non-standard shape. In addition to the mirror, as a headboard, a soft rectangular or trapezoidal canvas is well suited.
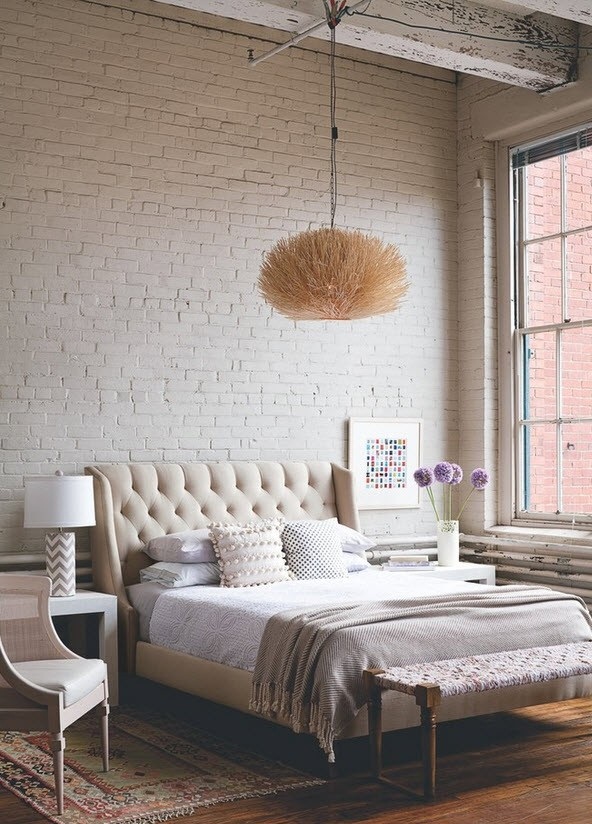
- Loft. This style is loved by many due to its spaciousness. Integral element of this style - the presence of crude brick masonry, often white. ABOUTmajor flowers are white, gray, shades of brown. Materialscharacteristic for this style is wood, glass, concrete, brick, chrome parts. This style combines rough finishing elements that have an unfinished look with modern technology. Furniture simple, concise and as practical as possible. Headboard it is better to make beds made of wood or made soft, so it will create the effect of incompleteness, especially against a brick wall.
- Eco style different in use natural materials with preservation of their invoices. Color spectrum as close to natural - shades of green, brown, yellow. Such an interior has a positive effect on human health, not only physical but also mental, providing a calming effect. Furniture - from a natural tree. The head of the bed may be like woodenand soft, the main thing is to maintain the overall color scheme.
2. Forms for the head
Off form the head of the head depends what impression will generally produce a berth. The simplest forms are rectangular or slightly rounded at the edges. Semicircular shapes are often used. But why not give the room a more interesting look and make a headboard, for example, in the form shells or crownslarge flower or rainbow? Children will certainly like such bright headboards and will always cheer them up, even on the coldest and cloudiest day. Even small bends will look more interesting than a regular rectangle. You will need to spend a little more time on making the blank for the head of the box an irregular shape, but the result will be worth it.
 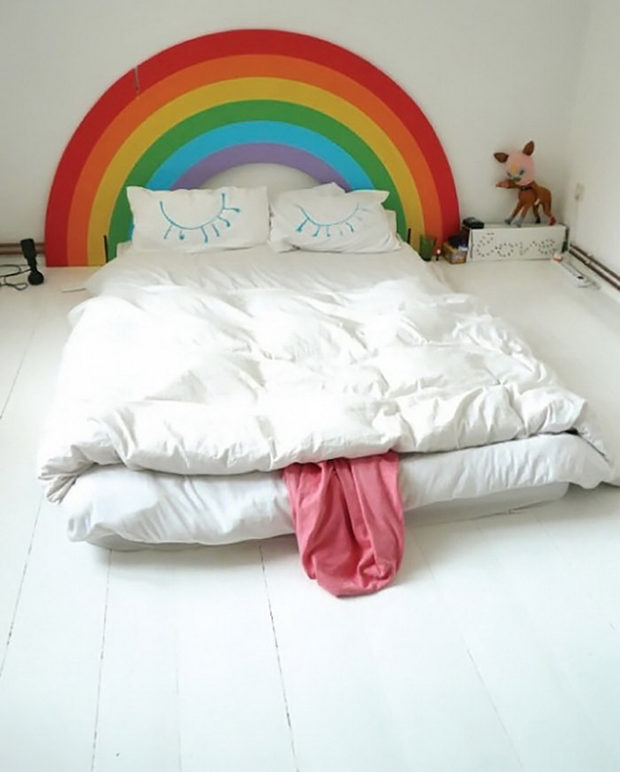 I think you have already decided on the style in which your bedroom, if not completely, then in its overwhelming majority, probably the image of a pleasant form of the headboard has already surfaced in your head, then it's time get down to business.
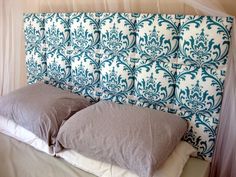
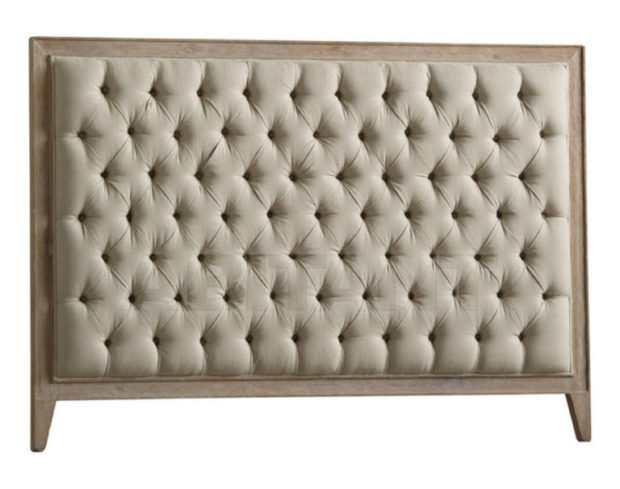
3. Soft headboard
 This type of headboard is most loved by many designers because it makes a room highly comfortable. And if you like to spend a little time reading before going to bed, then it will be much more pleasant to lean on a soft, pleasant to the touch headboard made by your own hands. For the manufacture of You will need some materials, but enough patience and free time.
You will need the base, upholstery and buttons with a buttonhole to your taste for the front part and buttons are the most common with four holes for fixing on the back side, packing foam, glue, furniture stapler, drill and strong thread with a needle. Base should be strong and not necessarily beautiful - it will not be visible. Its length can exactly equal the width of the bed, and can go beyond it, it depends on your preference. You also choose the height based on your desires. Some people like to fill the entire wall behind the bed with a solid, low headboard. It looks very comfortable and unusual.
As a basis, you can use what you have in your home. For instance, old door pantry, the wall of the old cabinet, a piece of chipboard, several small doors, just wooden boards, in general, everything that is a pity to throw out, but here it’s just right.
Filler packing foam rubber will serve us. Why not furniture? Because it is cheaper. To achieve the required thickness, you can lay in several layers. A piece of fabric should be 20-30 cm larger than the base along its entire perimeter.We put the base on the floor, smear with glue, apply foam and cut off all the excess around the edges. You can fix the foam with a stapler, as you wish.
We will make a soft headboard that is very fashionable now, imitating carriage upholstery. To do this, you need to make holes in the foam and the base for future buttons. To do this, make markup. 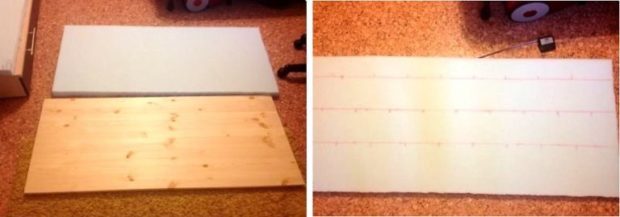 If you want to end up with squaresthen place the holes under each other if lozengesthen staggered. At an equal distance, mark on the foam rubber with a marker the points where the future buttons will be. With a sharp knife, make holes in the marking place in the foam, then using a drill, drill small holes in the base.
 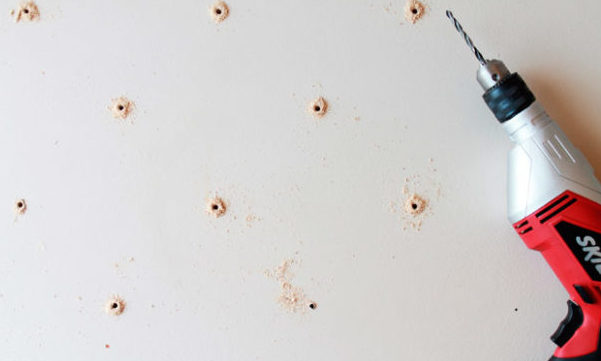 3-4 mm are enough for a needle with a strong thread to pass easily. Before you start drilling, place something under the base so as not to perforate the floor. Now we take fabric, a stapler, and we begin to tighten a headboard. Here you can need an assistantto hold the base and hold the fabric while attaching. Fasten the edges well, do not spare staples, but do not pull too tight, otherwise it will be difficult to tighten the fabric with buttons and the headboard will not come out as voluminous as we need. Now we take an ugly button for fastening on the back side, we pass a needle and thread into it and we firmly fix it, for this you can sew it into all the holes, as if you sew it, so it will not slip when tightened.
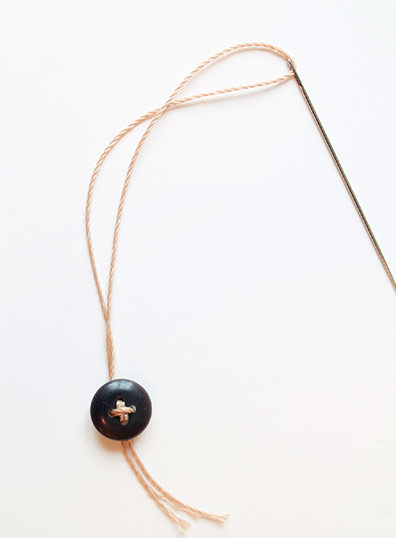 We skip the needle with the button at the end of the thread on the back side and gently grope its end on the front side. The needle should go out in the hole in the foam. Next, thread the needle through the loop of a beautiful button, make one revolution of the thread around the button and thread it through the loop again, and then pull the thread well. The button located on the back will help hold the thread, and the front button will press the fabric, forming beautiful folds. If the creases come out too small, lay the fabric as you like while tightening the thread. Now cut the needle, and wrap the remaining thread around the buttons and tie it several times, hide the rest under a hat.
Start work with the first hole in the upper corner. Why are we use two buttons? Because after some time, the tension weakens a little and the pattern becomes less pronounced. So as not to had to redo all over again, it will be enough to pull the back button, resuming the interference, and fix it a little lower for a piece of loose thread stapler. The back of the head can be a little transformby tightening with any cloth or thin plywood. When the headboard is ready, you need to hang it. To do this, you can use special loops that are attached to screwsscrewed into the wall. You can make the headboard attached, for this at the first stage to the base, you need to attach the legs of the desired height, and then just lean it against the wall.
 Important point - when you tighten the base with a cloth, on top of each hole in the first row, form small folds with your hands, otherwise they may not work out, which will slightly spoil the look of the whole product.
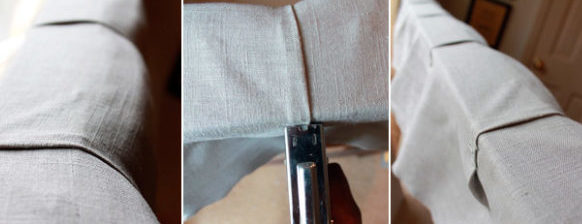
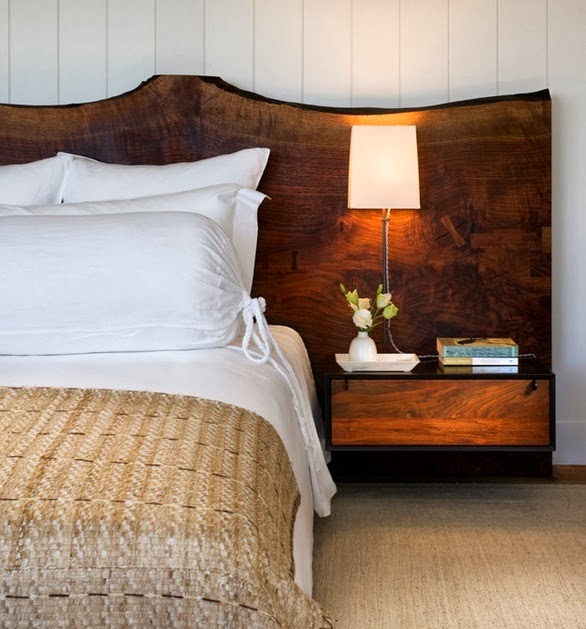
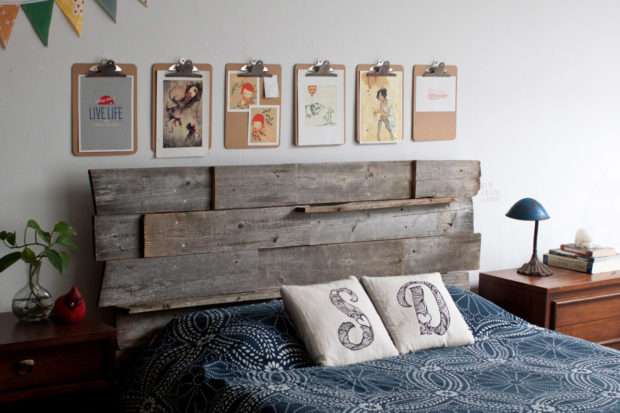
4. Wooden headboard
Tree - this is universal materialthat fits any style. Working with him is very easy and pleasant, but it always looks appropriate and natural. Let's make a wooden antique headboard. You can use anything for this - just wooden boards, maybe you have cuts of various sizes, maybe an old wooden door or unnecessary pallets. We will do burnt tree, you can also paint it, you can simply open it with varnish, you can paint it, and then partially wipe it with large emery paper, you can draw a pattern or an unobtrusive drawing or use a stencil ... We tell the theory, and you improve it for your version. 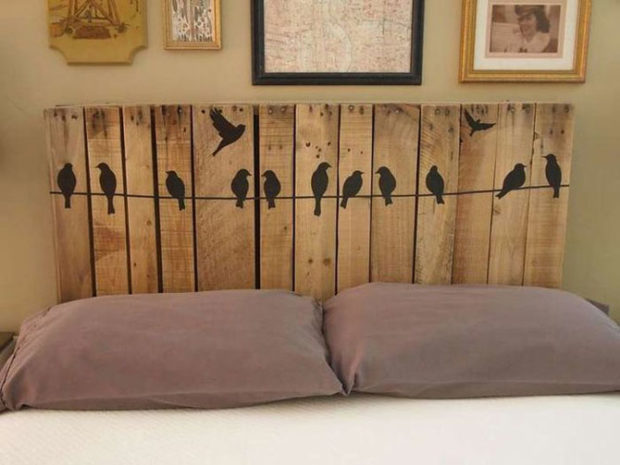 Take three boards from old gender in good condition.Knots, small cracks or chips are not a hindrance, so even more textured, the main thing is that they are even and can fit snugly against the wall. First, let's put in order the appearance of each board separately. We will need gas-burner. With its help, it is necessary to burn the surface of the tree, which will lead to its darkening. You can completely, you can only edge, as you like best. It should look something like this:
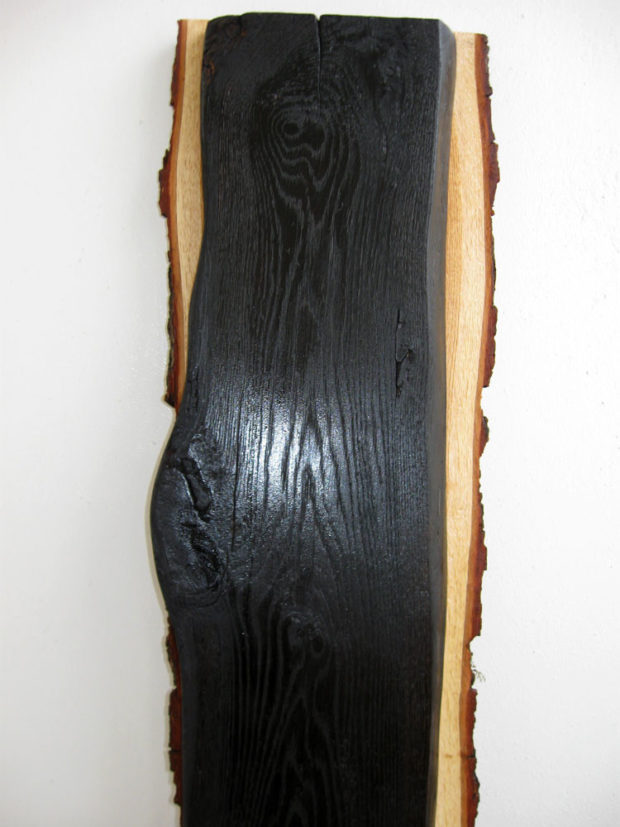
After aging open transparent boards varnish. Carefully read the composition varnish. Not everyone is suitable for internal use, since they contain resins that emit harmful substances. It is better to give preference to varnish on water based, it dries longer, but is completely safe. Open the boards on all sides in two layers, so you will extend the life of your head. If you decide to decorate the tree with a pattern, then apply it before opening with varnish and make sure that it does not get greased. When boards are dry need to fasten them among themselves. For this you can use wooden planks or a metal profile. Using small nails nail boards to the strips or profile on the back. 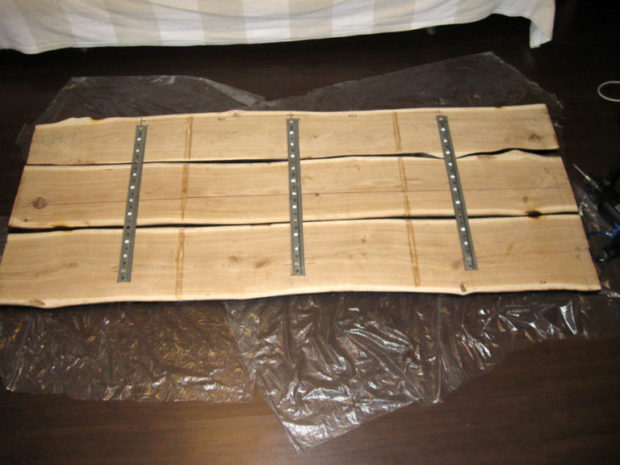 Pick up nails so long that their tip does not go right through and comes out on the front side. The headboard made of wood will have a decent weight, so ordinary screws can not stand it. Better for this anchor bolts. Before fastening, draw an even horizontal line on the wall so that the headboard hangs perfectly evenly.
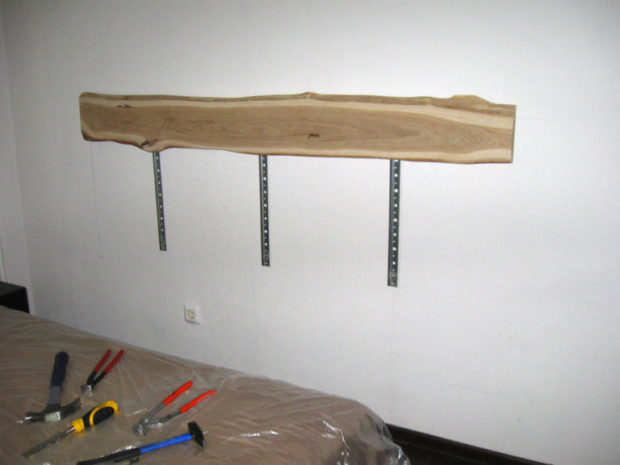
5. Hanging headboard
Highly unusual solutionwhich you easily bring to life. Idea consists in fastening various elements to the frame located above the bed. As a frame, you can use a piece of chrome pipe or a wooden plank, or you can even pen from old wooden mops the main thing is that its length is enough for the entire width of the bed. As hanging elements you can use anything, for example, small pillows in beautiful pillowcases or one pancake pillow. On such a headboard nice to lean on. And pillowcases are easy to remove or wash. It can be small wooden circles on which pictures are painted, metal discs with various emblems or your collection of favorite items. More comfortable Total pillows look on beautiful ties. To make such a headboard we will need: chrome-plated or powder-coated pipe, end caps in the color of the pipe 2 pieces, wall mount 2 pieces, pillowcases and small pillows. 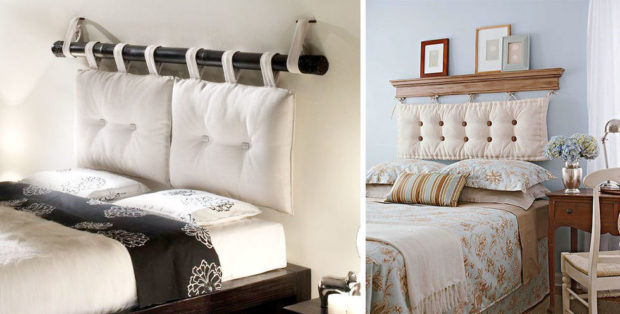 To reduce the cost of the process You can not buy ready-made pillowcases and pillows, but buy fabric cuts and sew everything yourself. Pillows can also be made by yourself. To do this, you need to buy a white bedding fabric and filler. In any sewing store, a synthetic winterizer or holofiber is sold by weight.
Imagine what we decided to sew on your own. It is necessary to make a pattern of the future pillow with a margin of a couple of centimeters on each side for a seam. Fold a piece of white fabric in half, apply a pattern, draw contours and cut it out. Before you start scribbling, sketch the workpiece This will protect you from uneven edges and distortions during sewing. Leave one edge stitched to the end by about 10 cm. Turn the finished pocket out and fill it with filler through the hole left. Choose your desired volume. At the end, it is necessary to sew the pillow to the end with a linen seam or manually. Our pad is ready.
Now we will eat pillowcases from the selected fabric. The principle is the same, only on one side it is necessary to add loops or ties, on which pillows will be attached to the pipe. To do this, stitch not very wide stripes of fabric from the inside, folded in half. Turn out the resulting tubes and iron, giving them a rectangular shape.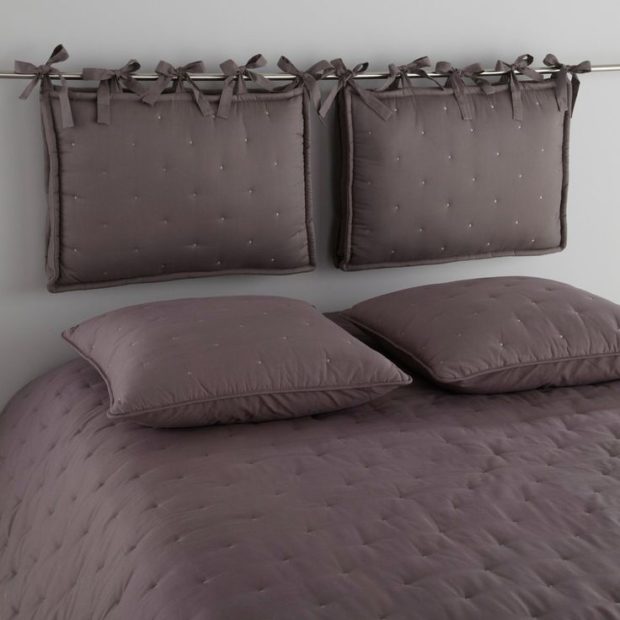 Do pillowcase pattern using the existing pattern for the pillow, adding another 2-3 cm around the perimeter.When you sew a pillowcase, on one edge, do not forget to insert our ribbons folded in half, these will be the future loops. For convenience further use in the edge opposite the hinges, you can sew in a hidden zipper. This will make it easy to remove the pillows. The number of pillows, their size and color, choose according to your own imagination. Ready pillowcases can be decorated embroidery or buttons, rhinestones, sequins or various stripes.
When all the sewing work is done, do on the wall markup which you will be guided during the fastening of the pipe. Screw one fastener to the wall, thread a pipe into it, cover the edge with a plug. After that, put the pillows on the pipe and only after that screw the second fastener and wind the pipe edge there. This only applies to pillows with hinges. You can tie pillows on ties at any time. Enjoy the view of the work done.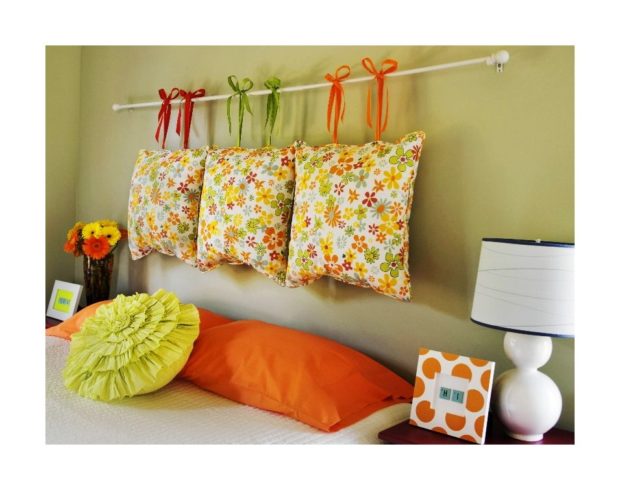
6. Headboard - mosaic
Such colorful headboard will give your bedroom freshness and enliven the whole interior. Two main questionsthat you now have is what to make of mosaic and what to fix it on. We suggest using a wooden frame and plywood sheets as the basis, and for mosaic pieces use tile, which probably remained with you after the repair.
First make the base. This will require flat boards. There will be three windows in our frame for the subsequent placement of plywood, with mosaic laid out on it. If you did not find suitable boards, buy already sawn boards in a hardware store. You will also need window glazing beads or thin corners. You need two long boards, this is our top and bottom, and four transverse boards. Count the width and height of the future headboard yourself. Boards and glazing beads you can just open up colorless varnish, you can cover with a stain of the necessary color, you can paint.
Lay out your boards on the floor, measuring the same distance between the transverse partitions. Mark with a marker where you want to do fasteners. Knock down the frame with long nails, after drilling small holes to facilitate the process. After the frame is ready, make a measurement of the resulting windows, these will be the dimensions of the plywood with the mosaic. Saw off the plywood with a hacksaw.
Now let's get started to mosaic. Put tile on a cloth and hammer it into small pieces. 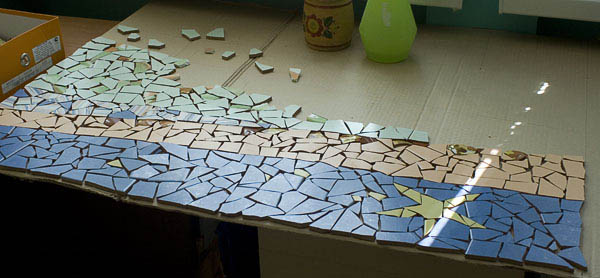 Well, if there are several types of tiles in different colors. Now start lay out pieces on plywood, leaving 5 mm contour free. This can be an arbitrary arrangement, or a picture of your own in the form of lines, curls or flowers. When the drawing turned out and you were satisfied with the result, carefully take one piece and apply glue on it. Can be used liquid Nailsso you have to glue all the pieces. You must gaps will remain between mosaic elements. They can fill grouting for tile. When everything is dry, gently wipe your work of art with a damp cloth and then a dry cloth.
 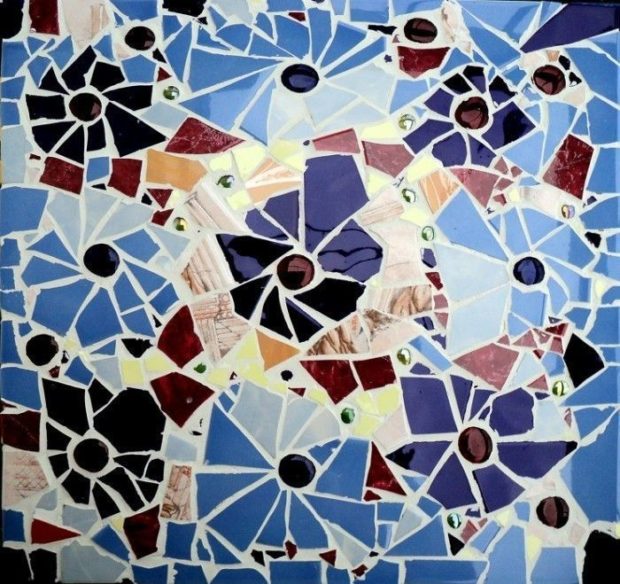 Now it's time to put together frame and mosaic. This can be done very simply using glazing beads for windows. On the front side of the head, fill a frame of glazing beads along the perimeter of each window so that they protrude 5 mm into the windows. This will be a support for plywood. On the inside, apply some glue to the glazing beads and attach the plywood with the mosaic. After gluing all three elements, lay the frame face down to allow the glue to dry. Your headboard is ready. Installation can be done in the same way as with a wooden headboard.
7. We draw a head
Why not? it cheapest way execution of the head. If you do not have the talent of an artist, do not immediately discard this method. Now you can buy all kinds of stencils any sizes and with any pattern. You will only need to transfer the drawing to the wall. Stencil needed securely fasten on the wall so that it does not peel off in the process. This can be done using tape. The figure should be evenly placed on the wall. Ideal for stencil cases paints in balloons. To avoid paint on the bedcover it with a special film.
After filling all parts of the stencil, let the paint dry a little and gently peel it off the wall. Such unusual way will allow you to show your imagination and personality to the maximum, both in the choice of colors, and in the choice of the picture itself. It can be anything from an air castle to a simple repeating ornament. In any case, it will be very unusual and original.
8. Headboard - photo frame
You many family photos which capture the happiest moments of your life? So why do they get dusty in the album, let's use them in as a headboard your bed. there is several ways how to make a photo. You can buy the required number of finished wooden frames of the same or different sizes, and then glue them together and stick to the base from plywood, or you can make a wooden frame with the required number of windows of any size. Or you can use the old one as a frame window framejust fine-tuning it a bit.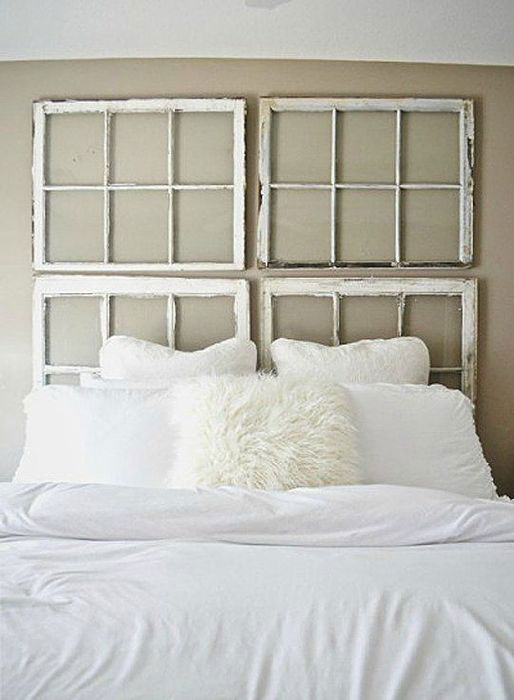 let's consider the most difficult way - with a frame of boards. No need to use thick and massive boards for the entire base. We propose to use larger boards around the perimeter, making one large frame, as for the head of a mosaic, and already make windows from thinner boards. At the first stage you will succeed wooden rectangle.
Now you need to determine the size of the photo, it’s better to choose a larger one, so it will be less sticky and more clear what is shown. Suppose we choose a format A4. Now you need to turn your rectangle face down and fill it with first transverse, then longitudinal bars with a step equal to the size of the photo. You will be released windows in which we will invest photos later. To keep them on something, it is necessary to nail a sheet of thin plywood to the last slats.
The frame is ready, turn over and with glue, we attach our photos in the windows to the plywood. You can leave the headboard open, or you can to close unbreakable glass. This way dust will accumulate less and you will not ruin the photo. Looking at such a headboard, you will always fall asleep, and wake up in a good mood.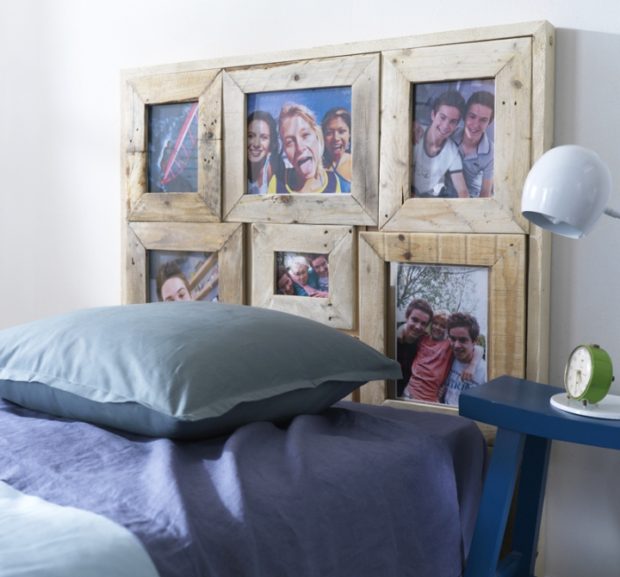
9. Headboard - panel
This type of headboard will not only make your bed more cozy and comfortable, but also decorate the wall behind her, moreover, it will be upon him Leans nicely. We offer to do do it yourself soft stuffed mural from multi-colored fabric. The panel will be a square or rectangle, consisting of squares of small sizes, covered with beautiful fabric, to which we will add a little volume with the help of a filler. 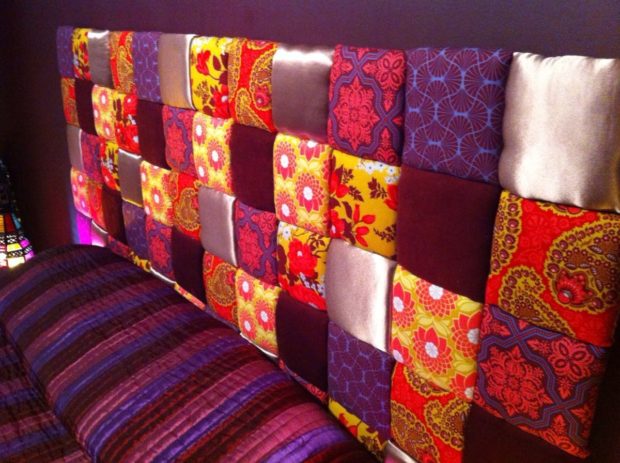 Technology manufacturing is very simple Having mastered it, you can use not only squares, but also rhombuses, triangles, hexagons as elements for a panel, and make not just a rectangle, but any figure that you like. So, we will need two sheets of plywood of the desired length and height - one for the base, the other for cutting. Flaps of fabric of different colors, foam for stuffing, glue, furniture stapler, hacksaw.
So you oriented in sizes Consider the technology of manufacturing panels with a size of 160 × 100 cm. Our squares will have a size of 20 × 20 cm, so we need 8 squares in length and 5 in width - a total of 40 pieces. On one sheet of plywood, mark up and cut into 20 × 20 cm squares, now cut the foam into 40 pieces of the same size. Use glue to glue the foam on plywood squares.After that, wrap each square with a piece of cloth and secure the edges with a stapler. The fabric should be 5 cm larger on each side, that is, our rags have a size of 30 × 30 cm. 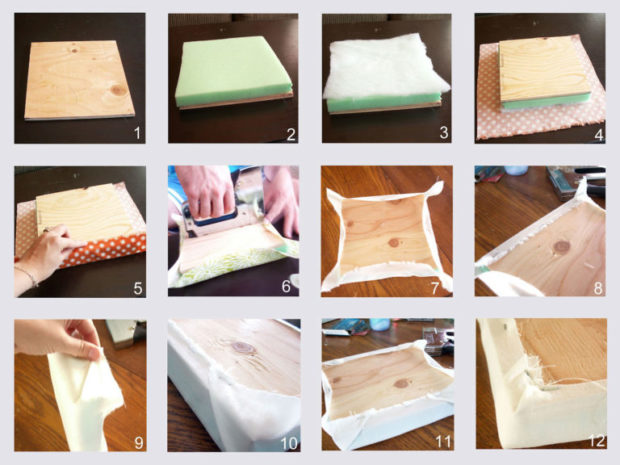 When all the squares are ready, you must fix them on the second, whole sheet of plywood. To speed up and facilitate this process, can use liquid nails. Make sure to the lines were even and the sides of the squares were adjacent to each other without gaps. The finished panel can be attached to the wall using hinges and screws. By the way, such soft squares can be inserted into old window frames. Maybe you still have old-style frames that are divided into many small rectangles.
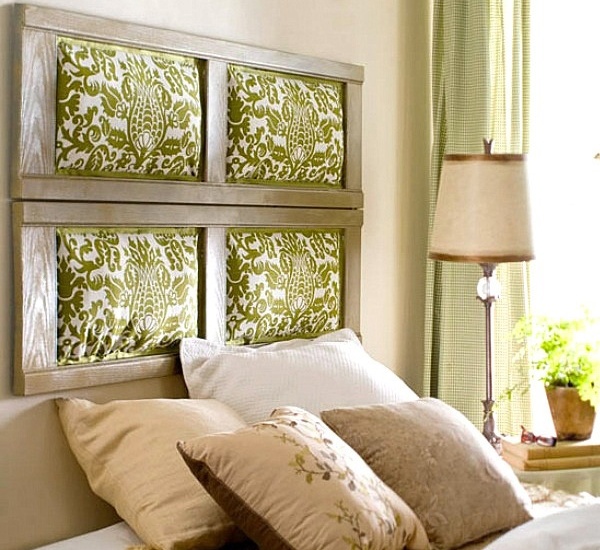
10. Lacy headboard
Most gentle and openwork view of the head which can only be. He will fit very well in light colors bedroom interior. Make such a headboard will be very simply, moreover, if you yourself own the technique of artistic knitting, or maybe your grandmother or mother can help you with this. We will need knitted lace or lace fabric, fabric for the base and the base itself. If you want a flatter headboard, then the thickness of the chipboard sheet or the old shelf from the chiffonier is enough for you, if you want a more voluminous and soft one, then foam is also needed.
let's make soft lace panel. We have a door from an old cabinet 12 mm thick. Glue on it a foam rubber 5 cm thick and trim the excess around the edges. 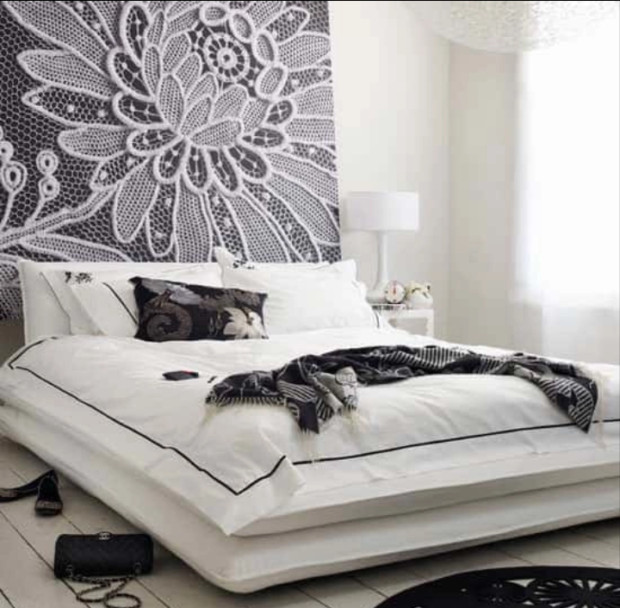 Our lace is white, so that it stood out better and it was more noticeable, as a fabric for the base, you can take linen fabric of a dark gray color. In the same way as in the manufacture of a soft headboard, it is necessary to tighten the base with fabric and fix it around the perimeter with a stapler. Now, on top of this, gently fix our lace. Next you can modify headboard by his to taste. You can add some rhinestones or bows. You can not use foam rubber, but make the headboard flat, then it will look more like a panel. In any case, the lace will be to look like highly original.
11. Headboard - canopy
Such a headboard will create more intimate and cozy atmosphere your sleeping place. For its manufacture you will need fabric, base, for attaching it, hooks for holding curtains and decorative decorations to taste. The fabric can be completely different, both heavy and dense, as well as light and transparent. Navigate depending on the interior of the room. The length of the fabric also depends on your preference. It can reach the floor, and can barely reach the bed. With the fabric you have decided, with its length and width, too. 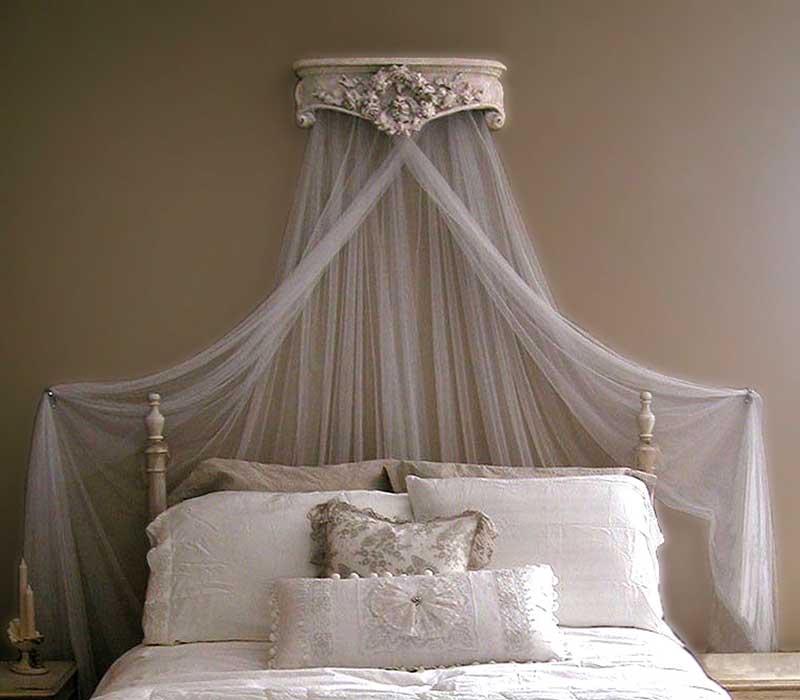 Let's get down to making grounds. You can attach the base to the ceiling if it is not stretch ceiling, can be mounted on the wall. We will mount to the wall. As a base you can use a small pipe, a decorative hook for hanging flowerpots, you can knock a square or a triangle out of small planks. If the fabric is heavy, then the base must be strong. We chose a weightless tulle, so the base will be a wooden square that matches the color of the bed. We knocked down small wooden slats between each other on the sides with the help of small nails. We fixed one side of the square to the wall using self-tapping screws.
Now we will arrange the fabric on the base, forming beautiful waves. On the sides of the bed, it is necessary to fix decorative hooks for curtains, with the help of beautiful garters to collect tulle and fix on them. Thus, above your head there will be a square that can be decorated with beautiful beads or hanging figures of angels, and tulle will fall from it with beautiful waves and end on the sides of the bed. Such a headboard will create highly romantic image in your room.
12. Headboard with shelves
Most practical a kind of headboard that is pretty just do yourself.You can use an old cabinet or old countertop. If nothing suitable was found in the house, you will have to spend a little money and buy sheets of laminated particleboard and a special tape that covers the ends. One sheet should be enough for you on the head of the medium size, since the chipboard is quite large. The main thing is right make markup and cut the sheet with the minimum amount of waste. They can help you with this in the same place where you will make the purchase, usually they have their own small sawmill and cutters.
After you cut the rectangles of the required size, you will need to assemble the whole structure together, after gluing the ends with a special laminated strip. This is done very simply with help the usual iron. Heat the iron to maximum temperature, apply the tape to the end of the sheet, you can cover it with a thin cloth on top and iron it several times until it sticks, cut off the excess. So you must work on all the edges, except those that are adjacent to the base of your head.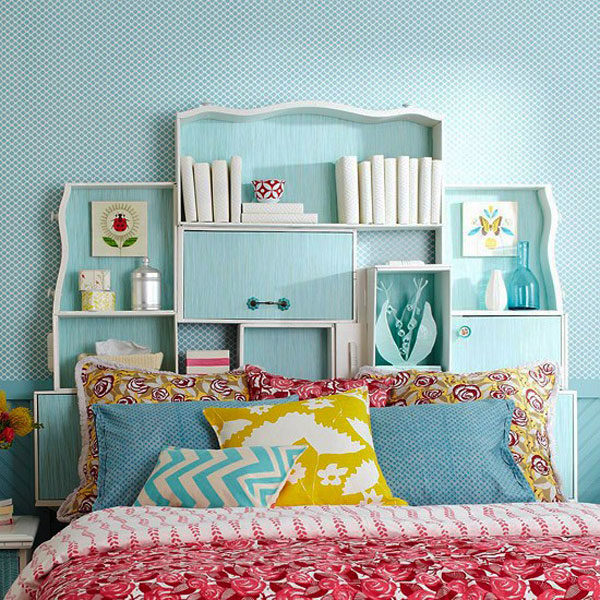 Now necessary mark shelves on the base and the distance under the mounting holes. When the work is done, drill small holes in the marked places, attach the shelf and place a marker on its end with a marker through the hole in the base, so you will be sure that the holes will exactly match when assembling. For fastening the shelves, you can use self-tapping screws, which must be screwed in from the back of the base.
If you do not want to mess with screwdriver and self-tapping screws, you can use special glue. So the work will be done much faster, but remember that such shelves should not be too heavy. They should serve as the location of decorative objects or lamps, but not books and massive figurines.
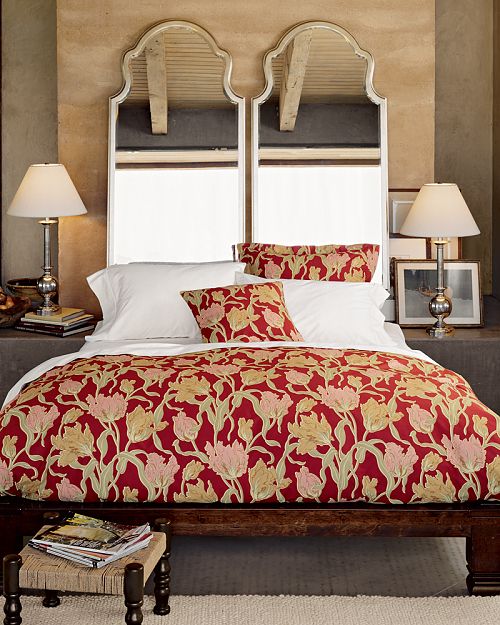
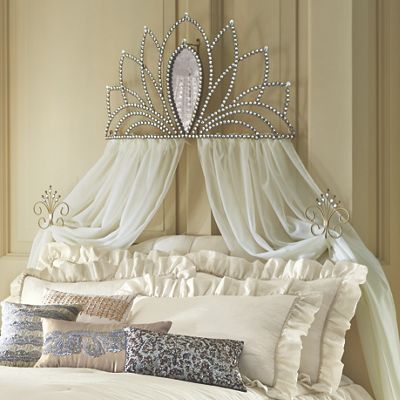
13. Mirror headboard
Such a headboard will help to cope with the problem. narrow room, because everyone knows that mirrors visually expand the space and if you select mirrored panels that will reach the very ceiling, then you will do premise visually higher. In addition, the mirror reflects the sun's rays and additionally fills the room with light. It is preferable to choose a mirror over the entire width of the bed and not too narrow. Can be used for this old dressing table. Remember, there were three sashes with a large middle mirror and slightly smaller side ones? To revitalize an old mirror, you must to do for him beautiful frame.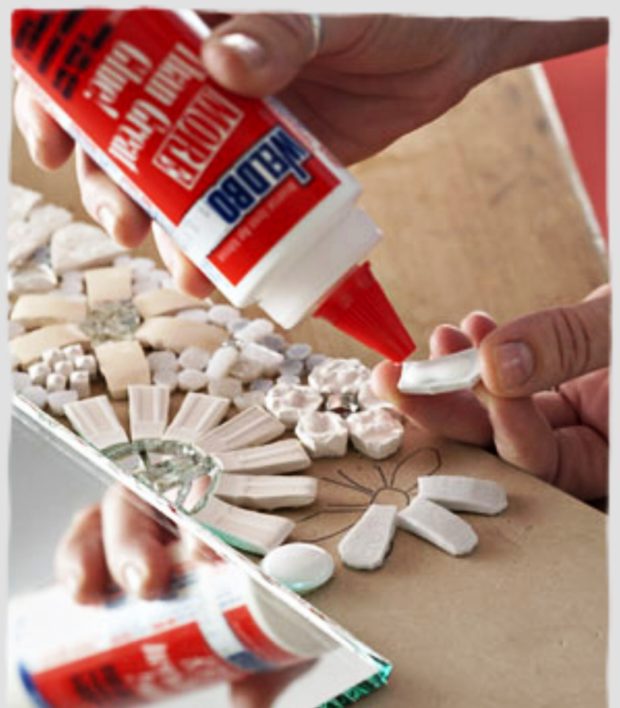 To do this, glue the mirror on a plywood sheet and leave 10-15 cm of free space around the perimeter. It is here that we will fasten the elements of our frame. For these purposes, you can use shells, beautiful multi-colored pebbles, large beads, bows, artificial flowers, you can lay out the mosaic with the same broken tile.
 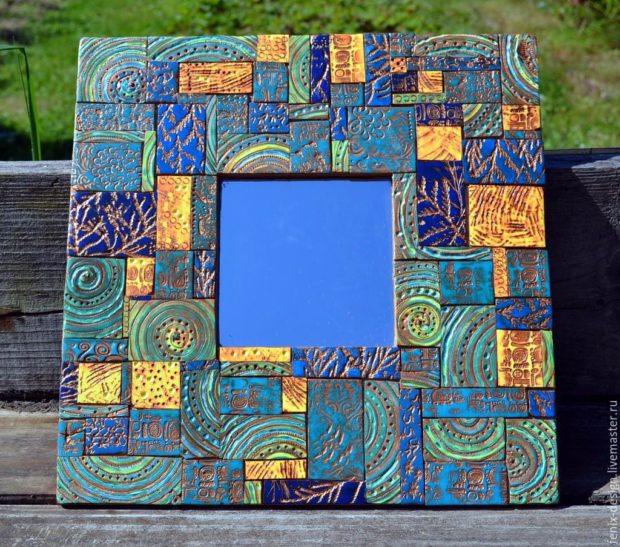 Use those decorations that you like and that complement the overall interior of your room. To make work faster, use a heat gun with glue or liquid nails for fastening. remember, that mirror, especially larger sizes - it’s very heavy item therefore and fastening must be reliable. Use anchor bolts, as in the example of fixing a wooden head. Or fasten the bottom of the mirror to a special metal frame that is attached to the wall, and just hang the top by the hinges on the screws. To avoid personal injury, if you have a restless dream, it is better to purchase unbreakable mirror panels and protect yourself, they will weigh less.
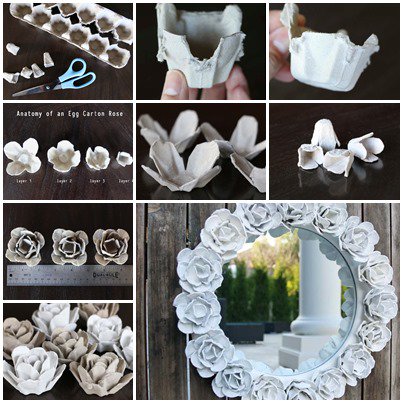
We hope that this article will help you make the head of your dreams with your own hands and inspire new ideas and undertakings.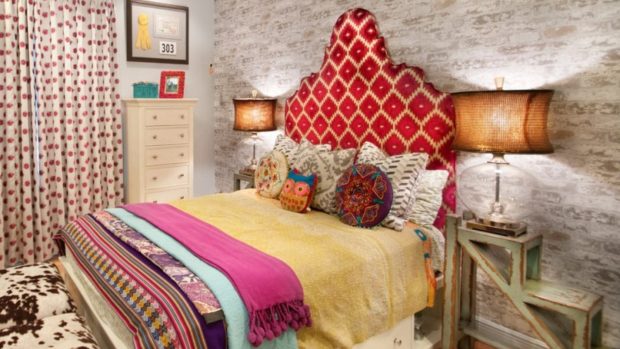

 8 design options for a small bedroom with a photo
 7 tips for choosing a bedside table
 Tropical style in the interior - 6 tips for creating + photo
 Baroque style in the interior of the apartment: 8 tips for ...
 9 bedroom lighting tips
 Woodgrain wallpaper in the interior: 4 tips for use
 What furniture to choose for the bedroom: 7 useful tips
 Provence style in the interior of an apartment and house: 10 ...
 6 tips for choosing a metal bed
 Choice of a chair of the head and style of an office