15 tips on how to make a lampshade / lampshade for a floor lamp and a chandelier yourself
If you have been wondering for a long time how to decorate your apartment or house without significant cost means and time, we propose to transform light sources, namely make a lampshade for floor lampdo it yourself. You probably know that beautiful and unusual chandelier the store is very expensive, but you don’t have to spend a lot of money to do something amazing. We will use the most common materials that you will definitely find on your farm. Any lampshade begins with a frame, if you have it ready, you just have to decorate it, if not, don't be discouraged, we will easily make the basis on our own.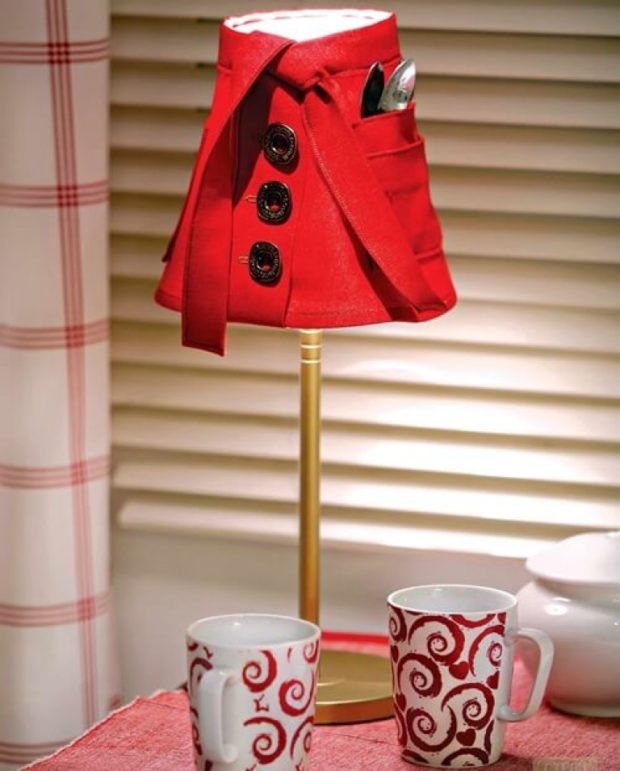
1. We make a framework
Any of the elements that we will continue to use as decoration, needs to be attached to something. In order to quickly cope with this task we will need: thick wire, pliers, cardboard. Any the frame consists at least two rings interconnected by spacers. Decide on the desired shape and size of the future lampshade.
Consider the simplest type of frame - conical. The lower ring will have a diameter of 30 cm, and the upper - 20 cm. discover wire length, which must be cut, you need to multiply the desired diameter by the number "pi" (3.14), that is, 30 * 3.14 = 94.2 cm. The ends of the wire must be connected and bent using round-nose pliers. The height of the spacers will determine the height of the lampshade itself. For structural reliability, we recommend making at least 4 transverse mounts that will be attached to the rings at an equal distance. Something like this should look like this: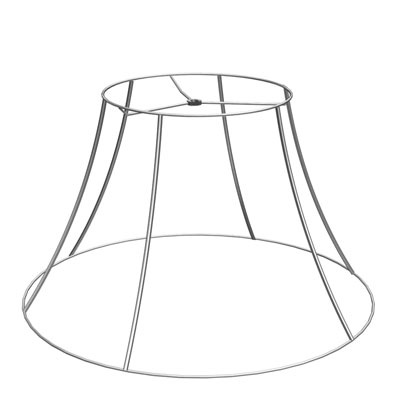
If you are preparing a frame for a future fabric shade, then you need to wrap it with thick cardboard so that the fabric has something to attach to. To do this, do pattern. Wrap the frame with newspaper, mark the line in which the newspaper will make a full revolution, and leave a centimeter of margin for gluing, and a line of top and bottom. Cut off the excess and transfer the resulting sketch to cardboard. You can fix it on the frame using a heat gun with glue, do not forget to grease the joint well, remove excess glue with a piece of cloth. Your frame is ready, you can start decorating.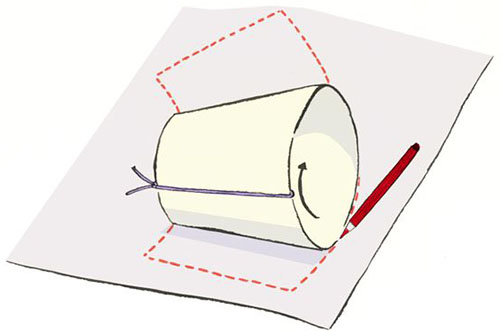
2. Paper or cardboard lampshade
Paper is the most plain and cheap stuff which is easy to transform, has many colors and different densities. A cardboard wrapped frame can already be used as a lampshade, if you decorate it a little. It may not be whole, but have holes in the shape of butterflies flowers, circles, hearts, rhombuses and other figures, which can then be hung from the edge of the ceiling using a thin fishing line. Using cardboard of different colors, you can create smooth transitions or a contrast composition. Such a lamp will look great in kids roombecause when it emits light, small shadows will appear on the walls and ceiling in the form of carved figures. 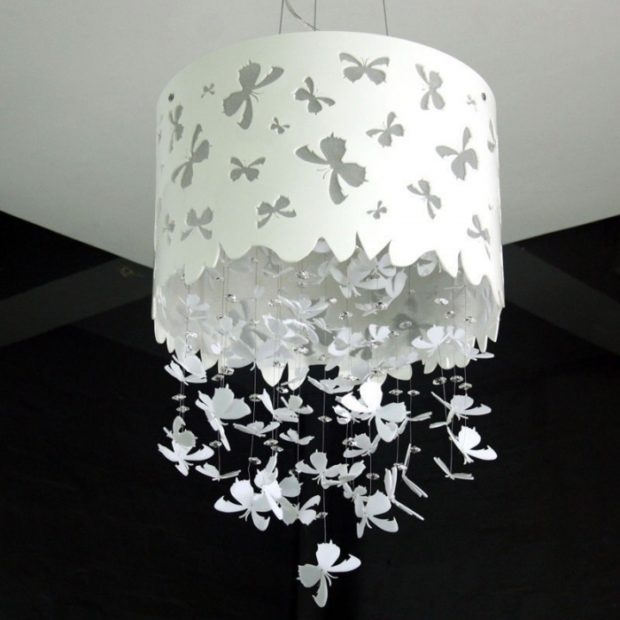 You can decorate the cardboard frame with corrugated paper or molds for baking cupcakes. Open one mold wider, drip a little in the center glue and place the second, more closed form inside. Three or more forms can be combined in this way. You will get air sockets that need to be placed as close to each other as possible. As a result, you will get very gentle and easy shade from which a soft, dim light will come. As a material, paper figures glued to thin ribbons and fastened to the wire rings of the frame are also suitable. For a more aesthetic look, use paper of different colors, which will form a smooth transition from darker shades from below to lighter from above. Remember that paper is not a durable material, but it is easy to replace if you get bored with the appearance of the lamp and come up with something new.
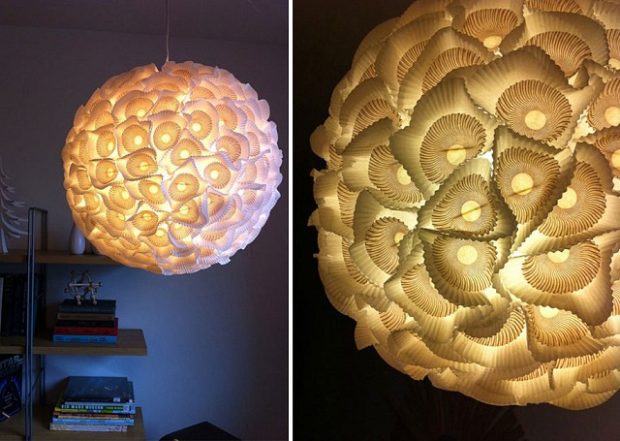
3. Fabric lampshade
Fabric selection depends on the desired light output. Dense and darker fabrics will give a muffled, soft light. Important and selected material color. Green and blue shades will create cold lighting, and red, yellow, orange - warm. When fabric is selected, it is necessary make a pattern. You can use the same section of newspaper as in step 1. To make the fabric cover more neat, sew it on a typewriter, then twist it and put it on the frame. You can just gently hem the edges of the pattern, iron it and stick it to the frame with glue. In both cases, do not forget to leave stock on the stitches. 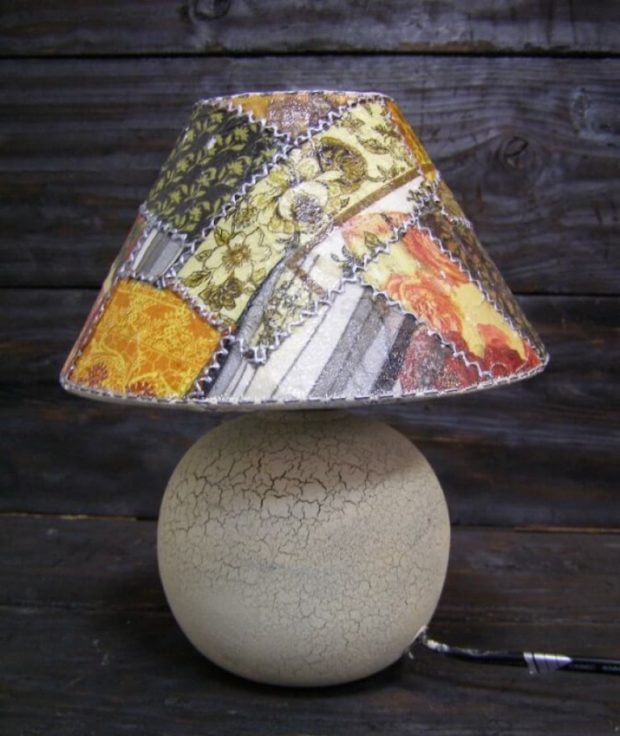 The cover does not have to be from a single piece, it can be multi-colored rags or a combination of plain fabric with color. If desired, you can draw or embroider on fabric beautiful patterns or big flowers. A self-embroidered lampshade will surely surprise your guests. On the edge you can glue a beautiful fringe with beads or wrap a ribbon and tie a small bow. Thus, minor flaws can be hidden. In order for such an object to look more harmoniously in the room, coordinate its color with other objects of interior. For example, with a touch of curtains or pillows on the couch.
4. Thread, yarn, twine
These materials are useful to us for the manufacture of lampshade ball.Make like that lampshade for floor lamp do it yourself even someone who is sure that needlework and crafts is not at all his element. As the basics we will use a balloon or an old rubber ball. We will also need PVA glue, a deep bowl and a wide brush. The essence of the method consists in winding threads on an inflated ball. The color, thickness and number of threads used are purely individual. If you want to get a more textured and dense shade that will let in a little light, use twine and wind up until you block almost the entire surface of the ball.
Before you start wrapping, grease the surface of the ball with oily hand cream or oil. You will thank yourself for this when you remove it from the dried lampshade. Soak the selected thread in the glue, adding a little water to it. Let them lie down and feed on this solution. This must be done so that the layers of wound threads not only fit on the ball, but also stay together. Inflate the ball of the desired size draw on it with a marker the border up and down.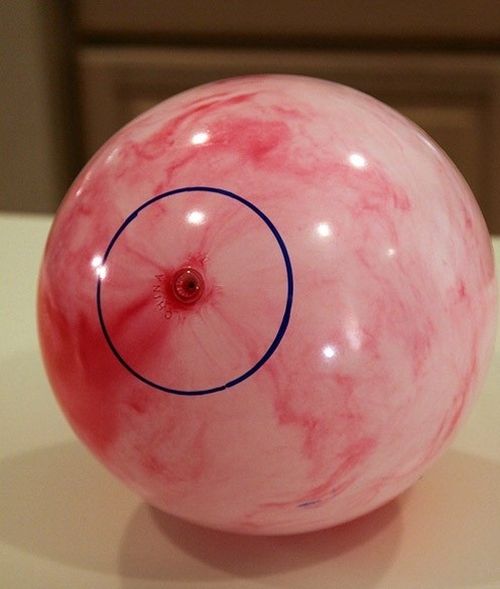 Upper bound will serve place for a cartridge from light bulb. There should be no threads in these places. Start wrapping from the top. First, carefully thread a few turns at the mark level. You should get a small circle, then lay the thread to the bottom border and do the same. If you do not want, you can do without the bottom hole. Now that you see your limits, you can wind in different directions, creating as many intersections as possible and pulling the thread a little.
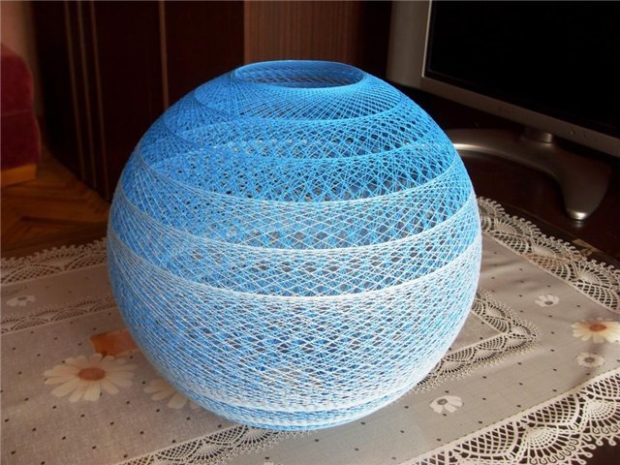 Each layer grease with glue with a brush. When you reach the desired density, cut the thread and hide its edge under the circle of the upper border.Leave your creation in a warm place until it dries completely. Just do not put about batteries. A stream of hot air will cause the balloon to deflate faster than all the layers have dried, and you will get a ceiling of any, but definitely not round shape. After drying, pierce the ball. By the way, using threads of several colors you can achieve very interesting combinations. A composition of several such lampshades of different sizes will look very harmonious.
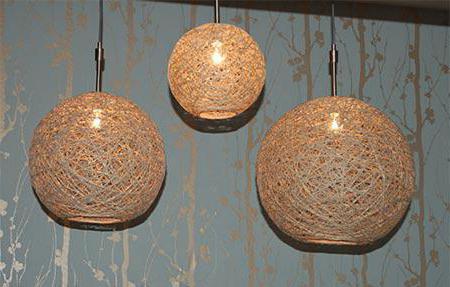
5. Tapes, ribbons, lace
This is very romantic and the gentle look of the ceiling, which will look great in the room of a young girl. In order to make it, a wire frame will be enough. Cover it with fabric, on top of which glue a beautiful lace, or place the lace ribbons directly on the wire rings. the cloth must choose either contrasting color either to match the lace. It will look more impressive. Lace may not be located around the entire perimeter, but only along the edge, so it will be even more interesting. As an additional decoration, tulle and all kinds of ruffles and bows are suitable.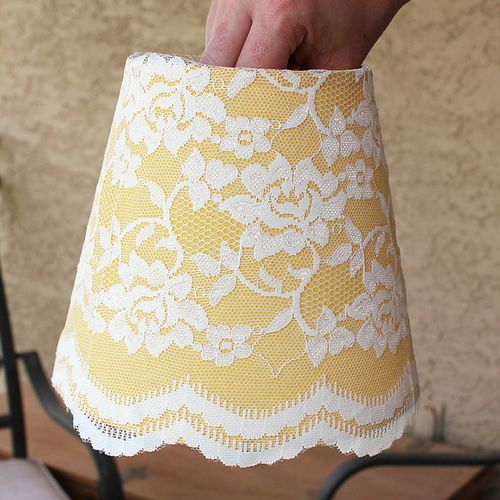 The most interesting thing in such lampshades is openwork shadows which they will discard. Can be used as a base material. colorful ribbons or beautiful braid. To do this, fasten the edge of the first tape on the lower ring and stretch to the upper one, make one revolution around it and follow back to the lower ring. Continue driving this way until you fill up all the free space. To avoid gaps, wind the tape with an overlap of the previous one at least 1/3 of its width. Glue the edge of the last tape on the inside, and to hide the flaws, make a turn on the upper and lower edges of the lampshade with a wider tape. Such a bright ceiling will resemble a rainbow, and glow with various colors.
 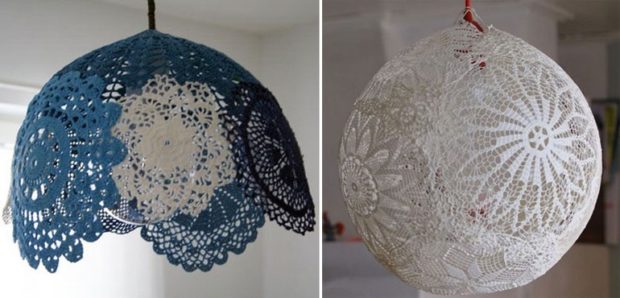 If you have knitted lace napkins, and you do not know where to put them, you can do with them the same way as in paragraph 4. Soak with glue, place on a bowl and let dry. They will take the form of a sphere and will look very different.
6. Bead lamp and artificial flowers
A very beautiful creation that requires laboriousness and perseverance. You will need many flowers, beads or large beads, fishing line, a needle with a thread and glue. It is most convenient to place flowers on a frame with cardboard. It used to be very fashionable to decorate walls with bouquets of artificial flowers, so they probably gather dust in your boxes somewhere. And in just a few hours, or even earlier, you will look at them in a completely different way.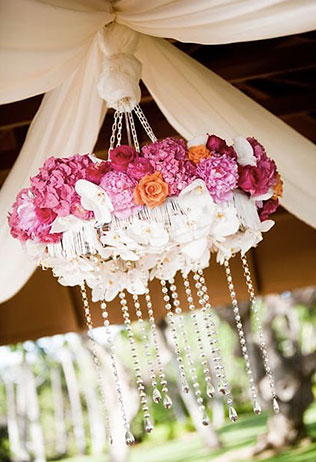 Separate the buds and some petals from the stems. You can even remove the plastic holders, but then you need to grab the petals with threads so that they do not fall apart. So the parts will fit most tightly to the cardboard and easily stick. Arrange flowers and petals on the frame, filling the entire space. Ok if there is several varieties colors. You can make a beautiful floral arrangement on a lampshade from plain fabric.
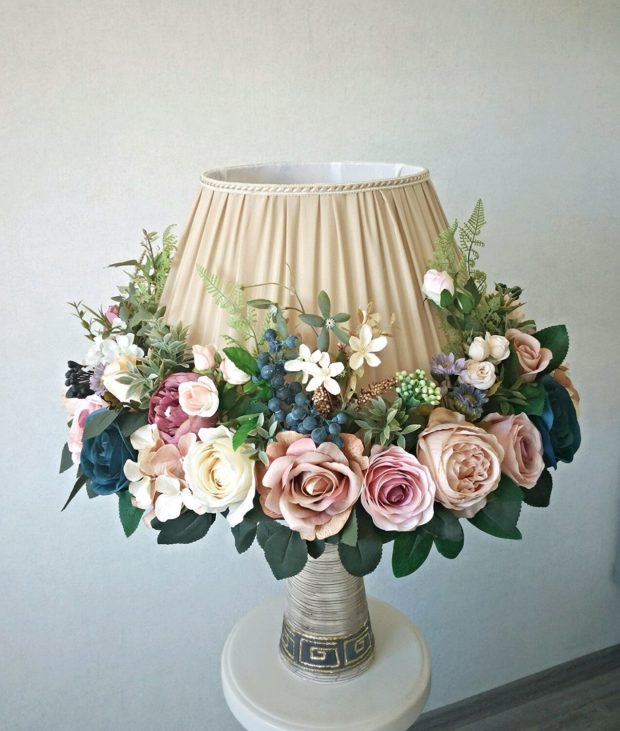 Imagine that you are making a bouquet, and you yourself will understand how best to act. Along the edge of the lampshade, you can add a fringe of several beads on a fishing line, or stick them in different places on the petals. You can stick a few butterflies or a dragonfly, in general, everything that you consider necessary. And the large beads strung on kapron thread can be used as the main material. As in the example with ribbons, it is necessary to fill the whole perimeter of the frame with beads, fixing the thread alternately on the upper and lower rings.
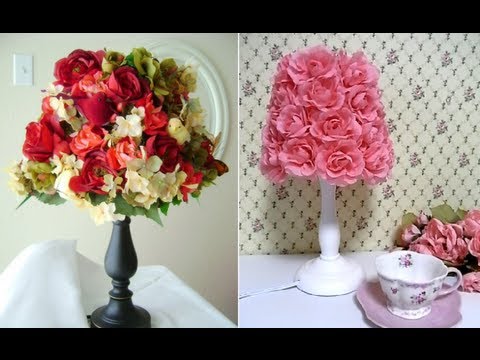
7. Knitted lampshade
Quite unusual and the most comfortable look of our product. If you own the skills of knitting various patterns on your own, then this is simply wonderful. Remember that knitting takes a long time, so if you want to present such a thing as a gift, then start preparing in advance.There are many sets with the required number of threads and patterns, just select the appropriate size. If you did not have time to master this skill, do not worry. They will come to your aid the old knitted sweaters and nurseries that are already small for your child. Depending on the size and shape of the lampshade, even sleeves from sweaters can be used. 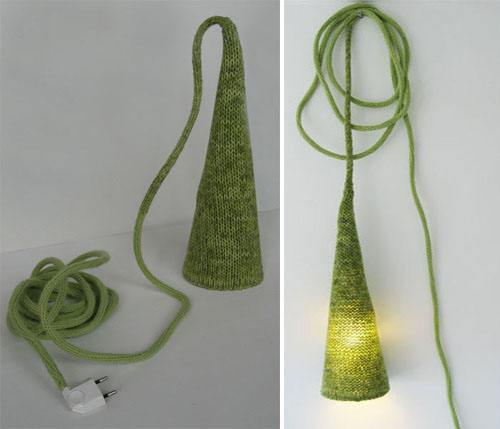 The top and bottom will have to be sheathed so that they do not open. Put the selected part on the lampshade, on top you can knit a ribbon and decorate with decorative elements, or you can just sew it. If wrap up yarn in the color of the lampshade and cord power supply, which will be in sight, it will come out pretty cute and finished composition. Fits like a tight knitting made with knitting needles, and a more delicate version with gaps made crochet. To fix this option, use glue. Apply it pointwise to the surface of the wire rings and press. Do not neglect the fabric or cardboard frames. With their help, the shape of the ceiling will be better transmitted. Complete the composition with small knitted pom-poms or large beads tied with thread. Surely all your friends will be surprised to see a similar element of the interior.
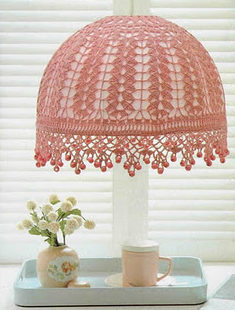
8. The ceiling of the old hangers
Broken wooden hangers or those that are high time to be renewed are found in every home. Finally, you can not just throw them away, but find a more worthy application. By the way, these may not necessarily be hangers. Old ones will do. broken lamellas. They are quite thin and have an arched shape. Before assembling such a lampshade, immediately think about its color. If you are an adherent of all natural, just go sandpaper on a wooden surface to remove minor defects, and then open water based varnish. If you want to make the composition colorful, use paints in the form of a spray. Now it's time to think about how we will arrange the elements on the frame. Most simple option looks like that:
The figure shows that there were removed metal hooks and the hangers themselves are sawn in half and simply glued to the cartridge. You can do this, but you can work hard and get a more interesting result. We will need screwdriver. Remove the hooks, paint the hangers and drill a hole in one edge. Insert the wire into the hole obtained by collecting the necessary number of hangers on it. Now fasten the edges of the wire, and in the space that forms after bonding, thread the cartridge with the wire in advance. Arrange the hangers evenly with their backs to each other and pull them in the middle with a metal clamp. You will be surprised appearance of the finished lampshade. To make such a lampshade for a chandelier with your own hands is simple and not for long.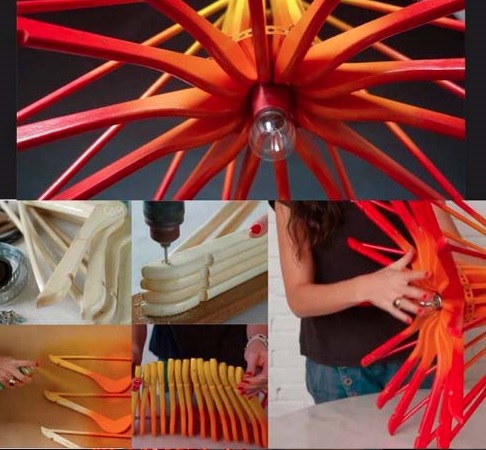
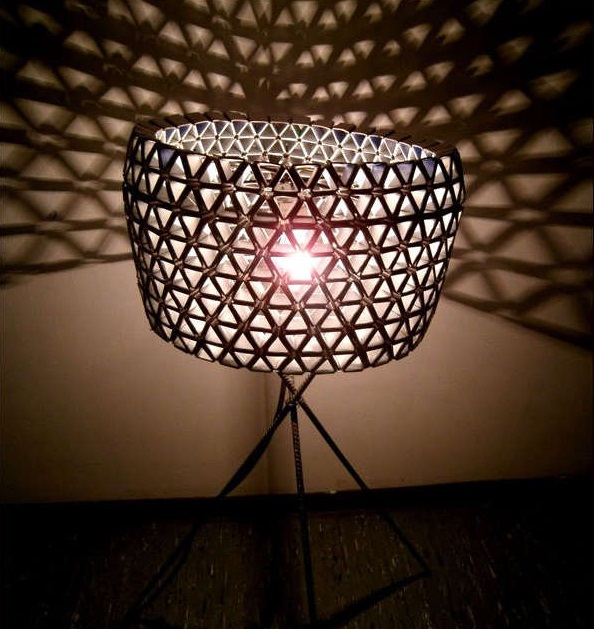
9. Plastic bottles, spoons
Plastic bottles different colors are definitely in every house. So that no one would even think that before him is a product made of this material, we offer to work hard and to cut the bottle into small parts in the form of leaves, flowers, butterflies or any other shapes. We used the shape of the leaves. Draw some patterns of different sizes, circle their contours and begin to cut. When you finish cutting the required number of elements, give them a natural look. Using a blunt nose of small scissors, squeeze on each leaf of the vein. Fasten There are two ways to frame parts. Either stick a wire to each element and wind them to the frame at different levels, or glue it on a cardboard frame. We advise you to give preference to a longer, but also more beautiful first method. So the ceiling will come out more translucent and all details will be noticeable due to placement at different heights. 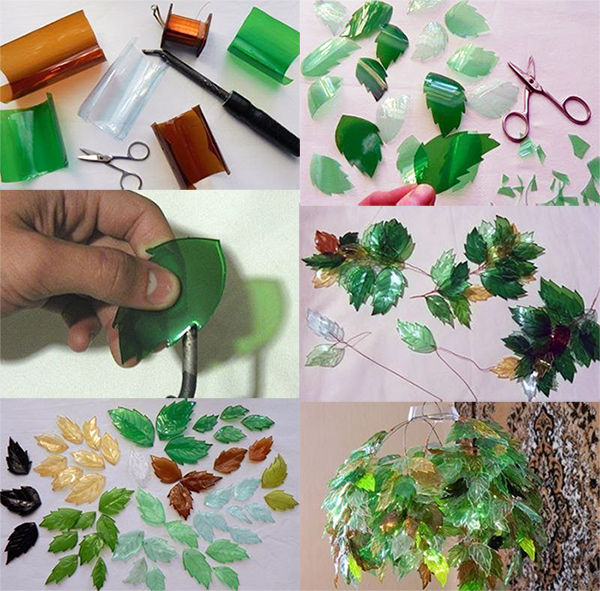 If it's too much for you long and tiring just cut off the tops of the bottles, leaving 10 cm on top, cut them into thin ribbons, bend them out and fix with glue. Ready the flowers stick to the frame.
 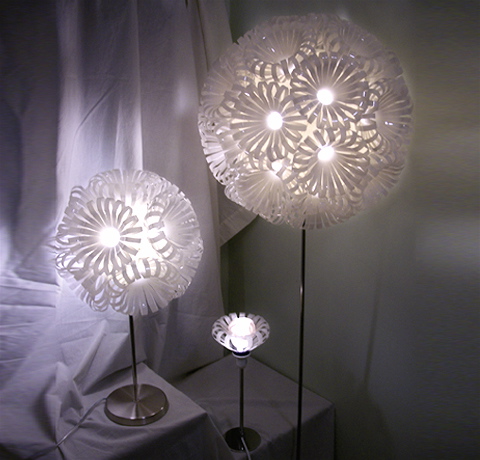 No bottles were found, but there are a couple of sets plastic spoons after the picnic, they will also find use. Will do pineapple lamp. For the frame, we need a plastic 5-liter bottle. Carefully cut the bottom and degrease the walls. Now prepare the spoons. You need to separate the handle, leaving about 1 cm. When you cut off all the spoons, start gluing them from the bottom row. Each subsequent row should overlap the previous about half a spoon. Try to glue the entire frame in this way to the very neck so that you get neat edges that will hide under the cartridge. Your lampshade is ready!
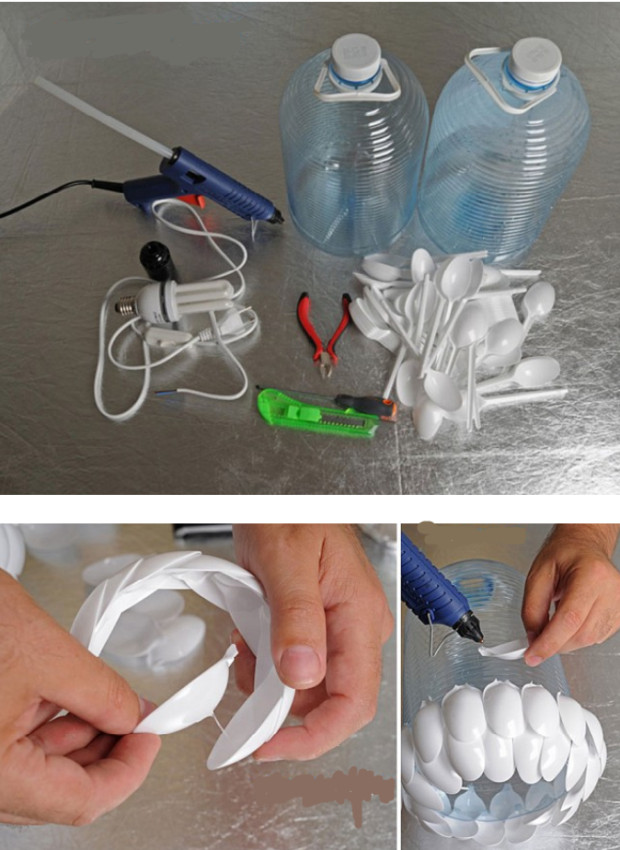
10. Do not throw away tetrapaks
 Yes, you were not mistaken, we will work real miracles, practically, from waste. Not all types of packaging are suitable for us, but only those that have a mirror surface inside. This type of plafond perfectly complements the interior, in which emphasis is placed on various geometric shapes or strict straight-line shapes prevail. Tetrapakov for this venture will need a lot, so it will take some time to save the source material. The packaging should be carefully cut, making one solid canvas. Now we cut it into strips 130 × 21 mm in size, divide it into six equal parts and fold the triangles from these ribbons.
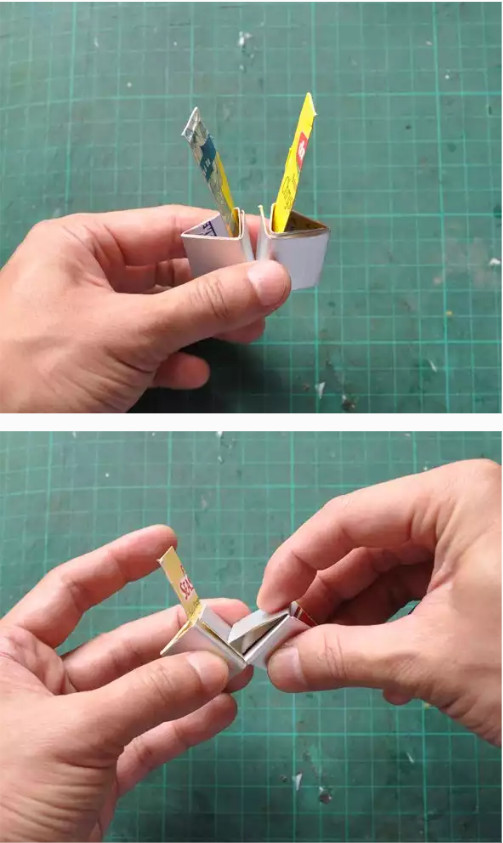 Now the most difficult part lies ahead - the individual elements must somehow be combined into complex figures. We cut the fastening tapes with a size of 75 × 19 mm, fold them into four parts, turn them back and fasten two triangles with them. Further, according to the same scheme, it is necessary to collect 108 hexagons and 12 pentagons. Do not be alarmed when you fill your hand, everything will turn out by itself.
 You can do with ordinary glue, as it will be much easier and faster. When all the elements are ready, you can assemble from them a sphere or an ordinary cylindrical ceiling. In the latter case, pentagons are not needed. Just glue all the parts together. In the case of the sphere will have to tinker. You can inflate the ball and use it as a support when gluing the elements, and then burst it and remove it through the hole. Now you can be proud of the work done. You definitely won’t see such a lampshade in any store, and when you turn on the lamp, the game of shadows will captivate your whole family.
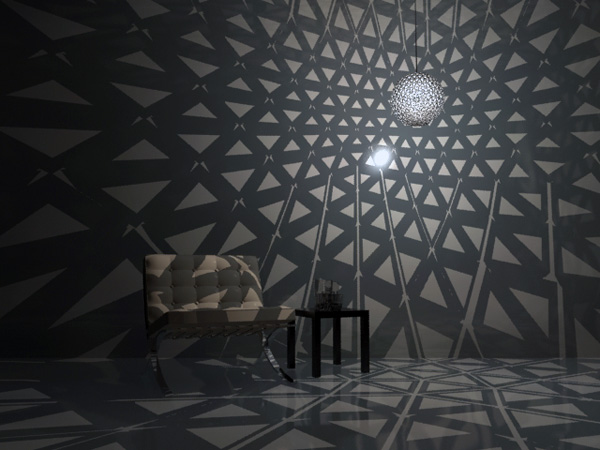
11. Newspaper tubes
Recently, it has become very popular weaving products from newspaper tubes. Skillful housewives make baskets for storing various items, sew covers on them, decorate, paint and even sell them via the Internet. We thought that in this way it is quite possible to make a beautiful lampshade for a chandelier that will look great in hallway or the dining room. We don’t even need a frame, but many newspapers are needed.
If you use pages glossy magazines then the tubes will come out much stronger. It is necessary to cut a large number of paper strips, then twist the tubes. It’s much easier to do, using knitting knitting needle. The ends must be smeared with PVA glue, and then let them dry well. Try to make sure length the tubes were not less than 20 cm. We need about 100 pieces to make a medium-sized shade. Take three tubes and cross them between each other, you get a six-pointed snowflake.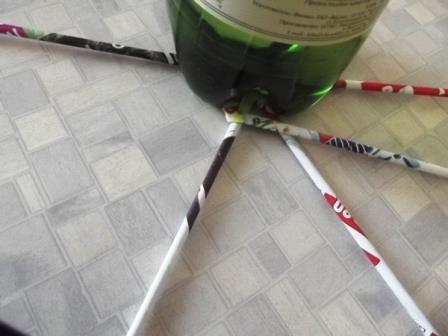 This is the beginning of our ceiling. To make it more convenient to work, put something heavy on top of the intersection so as not to move the workpiece. Put the next tube on top of one of the beams peeping out from under the load. The bottom element must be wrapped over the applied so that it rests on the adjacent vine. Repeat this step with all peeking rods. You will perform weaving in a spiral. When you completely go around two circles you need to expand the diameter. To do this, apply instead of one twig two, stacked parallel to each other. Continue weaving until you reach the desired size.Cut the excess ponytails with scissors, grab the edges with clothespins and treat the entire surface with glue.
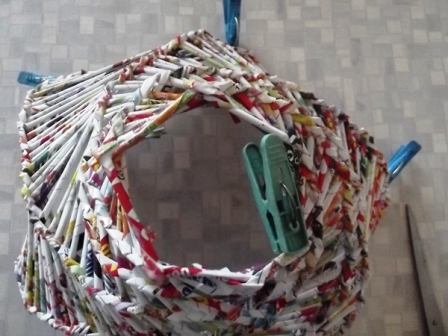 When the frame dries with a spray paint, attach wish him color and after drying, fix everything with varnish. At the top you will have a cross that can be carefully cut, thereby freeing up space for a cartridge. Instead of weaving, you can fix the tubes with glue, forming a sphere or other geometric shape.
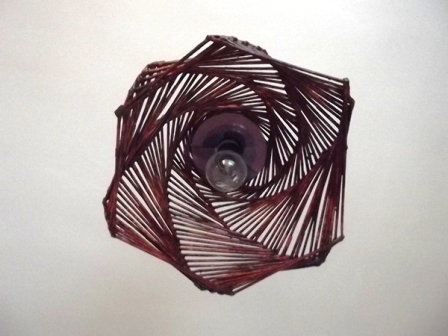
12. The new life of old cans
In order to make a stylish and unusual lampshade that perfectly complements the interior with its soft, cozy light, you can use the usual cans different sizes. It is necessary to remove all labels, remove the remaining adhesive from the surface, wash and dry well. Next we will be using a small a hammer and a nail make holes on the walls. Draw marker desired pattern, pour water into a jar and put in the freezer until it freezes completely. This is done so that when making holes, the bank was not deformed. The second option is to keep the shape - tightly stuff it with paper. It remains to carefully make holes and dip the finished product in hot water to remove ice. You will get small cute plafonds from which it is recommended to create compositions. The surface can be left unchanged, or painted or wrapped with thin paper.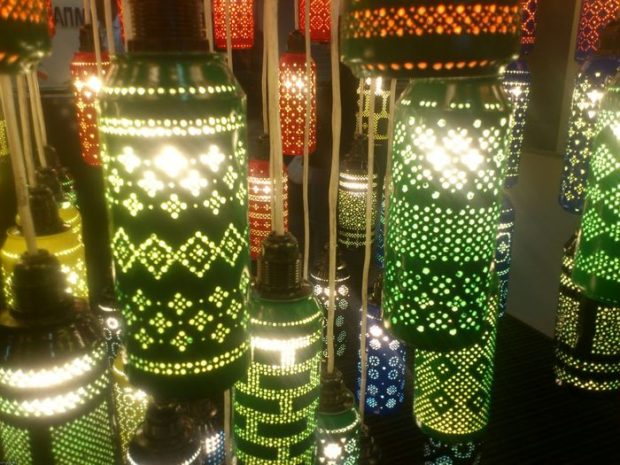
They will suit us and glass jars especially if they have a non-standard shape and color. However, you can give them any color, it is very simple. Prepare cartridges and bulbs in advance. To place them inside, carefully make holes in the lids with a knife to open. In the future you will need to replace the lamp, so give preference twisting banks. The hole should equal the diameter of the cartridge, nothing more. Thread the threaded part through the hole in the cover, and then twist the bulb. Now we proceed to design the shades themselves. Wash and dry the cans thoroughly. Now you can paint, paint, paste over with beads or flowers, wrap with colored threads or lace, in general, anything you want. Fix the surface painted or pasted over with small details with transparent varnish and tighten the covers. Your shades are ready.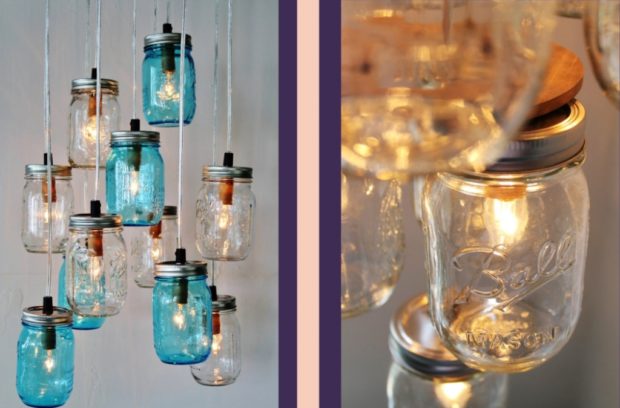
13. Marine lampshade
There are people who cannot live without the sea and are doing their best to portray their love for him in the interior of their apartment. Someone brings frames for a photo from shells, someone hangs pictures from the sea coast, and someone cannot return from vacation without a package with shells, which they are then unable to find application. If you recognize yourself in this phrase, then specially for you we have prepared a small master class on manufacturing shell lampshade, as well as beautiful sea pebbles and everything that you could not get past. For this we need frame wrapped in thick cardboard, glue and your seafood. Think in advance about color lampshade. If you want to leave natural shades, then just open all the elements with transparent varnish, if you want to add a little different shades, then use acrylic paintsand after varnish. You can paint the finished ceiling, but the paint and varnish will flow into the joints between the parts and will not come out very carefully. 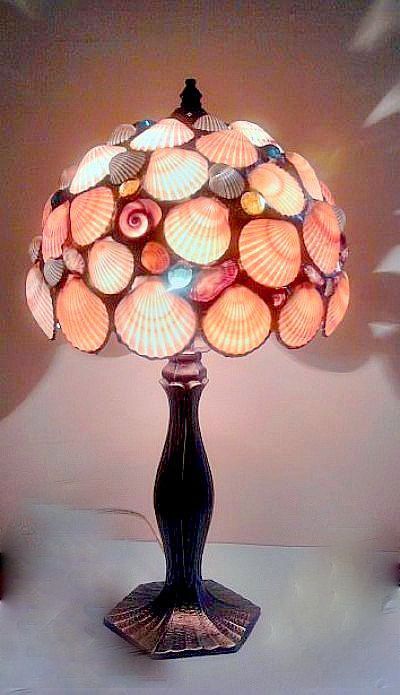 Now, using a heat gun, glue all or part of the frame surface with shells, aging leave how can less gaps. Small pebbles can be glued in places on top of the first layer, this will add volume to the finished product. Such a cute piece of furniture, which has a very characteristic mood, will always remind you of pleasant minutes spent on the sea coast.
14. Forest handsome
Very unusual and spectacular ceilingthat will appeal to nature lovers. Fits well interior in style eco. Its name speaks for itself, and you were not mistaken if you thought that we would use what we bring from the forest as material.More precisely, we are interested tree twigs different thickness and bizarre form. Too thin twigs are not suitable, they will break during the fastening process. Length branches should match the desired height of the lampshade. Collect material with by stock because during the manufacturing process, not all sticks will definitely suit you. The most interesting thing this kind of lampshade boasts is the shadows which will be reflected on the ceiling and walls. They will create the feeling that you are in a real forest. 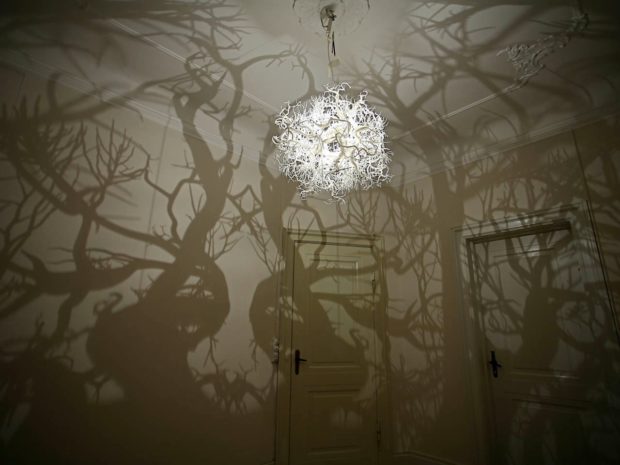 The branches should be washed well under hot water and dried by laying on paper and providing oxygen. Dry sticks need a little bit ennoble. You can cut off with your knife extra knots or thin parts, in your opinion. Open with paint in the form of a spray or just varnish all the elements from all sides. The clumsy the branches, the more interesting the ceiling will come out. The frame we need a regular wire without cardboard. We will wind parts to it with a thin wire or glue with a thermal gun, as you prefer. Well, not conical, but cylindrical shape grounds. Fill in the gaps very carefully and leave as little free space as possible. You can glue gaps in small pieces. After complete drying, the extraordinary lampshade is ready for use. Creating such a lampshade for a chandelier with your own hands will be fun with the children.
15. Space shade
Many in childhood dreamed of becoming astronauts and raved about distant galaxies. If now your child is sleeping and sees himself in this role, we offer to arrange his children's room to match his dreams. Stationery stores sold planet layouts, which we need. We will do multi-level space system shades.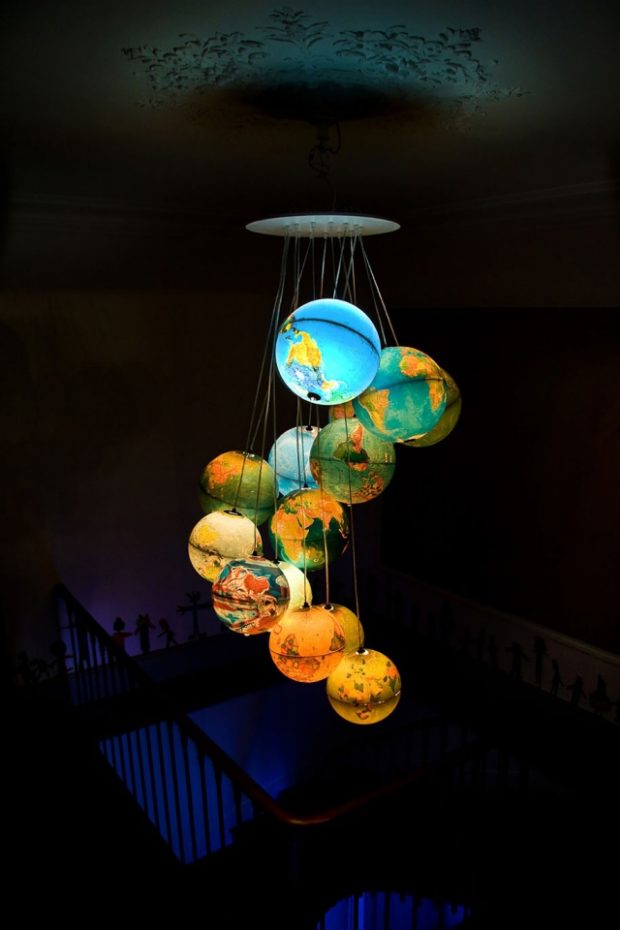 To do this, we need lampholders and several layouts of different planets. The layout needs to be neat split up into two parts. Before this, draw a circle on top, the diameter of which coincides with the diameter of the cartridge. After this, you must delete this section. In its place, place the lamp holder and glue the layout back. These steps must be done with all layouts. If you have not found a planet, you can do globes different sizes.
 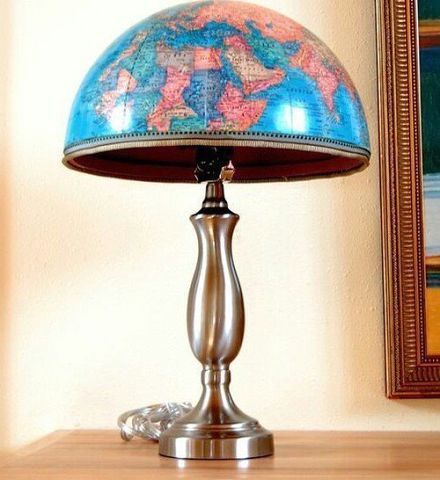 You can use the halves, which is much more convenient, because it will be easier for you to replace the light bulb. From halves it’s good to make a lampshade for table lamps. Can use old world mapswrapping the frame over white, thick cardboard. The spirit of travel will always be present in your home, and inspire you to new achievements.
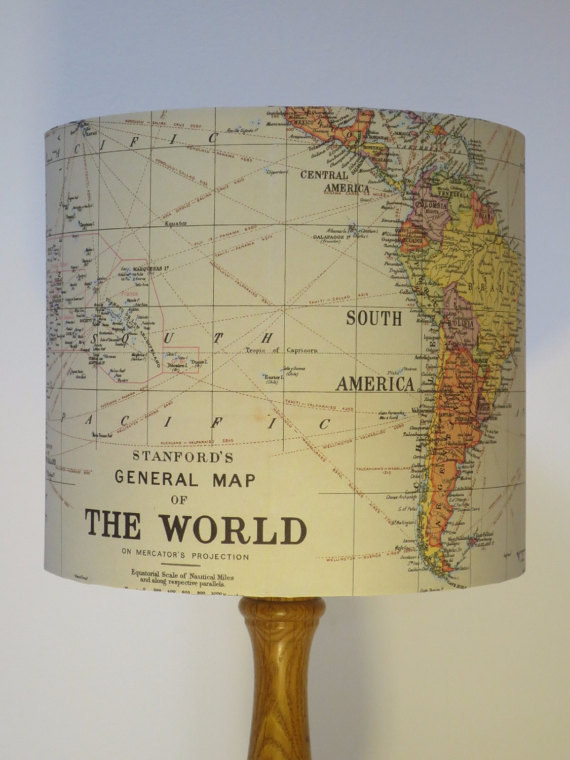
When making any of the above types of plafond, remember that all materials are fire hazard. Especially when they are exposed to frequent heating from incandescent lamps. Therefore, place all parts on distance of at least 15 cm from the center of the ceiling, that is, the minimum diameter of your product should be at least 30 cm. Following this simple rule, you will protect yourself and your home from unnecessary troubles.

 Laminate ceiling. How to fix the laminate to the ceiling
 DIY garden scarecrow: 5 interesting ideas
 7 tips for choosing a floor lamp: types of floor lamps, lampshade ...
 How to choose a sofa bed
 7 Tips for Lighting a Kids Room
 5 tips for choosing a chair in the living room
 Knitting reinforcement: tools, materials, methods and patterns of knitting
 16 ideas for crafts from plastic bottles for giving + photo
 How to choose a leather sofa
 6 living room lighting tips