5 tips to do your own drip irrigation
Experienced gardeners know how important it is to organize competent watering system on his site. Most of them come to a unanimous opinion that drip irrigation is the most suitable for vegetable crops, grapes and ornamental plants. Summer residents are a special, creative, resourceful and inventive people. From practically nothing, they can do very useful things for the household. And the drip irrigation system was no exception. Having analyzed many recommendations of experts, in this article we have collected 5 most Useful tips on how to make drip irrigation with your own hands.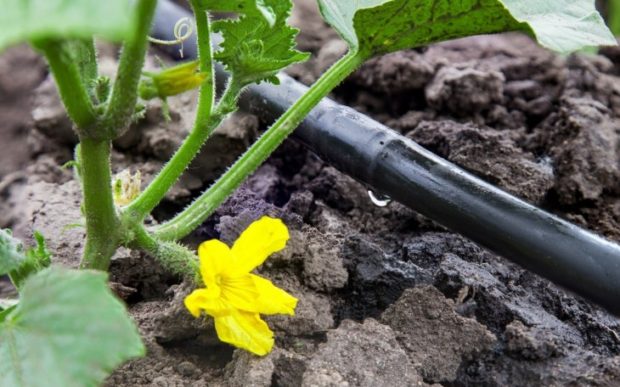
1. The principle of operation and advantages of the drip irrigation system
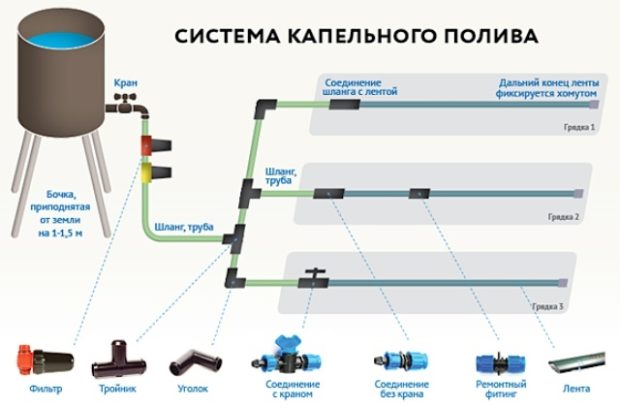
The drip irrigation system can be used to moisten the soil as in greenhousesand in open areas. The principle of its operation is very simple - purifiers are connected to the water source filters and branch pipes, which are located along the entire length of the beds, and through special holes along the entire length of the hose, water evenly flows to the roots of the plants. Water source central water supply can serve, well or a well that is equipped with a pump, a storage tank, or a reservoir that is located near your site. 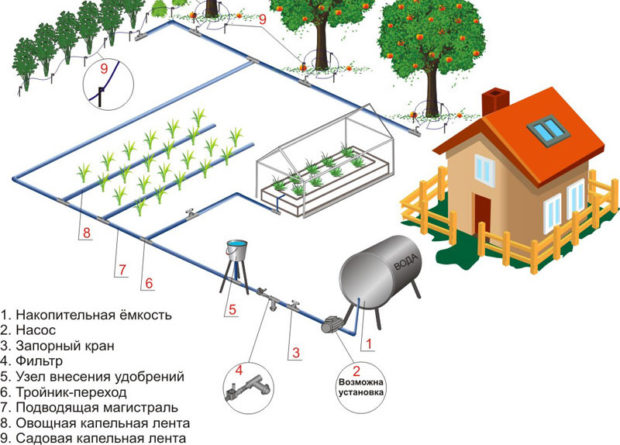 Water from the storage tank can be fed by gravity, under the influence of gravity and pressure, and can be forced to come in using a pump. The system will work in both cases. The difference will be felt only in the flow of water and the duration of irrigation. For example, when using special drip tape, which has a specific rate of water flow per hour, it is necessary to ensure a minimum working pressure. Only in doing so condition water consumption will be in accordance with the specifications.
When gravity feeds water consumption will be less. This is necessary to know in order not to commit one of the most common mistakes many who first take on the installation of the system with their own hands. If you realize that you cannot provide the necessary pressure or the use of a pump in your area is not technically possible, in no case do not think that the watering time will be the same as if the requirements were observed. To moisten the soil to the required depth, you may need half a day, but the plants will receive water constantly.
With drip irrigation, crops are not threatened with sunburn even at lunchtime, because their stems and leaves remain completely dry. Watering can begin in the early morning and end in the late afternoon without any harm to the plants. And if the system is additionally equip with a timer a pair of sensors (for example, a rain sensor and a soil moisture sensor), then your presence on the site is completely optional. The timer will either turn the water supply on and off at the set time, or do it as needed. This will be signaled by humidity sensors. And if it suddenly rains during watering, the system will react and turn off the water supply.
Important condition for normal operation of the system is the use of purification filters. Industrial water has many impurities and small debris that quickly clog holes. In this case hoses will have to be cleaned very often.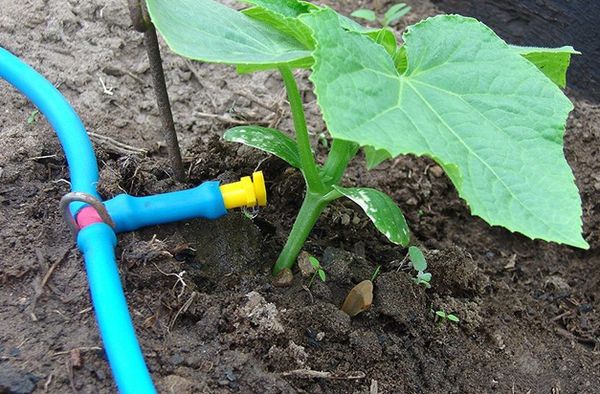 Than yet good drip irrigation:
- Due to the fact that water gets as close to the roots as possible, the coefficient of evaporation is practically absent;
- Economical water consumption;
- Uniform watering;
- An opportunity to regulate intensity of watering for each group of plants individually;
- Saving your personal time and effort;
- Free access of oxygen to rhizomes;
- Lack of a heavy airtight crust on the surface of the earth;
- Purchase Costs polyethylene pipes, drip hoses and all kinds of connecting elements will pay off very quickly, because the service life of such a system reaches 10 years;
- In the cold season, the system is easy to dismantle;
- Thanks to the flexibility of the hoses, they fold compactly and take up little storage space;
- Watering with cold water is stressful for plants, which can slow their growth. This often happens when watering from a hose directly from a water source. When drip irrigation, the water manages to warm up to ambient temperature while it is inside the hose. Such conditions are most favorable for plants, and the moisture absorption coefficient increases;
- Due to the fact that only soil under the plants will receive regular moisture, you will soon notice that the number of weeds on the site will decrease.
It is not surprising that this irrigation system is used almost everywhere, especially if you come to the cottage only on weekends. Next we will consider methods of organizing drip irrigation do it yourself, from the elementary scheme to the installation of an automated line.
2. The simplest scheme of drip irrigation from plastic bottles: 4 possible options
If you have accumulated a large amount plastic bottles or cans, do not rush to get rid of them. In addition to the various decorative items that many do to decorate their summer cottage, from them you can make a complete irrigation system. 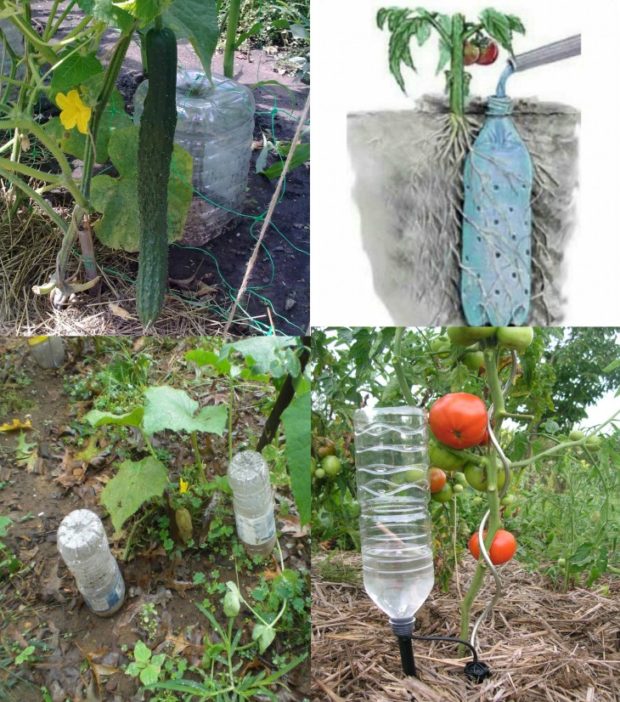 Thus, you can provide high-quality soil moisture for 2-4 days. From the observations of many summer residents, we deduced a small statistics which states that a 1 liter bottle can irrigate tomatoes and cucumbers for 4-5 days, a 3-liter bottle for 10 days, and a 6-liter bottle for 2 weeks.
Water consumption depends on the type of soil on which you grow crops. The number of required openings, which will provide sufficient watering, but at the same time avoid underfilling and overflows, depends on this. For example, sandy soils absorb moisture well and they need only one hole in the bottom of the bottle, while heavy clay soils need more of them.
Optimal is the use of a plastic system in small areas. In large areas, you will spend too much time and effort re-filling bottles with water. Also, such a system is effectively used for fertilizing and fertilizing various crops. However, only water-soluble additives that do not have solid particles should be used so as not to clog the holes.
Consider all advantages and disadvantages of such a system:
- Significantly lower water consumption compared to manual watering with a hose or watering can;
- Continuous operation of the system, which does not require your participation;
- Minimum expenses for the organization;
- Possibility of an individual approach to each plant;
- Easy installation and maintenance;
- Targeted moisture.
Now about disadvantages:
- Due to the elementary design, from a technical point of view, frequent clogging of the system is possible. This is due to the fact that it is impossible to install filters in bottles.Seasoned summer residents were able to find the same elementary solution to this problem - ladies' nylon tights. Even when particles of kapron get into the ground, it does not cause decay, but it has excellent throughput.
- It will be difficult to talk about the aesthetic pleasure that many experience when looking at their well-groomed area with young shoots. Indeed, in this case, the entire garden will be “decorated” with plastic bottles;
- Limited supply of water, which is constantly necessary to replenish with your own hands;
- On very hot days, additional watering will still be required.
This is not to say that the flaws are too critical, so consider manufacturing methods. From plastic bottles, you can organize four types of irrigation systems, depending on their location. But be careful, all recommendations are focused on the cultivation of vegetable crops, in particular cucumbers and tomatoes.
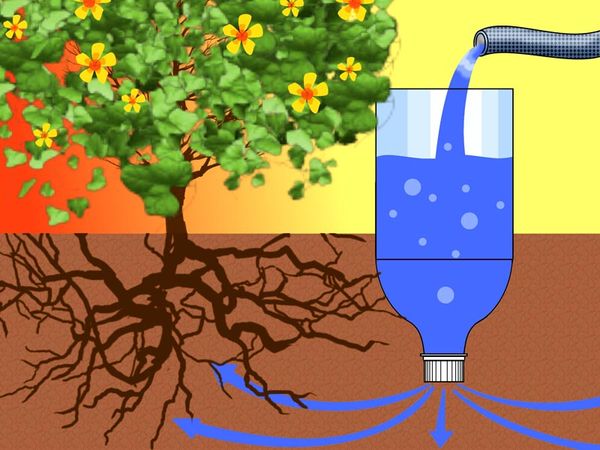
Lid up or down
This is the most versatile arrangement, which is suitable for use in greenhouses and in open space. More summer residents use this particular method.
Procedure:
- Take a container suitable for you size. Step back 3 cm from its bottom and pierce several holes with an awl or gypsy needle. The number of holes is determined by the type of soil. They need to be pierced along the bottle until it begins to narrow to the neck. On average, no more than 10 holes are made.
- Near the plant to which the container is intended, it is necessary to make a hole of the appropriate diameter and depth so that only a narrow part of the bottle protrudes above the ground.
- Wrap the bottle with a thin cloth, dip it into the hole, then fill it with water and tighten the cap.
- As the container is emptied, it may deform under the pressure of the earth. To avoid this, pierce a small hole in the cover to equalize the pressure and replenish water supplies in a timely manner.
A similar system is drip, but irrigation going on subsoil. In this case, there is no need to push the top layer of the soil, because it remains dry. At the same time, plants are saturated with moisture faster, because water gets directly to the rhizomes. 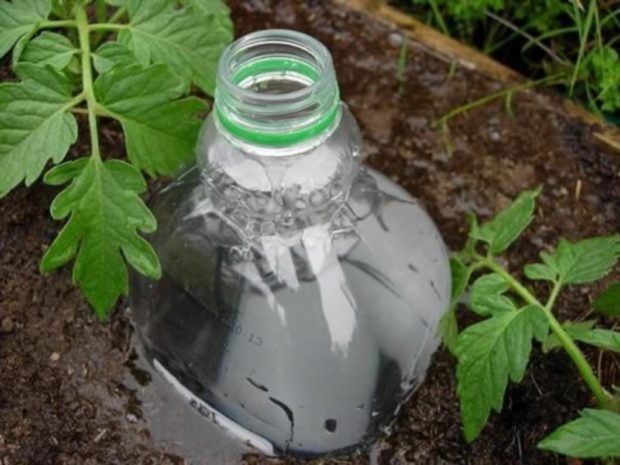 The irrigation system with the arrangement of bottles has the same principle of operation. cover down. Only order of execution slightly different:
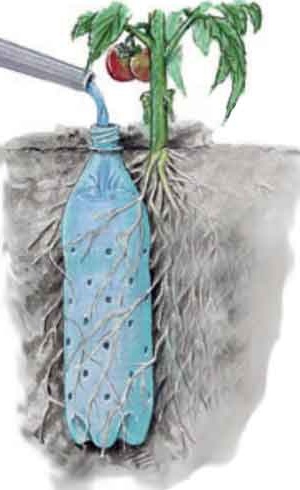
- The bottom of the bottle is completely cut off;
- A cap is screwed on the neck;
- A small number of holes are made along the entire length of the bottle, not reaching a couple of centimeters to the top;
- The bottle is wrapped with gauze, placed in a hole, filled with water;
- Gauze or a piece of nylon pantyhose is pulled on top to prevent debris from entering.

Root watering with plastic bottles
This method is convenient in that you can most accurately direct drops of water to the desired location. Us required;
- Small bottles with lids; it is best to use a 1.5 liter container;
- Preheated on gas a nail or with a thick needle, make a hole in the center of the cap. To protect your hands from burns, hold the nail with pliers;
- First, determine the optimal angle of inclination, and then cut off the bottom of the bottle at the same angle, so that more liquid will fit in it;
- Now you need to fix the bottle with a few sticks and tape as close as possible to the bush, tilting the neck so that the drops fall directly on the rhizome;
- Fill the bottle with water, see if moisture enters and if the mount can support the weight of the structure.
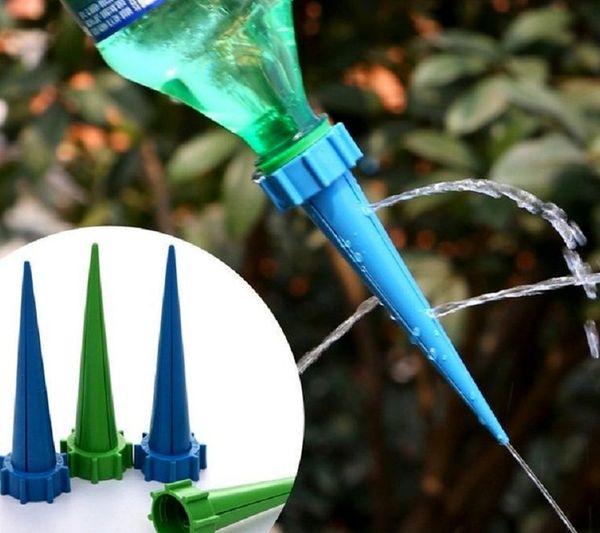
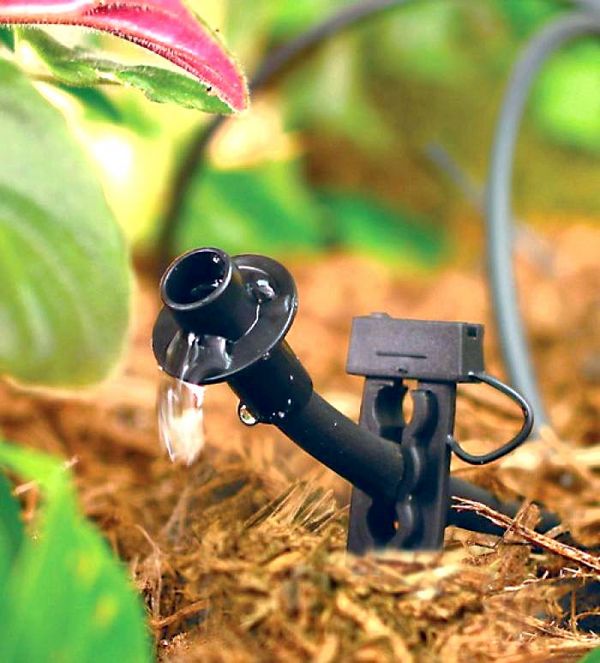
More convenient A similar method of watering will be if you purchase in the store special cone-shaped nozzles made of plastic, which are specially designed for root watering. You can also avoid the need for fastening containers at an angle so that a gust of strong wind could not tumble it. To do this, a full bottle of water is dug into the ground to a shallow depth.Previously, a small diameter hole is made in it so that it can be inserted into it a straw for drinks.
It is very convenient to use tubes with an inclined end. The hole is positioned as close to ground level as possible. The tube is inserted into the hole, the connection can be smeared with silicone. The end of the tube must also be muffled. The liquid will not be supplied from it, but from the hole that you will pierce yourself on its lower part. Direct the tube under the roots and see where it is more convenient to do this. Now fill the bottle with water and tighten the cap. Your system is ready.
Hanging drip irrigation system
For small plots A suspension system is also suitable, which is very simple to manufacture. To do this, we required:
- Above the bushes, you need to build a support on which water bottles will be suspended in the future. To do this, you can use a wooden beam of the appropriate length or metal pins with hooks. When sticking support elements into the ground, be careful not to damage the roots of the plants;
- Prepare the required number of bottles - one between two bushes;
- Cut the bottoms of the bottles;
- Without reaching 1-1.5 cm to the cut, make two holes opposite each other. Twine will be threaded through them, for which the container will be suspended;
- Make one or more holes in the bottom of the bottle above the cork. Water will ooze out of these holes.
- Hang the container over the bed, fill it with water and see where the drops fall. If necessary, move the bottles slightly to prevent water from entering the leaves.

Recommended height placing the system above ground level - 30-50 cm. In the future, you can add several holes to increase the intensity of water flow, so do not prick too much at once. If it’s more convenient for you, you can make holes in the lid.
3. DIY do-it-yourself watering system installation
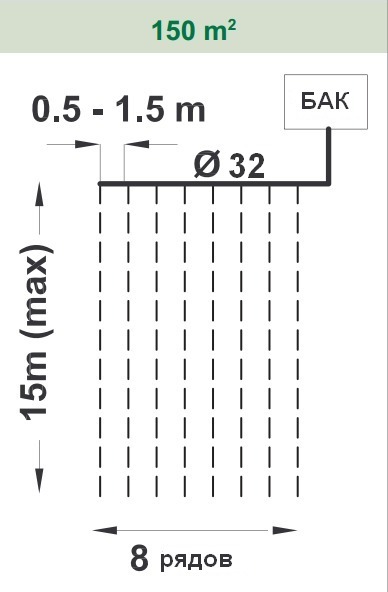
If you decide not to save on creating an irrigation system, then this is the right decision. Made of quality materials and connecting elements, it will last you for many years. Remember that than simpler circuit system, the more correctly it will work. Try to use the smallest number of connectors. In the place of each such connection, the pressure weakens, and particles of small debris accumulate. let's consider simple arrangement scheme drip irrigation for a small area and calculate the amount of necessary materials:
- Any large-scale work begins with a small working drawing. In this case, it should clearly show the location of the water supply, the length and number of beds and the distance between them. When you see all this on paper, you can correctly decide where the main pipe will be located, how many branch pipes you will need, how many connections are needed for installation and what size of drip tape you need to purchase.
- If you have not yet acquired a storage tank for water, then now is the time. It is better to give preference to a synthetic material, for example plastic, upon contact with which rust does not form in the water, which clogs it when it enters the system;
- Next, we need to install a water tank at a height of at least 2 meters from the ground. If necessary, immediately install a submersible pump of such power in it that it can ensure uniform pressure along the entire length of the watering line. For normal operation of the simplest system, a minimum pressure of 2 bar must be ensured. Each meter of height to which you lift the barrel gives only 0.1 bar.
- Now you need to connect the main hose or polyethylene pipe to the tank.
- The main branch should have a larger diameter than branch.
- It must be located perpendicular to the beds.
- Its width, respectively, will be equal to the width of the landing strip.
- When cutting a hose into a barrel, do this at a height of about 10 cm from its bottom.This is necessary so that the debris that will settle does not get into the system.
- A coarse filter must be installed between the tank shut-off valve and the main pipe.
- Now you need to drill holes in the main branch for attaching drip tapes to it. This must be done at a distance equal to the distance between the beds. Attach tapes with starter fittings.
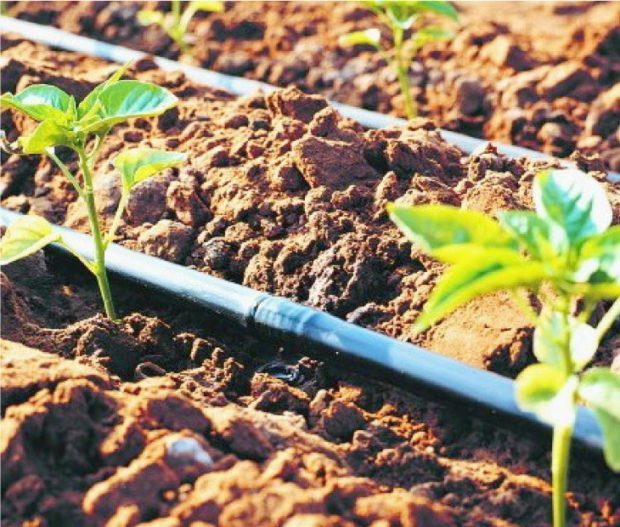
- Lay them along the beds so that the hoses are as close as possible to the base of the plants.
- At the end of each tape, put a cap.
- Now you need to fill the tank with water and check the operability and tightness of the system.
- Open the tap gradually, do not give a big head immediately.
- When the tap is fully unscrewed, carefully inspect all joints for leaks. It is also necessary to check whether water flows evenly from the droppers at the beginning and at the end of each line.
As you can see, there is nothing complicated in organizing a home-made irrigation system - the main thing is to correctly calculate the amount of necessary materials.
4. Home-made system of medical droppers
No less effective way irrigation is the use of ordinary medical droppers. Due to the fact that they are equipped with a special wheel, you can adjust the fluid flow rate for each particular plant. To do this, you do not need to do several watering lines, which in turn can reduce the total cost of organizing an irrigation system. Principle of operation almost identical to what is indicated in the paragraph above. Only instead of special drip hoses we will use ordinary rubber or polyethylene pipes.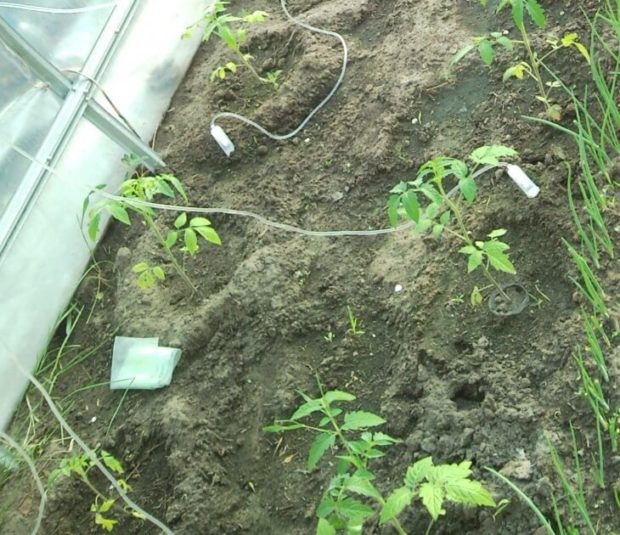
- Route the supply pipes throughout the section;
- The layout should be such that you have the opportunity to reach all the plants;
- Use tees to connect the elements;
- Now connect the entire system to a water source. It can be both an accumulative tank and a central water supply;
- At the end of each hose, install plugs;
- Now, in front of each bush, make a hole in the hose.
- It is most convenient to pierce rubber with an awl, and plastic - self tapping screw;
- The plastic end of the dropper must be inserted into each hole;
- Dilute the dropper tubes under each bush and enjoy a great result.
There are also simpler way equipping an irrigation system from medical droppers.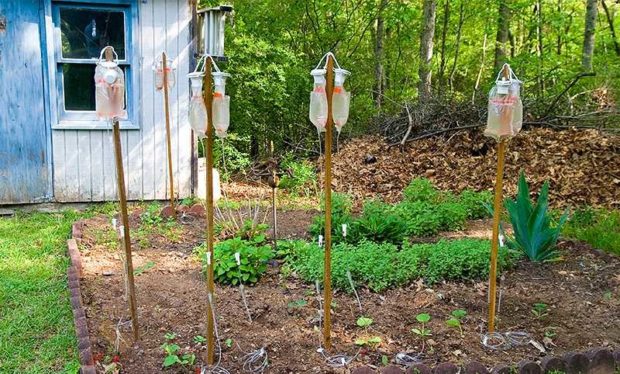 In this case, droppers will be used together with a liquid container:
- In the required place, install the support for hanging the dropper. It can serve as an ordinary stick;
- Fill the tank with liquid, fix on the support;
- As supply hoses, medical systems with thick needles or medical hoses with a diameter of 1-2 cm are used;
- Insert the needles diagonally into the main hose and place the ends of the tubes in the right place.
Probably nowhere is easier. Droppers are clogged up quite rarely, and even if this happens they are very easy to clean. TO disadvantages can be attributed to the rapid fouling of the system with algae in direct sunlight. To avoid this, you can cover the structure with a dark cloth.
5. Basic tips for operating the drip irrigation system
To extend the life of any system, it is necessary to correctly and timely carry out technical service. To do this, you need:
- Clean the filter of accumulated debris once a week. In the future, you can do this less often if you see that between deposits there is not enough time to accumulate a lot of deposits.
- Before the first watering, it is necessary to flush the entire system.
- If you want to use fertilizers, you can add them directly to the storage tank. Choose soluble formulations. After spending the entire volume of water with fertilizers, the system must be flushed with clean water. To remove residual impurities, just let her work for 10-15 minutes.
- If in the fall you want to dismantle the system, first rinse it well and dry it thoroughly.
- After that, carefully fold the hoses or tapes, cover them with a cloth or lay them in boxes.
To prevent small rodents from ruining the hoses, it is better to store them in a suspended state.
Following these recommendations, you can count on the fact that your system will last for more than one year.

 8 tips for organizing a watering system in the country
 6 tips for watering the lawn: equipment, frequency, norms
") Tips for choosing and installing a greenhouse irrigation system (5 ...
Tips for choosing and installing a greenhouse irrigation system (5 ... Garden Watering Hose: 7 Tips For Choosing
 Outdoor washbasin for summer house and garden: choose the finished one ...
 How to properly drain the water from the bath - 5 ways
 Choose a flow-through main water filter - 6 tips
 How to make a dry stream with your own hands in the country: 4 ...
 7 tips for arranging gas heating ...
 6 tips on how to make a lawn in the country with your own hands