Mosaic floor: 9 tips for choosing and laying
When we hear the phrase “mosaic floor”, colorful pictures immediately come to mind with the image of chic huge halls, whose flooring Perfectly smooth and decorated with an incredible pattern. In principle, this is a correct idea, since such a way of arranging the floor came to us from beautiful Venice. In ancient times, only really noble and wealthy people could afford such a luxury, because work and materials cost a lot of money. Today, everything has become much more affordable, technologies are more advanced, and the materials used in the installation process are easy to buy in unlimited quantities. Nevertheless, mosaic floors are one of the most interesting and practical coatings. In this article we will understand what types of mosaic floors are, what advantages and disadvantages they have, as well as consider the detailed technology and give 9 tips for installing mosaic floors without the help of specialists.
1. Varieties of mosaic floors
Mosaic floor is nothing but a variety bulk floor. His styling going on in two stages.
- First of all, it is necessary to prepare the base, the base, which is an ordinary cement screed. And on top carefully leveled base Already lay a decorative layer, which consists of granite or marble chips and pigments (if necessary), as well as a binder.
- The base is made of cement-sand mixturewhich can be laid directly on concrete slabsreinforced screed, which is poured on top of insulation or on a concrete base, poured on top of compacted soil.

- The thickness of this layer is on average 25-30 mm, however, this parameter may vary slightly depending on the curvature of the base base. And if necessary, arrangement warm mosaic floor, which, by the way, is also quite possible, the thickness of the base layer should be at least 40 mm;
- Facial or decorative layer may have a thickness of 15 to 25 mm. This parameter depends on the size of the fraction of crumbs used, as well as on the type of binder component.
All variety of mosaic floors can be divided into three large groups depending on the binder material used when mixing the decorative layer:
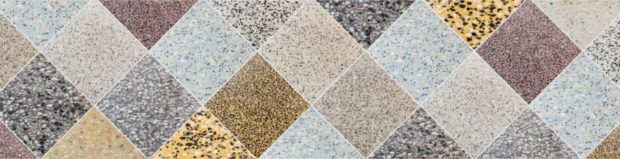
- Cement - the most common option, which, moreover, is the most affordable. The composition consists of two components - actually cementas a binder and aggregate. However, the usual gray cement is absolutely not suitable for these purposes. It will require white cement or colored. In extreme cases, you can use a combination of white powder and natural dye to obtain the desired shade. As a placeholder use sand fine, medium or large fractions. Sand should fill the voids between granite or marble chips, which can form during installation and thereby exclude the possibility of cracking on the surface of the coating during further operation;
- Polymer cement - their composition is almost similar to cement mixes. The difference is only in the addition of special polymer additives, which make the mass more ductile, supple, which facilitates the process of leveling the decorative layer. The addition of polymers also had a positive effect on the operational properties of the finished coating, which is characterized by increased strength, abrasion and less weight. To mix the composition, you can buy ready-made dry mortars based on cement with polymers, or you can buy separately only an additive and use it in the indicated recommended proportions. The difference between polymer-cement mosaic floors is their smaller thickness than conventional cement floors;
- Polymer - completely unlike the previous two types of solutions, polymer compositions do not contain cement at all. It is replaced by components such as epoxy or polyurethane polymers. Moreover, the composition is difficult for self-cooking, as it consists of two components. The latter should be added in strict proportions immediately before starting work. Even the method of arranging polymer floors is fundamentally different. If cement-based formulations are laid out on the base, then leveled and tamped, then the polymer floors are bulk. The composition includes crumbs of the smallest fraction or even rubbed into sand. As a result, the decorative layer has a thickness of up to 5 mm.
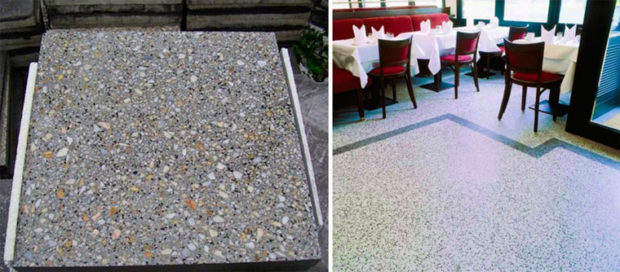
2. Mosaic floors of Terrazzo (Terrazzo)
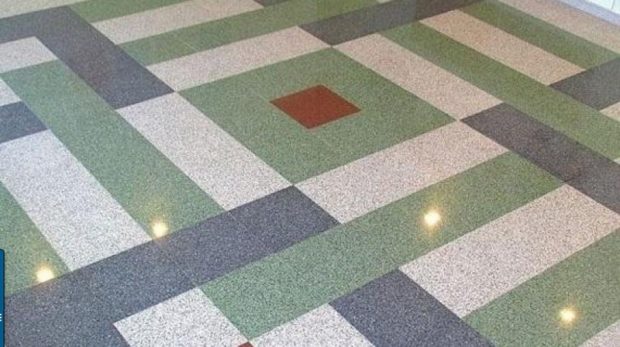
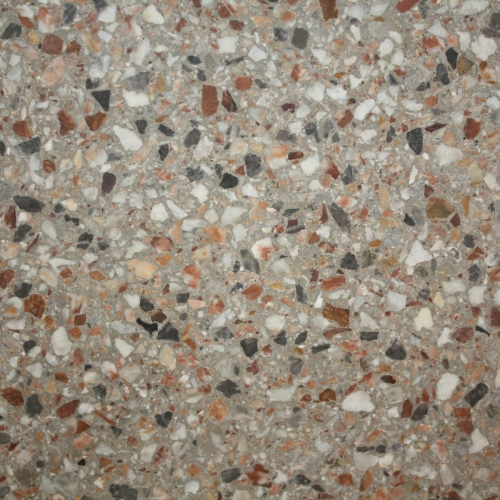
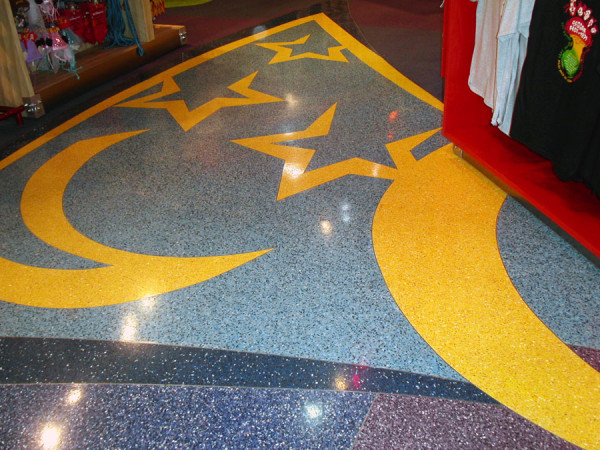
A common variety of mosaic floors are terrazzo floors - Terrazzo or Venetian terrazzo. According to tradition, the real Terrazzo laid on a base of lime. However, in our time, the use of this material is completely not relevant. Therefore, to equip the first layer, a material derived from lime is used - all the same cement. And for the decorative layer can be used natural filler in the form of stones, including precious and semi-precious, marble, glass and other multi-colored materials. Fractions can have both small and medium and large sizes. Main difference Terrazzo floors is that they are made using seamless laying technology.  By the way, depending on the size of the fraction of decorative inclusions and their color, distinguish several varieties sexes Terrazzo:
- Pastellone (Pastellone) - the first mention of it appeared in the XV century. Therefore, we can say that Pastellone is the very first type of mosaic floor. Characteristic features are the dominance in the color scheme of such warm shades as red and yellow. To obtain the necessary colors, only natural dyes are used - red cinnabar, yellow ocher or siena. Very rarely, but still found Pastellone green, which was obtained from unusual clay;
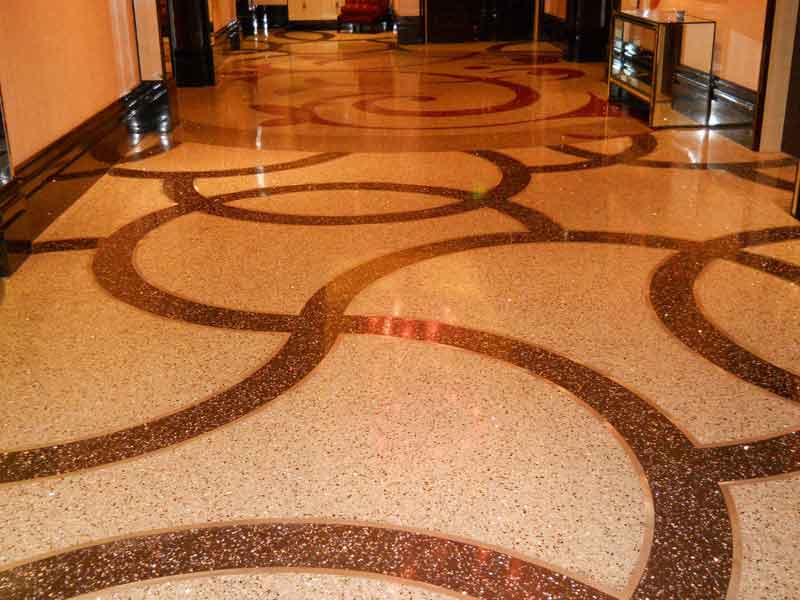
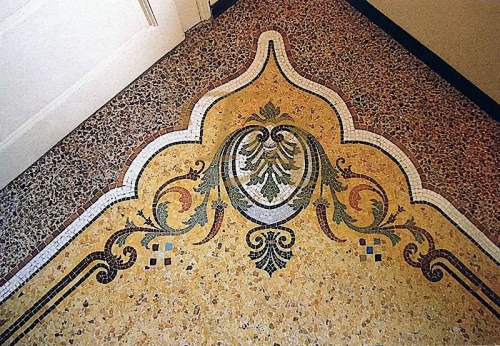
- Classic or Venetian Terrazzo - originates in the 19th century. Initially, the so-called marble “seeding”, that is, crumbs of different fractions, entered the decorative layer. However, they did not mix with each other, but fit in a certain order. The first layer was made of large marble inclusions, and the second consisted of small fractions, which were supposed to fill the voids between large ones. To add sophistication, plates of valuable marble rocks of small sizes, which were cut by hand, glass elements or mother of pearl, as well as medium-sized pebbles, could be added. One can only imagine what a spectacular appearance the first mosaic floors had and how painstaking and time-consuming the process of their creation was. Often the mosaic elements were laid out not randomly, but in the form of some kind of pattern. Thus, it seemed that before you is not just sex, but of unusual beauty carpet. This type of coating was called Venetian Terrazzo with mosaic;
- Terrazzo Palladian - A kind of mosaic floor, which got its name in honor of the architect Palladio. Another name is terazzo from large plates. Initially, this method was used for paving. street tracks, later adapted for use in residential premises or offices. Outwardly, such a floor is very similar to pavements in ancient Rome, and it reached its peak of popularity in the early 60s of the last century.
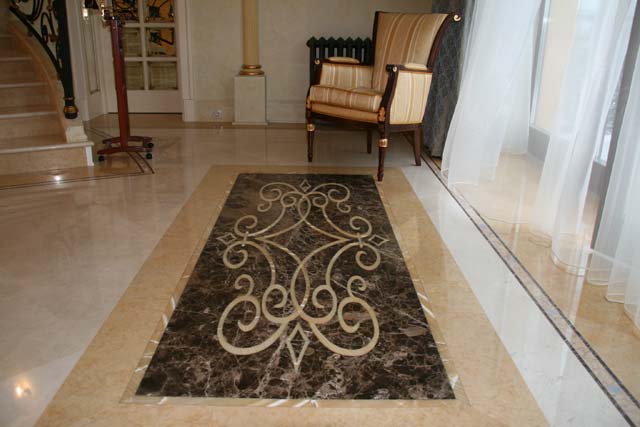
By the way, thanks to a special application technique, the classic Terrazzo is still used for facing staircase openings countertops and pallets.
3. Advantages and disadvantages of a noble coating
Despite their high decorative characteristics, mosaic floors are incredibly practical. They possess many advantages thanks to which they received such wide distribution:
- High strength. Concrete in itself, which is used both for laying the starting and finishing layers, is one of the most durable materials. And in combination with marble chips, indicators increase significantly. And the most interesting fact is that, despite the fact that marble is included in the form of crumbs, the hardened coating is comparable in strength to monolithic marble rock;
- Moisture resistant. Since the final stage of arranging mosaic floors is polishing them to a mirror shine, a smooth surface has an almost zero coefficient of water absorption. Even if you pour a glass of water on the floor, it evaporates faster than absorbed;
- Hygiene Due to the same final stage - polishing, the surface does not have pores in which dirt accumulates, it can develop fungus other microorganisms;
- Wear resistance. The coating is so hard and monolithic that it is almost impossible to scratch. That is why in the days of the USSR, and even now, in many public institutions with a high degree of patency it was possible to meet cement mosaic floors;
- Resistance to aggressive chemicals and reagents;
Environmental friendliness. Since the mixture contains exclusively natural components, the finished coating does not emit any harmful substances even under the influence of high temperatures; - Durability coverage is tens of years old. At home, mosaic floors can maintain their performance for 100 years. They will have time to bother you several times, but will be equally attractive and durable;
- Caring for such floors is very simple and comes down to the need for rare polishing to restore shine or eliminate minor scratches;
- High maintainability. Even if a cleavage or crack forms on the surface, this disadvantage is easily remedied. It is only necessary to clean the damaged area, fill the void with concrete and sand the surface;
- Fire resistance. Even under the influence of open flame, such a coating does not ignite. And when a heavy metal object is hit or dropped on it, sparks do not form. What is a very important point within fire hazardous industrial premises;
- Well and last - the ability to create real works of art thanks to a variety of fillers for the decorative layer and a rich color palette. Such floors can not be compared in appearance with any another type of coating and instantly transform the interior of any room.

Disadvantages much less, but not without them:
- First of all, I want to note that this not the cheapest kind of coating. Especially when it comes to complex design. However, judging by the prospect and remember that such a floor can serve a large number of years, the expenditures for its arrangement can be called quite fair;
- Many repeatedly pay attention to the fact that the surface is highly cold. This is not surprising, because it includes concrete and marble. However, in public places this fact is of little concern to anyone in fact. And within a private house or apartment, you can think over underfloor heating systemMoreover, the technology provides such an opportunity;
- Over time, under the influence of ultraviolet radiation, the surface may lose some saturation, and white marble will begin to give yellowness;
There is a high probability that over time drawing may bother you. Of course, you can cover the surface carpet or as a last resort linoleumbut would the costs be appropriate in this case? - And if after ten years you decide to permanently get rid of the mosaic floor, then you may encounter difficulties. Because dismantling its is very complicated.

4. Scope
Due to the excellent performance characteristics, mosaic floors are very widespread and can be used in a variety of conditions:
- At large industrial enterprises and production sites;
- On the food enterprises - in cutting shops, meat processing plants and confectionery factories;
- For arrangement parking areasboth ground and underground parking;
- On the car washes, car service stations;
- On rail and bus train stations, as well as at airports;
- IN transit centers, subway lobbies;
- IN storage facilities;
- Cafes, restaurants, galleries, shopping and entertainment centers, libraries, cinemas;
- IN hallways and foyer residential buildings and office centers;
- IN temples and churches, chapels and other places of worship;
- And even to equip the coating in aircraft hangars.
Just imagine which colossal daily load can withstand marble-based chips based on cement.
5. Tools that will be required to create a mosaic floor
The simplest in terms of execution are mosaic floors based on polymers. The mixture is applied in a thin layer and leveled using a conventional spatula, and after complete drying does not even require polishing to smooth out irregularities or to give shine. But for laying floors based on cement, you need to purchase or rent a large number of very different tools. We will understand in stages. For arrangement concrete screeds:
- Work will progress much faster if you rent a small concrete mixer;
- To maintain evenness, it is recommended to use building beacons;
- To level the mixture will require the rule.
For preliminary processing concrete grounds and finishing of the decorative layer will require:
- Grinder;
- Polishing machine
- Abrasive stones for peeling the surface to a depth of 3-4 mm;
- Abrasive stones for grinding;
- Abrasive stones for polishing.

For tamping decorative layer:
- Trapezoidal rule different sizes;
- Ironer metal or plastic;
- Trowel;
- Rammer manual;
- Vibrorail or ramming machine flat.
In addition, if the coating is not supposed to be continuous, but with division into sectors, special veins will be required. Also, if some kind of ornament or pattern with complex shapes is realized, it is recommended to make a pattern from polystyrene foam or a tree, the inner contour of which will repeat the necessary shape (like a pasochka). Before we begin a detailed discussion of the technology of laying mosaic floors, I would like to say that this process is quite painstaking and time-consuming. Especially if the surface is not created by a seamless method. However, no supernatural actions will be required of you. Can highlight some major stages:
- Base surface preparation;
- Pouring cement-sand screed;
- Core installation to form the contours of the future pattern;
- Kneading decorative composition;
- Pouring concrete-marble mix;
- Surface finishing.
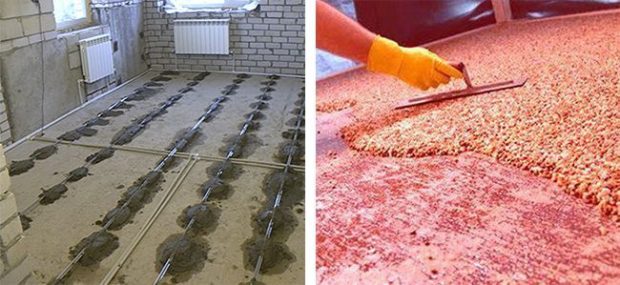
6. Preparing the base and pouring the screed
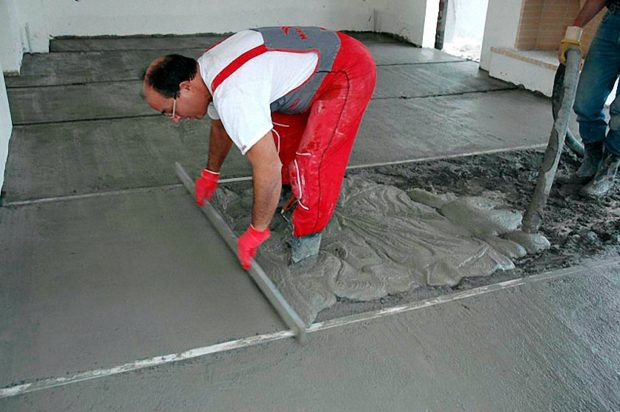
The final look and evenness of the entire mosaic floor depends on how high-quality and even the concrete screed will be. Note, that the screed will lie evenly, and subsequently will not crack only when applying it to a carefully prepared subfloor. To do this, you must:
- Remove the remnants of the old coating, as well as the remnants of adhesives and other solutions on which it could be held;
- Removing greasy oil stains and other contaminants;
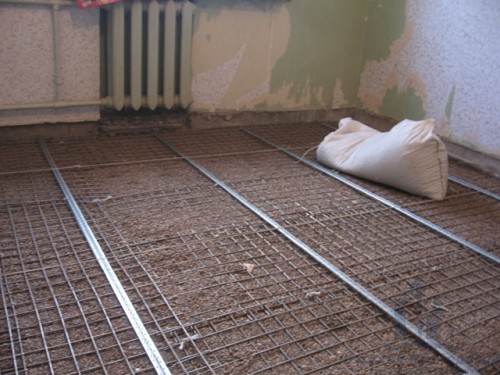
- If cracks were found on the surface, they must be cut with a grinder and the cavity filled with cement. Pay particular attention to places where heating pipes. There are usually holes around them that lead to voids. reinforced concrete floors;
- When all defects have been eliminated, and the solution has finally crystallized, it is necessary to roughen the surface to improve adhesion. To do this, you can carefully walk on the rough floor with a hard metal brush;
- Now, using a construction vacuum cleaner, you need to carefully remove dust from the surface;
- Apply several coats deep penetration primers and let it dry completely;
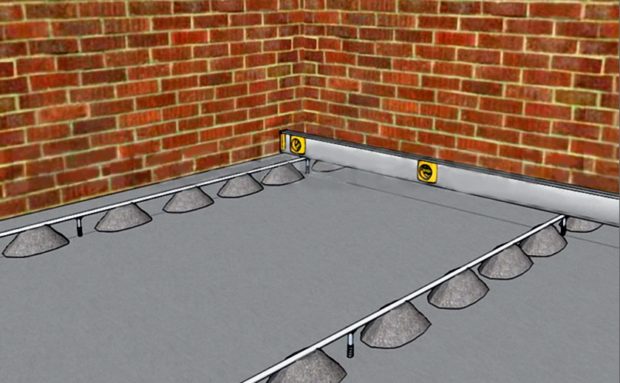
- After this, you need to determine the required height of the concrete screed. A minimum of 2 cm is recommended. This is the minimum border. The maximum will determine the curvature of your base. It is necessary to find the highest point, add the height of the building beacon and make a mark on the wall at the appropriate height;
- With the help of a laser level or a cord painted in blue, you need to beat off the level around the perimeter of the whole room;
- Check again whether the mark covers all the differences and unevenness of the floor, taking into account the height of the beacons;
- Install beacons at a distance equal to the length of your rule from each other. They are installed on the same cement mortar. Do not forget to constantly monitor the relative position of the lighthouses with a long building level;
- Wait for the cement mortar to set and check that the beacons are motionless and do not bend. If necessary, make additional fixation points with the solution;
- In a concrete mixer, knead the mortar solution, distribute the mixture between the first two beacons and stretch it evenly using the rule;
- Thus, you need to fill the entire surface;
- After that, cover the screed with foil or sprinkle with tyrsa to avoid its premature drying and cracking;
- Once a day you need to spray the screed with water.
When the mortar begins to set, you need to remove the building beacons, and then fill up the voids with mortar. When the screed can be walked freely, you can proceed to grinding it, if necessary. Then you can begin to form a picture of the future mosaic floor.
7. Tips for installing cores
If the base is seamless, you need to install the cores by analogy with building beacons, so that it is easier to maintain a horizontal plane when leveling marble chips. If there is a need to lay out the ornament, then first you need to transfer the drawing to the base with chalk or pencil.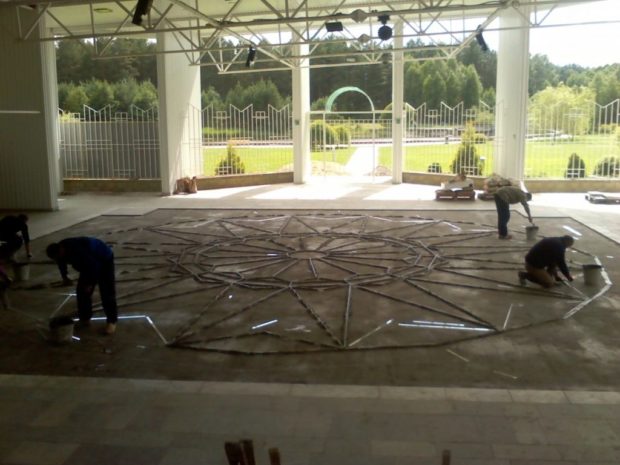
- Separating veins are metal or glass;
They are fixed using special fasteners or on a solution; - The cores simultaneously fulfill the function of lighthouses;
- You need to install them according to each line of your sketch;
- It is possible to lay the decorative layer only after the solution has completely dried, if it was used in this case.
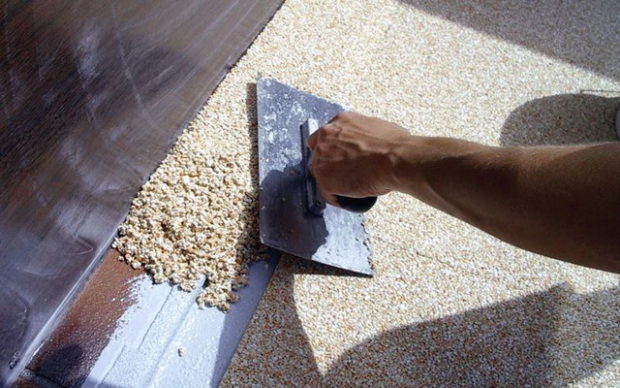
8. Mixing and laying technology of the decorative layer
The crucial stage, on which the decorative properties of the coating completely depend, is the moment of mixing the finish layer and the correctness of its laying.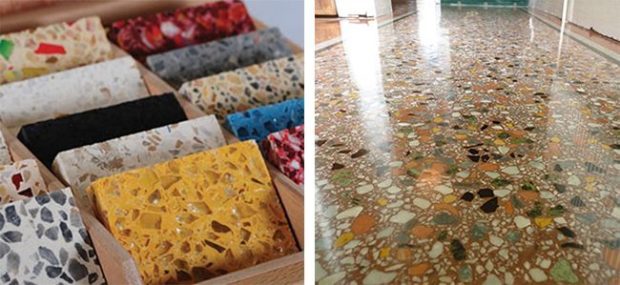
- To make the picture more dynamic and interesting, you can use marble chips of different grain sizes and several colors;
- Before mixing it with cement, experts recommend carefully rinse it with water. So you remove excess dust from the surface and increase the degree of adhesion with a binder;
- If several types of chips are used, you must first mix them together. Then add dry cement to the marble at the rate of 1 part cement to 2 parts crumbs. Mix the components thoroughly again. If necessary, now is the time, add dry dye. Its part should not exceed 30% of the volume of cement;
- Only after that can add water. How much water you need is pretty hard to say, since it all depends on the size of the fraction. It is tentatively recommended to adhere to a proportion of 1: 3: 0.5. Where 1 is the total part of the dye and cement, 3 is part of the marble chips, and 0.5 is the necessary part of the water;
- The finished mixture is evenly distributed on the surface, compacted, control evenness;
- If after a while you find excess liquid on the surface - they must be removed by pulling together with a rubber spatula and once again finally level the crumb;
- The decorative layer hardens for about a week, after which it is necessary to remove the beacons, and fill the voids with a decorative composition.
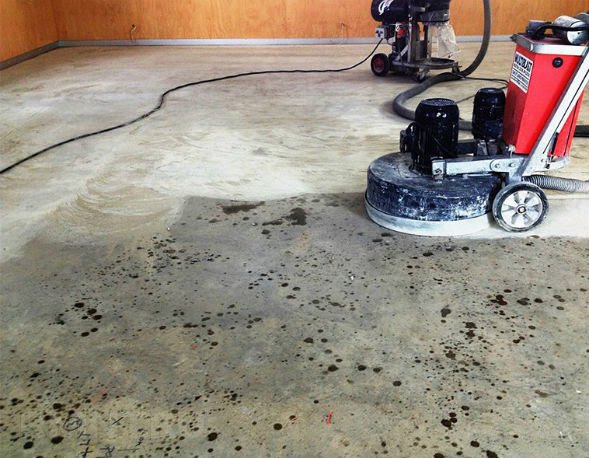
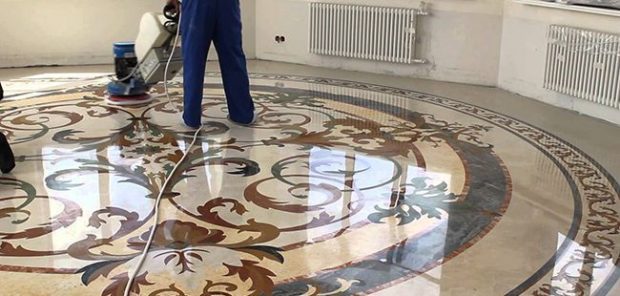
9. Grinding and polishing the floor
After complete drying, it is necessary to give the surface those qualities for which marble floors are appreciated - it must be sanded to emphasize the resulting picture.
- The easiest and quickest way to do this is with a grinder.
- The surface is recommended to moisten and sprinkle with fine quartz sand.
- It is possible that during grinding, small voids or other defects may open. Nothing wrong with that. It will be necessary to prepare a small amount of the finishing solution and fill the void.
- After drying, sand the finished place again. To give a characteristic shine and smoothing of small pictures after polishing, the floor is polished using special pastes, and then wiped with a dry soft cloth.

 Dry mix for floor screed: 7 tips for choosing and calculating
 Do-it-yourself laying laminate flooring. Stages of work
 8 tips for choosing bulk floors
 Vinyl: classification, styling, reviews
 Warm floor under the laminate: how to choose and install ...
 Do-it-yourself bathroom waterproofing
 Quality of flooring: parquet, laminate, linoleum
 5 ways to level the floor for decoration in an apartment or house
 Types of waterproofing materials used in ...
 5 Tips for Putting Tiles on a Wooden Floor