DIY wall plastering
Assessment and planning of plastering
What is plaster for? Naturally, to level the surface of the walls and make them suitable for any subsequent finishing. But situations are different and before work you need to clearly imagine the end result. Therefore, you need to clearly determine in advance how much the walls should be aligned, what kind of finish coating will be used, clearly understand the features of the material of which the wall is made, etc. The scale and cost of the work, as well as the material to be used, and its amount will depend on the totality of these parameters. Therefore, a thorough assessment of future work must be done before you go shopping.
Calculation of the amount of plaster needed for wall decoration
Factors That Affect Plaster Consumption
How much plaster is needed is influenced by two main factors:
- wall curvature - how far the vertical plane is deviated from the ideal. If in new buildings such a deviation is about 1-3 mm per meter, then in older buildings the deviation can be much more significant and even catch the eye;
- type of plaster: Naturally, the flow rate of different mixtures is slightly different, so there is no single flow figure for a certain area.
It is on these basic parameters that the method of calculating the required amount of the mixture is based. A clear example is given below, you just need to substitute your own values.
Calculation Method
The calculation consists of two main stages:
- Determination of the thickness of the required layer. First you need to clean the necessary surface well and set up the beacons: the more the better. In several places, we highlight the key points where the required measurements will be made. So, it is necessary to measure how much at key points the surface deviates from the planned one, then the obtained values are summarized and divided by the number of points. Suppose you have a wall evenly covered by 5 cm, you make three control points and determine that the deviations are 1, 3 and 5 cm, which gives a total of 9 cm. If you divide 9 cm into 3 control points, we get the average thickness of the plaster layer 3 cm, and it is this indicator that we will need for subsequent calculations. Please note that if you use beacons, no matter what the results are, anyway the minimum layer of plaster will be 6 mm to hide the beacons themselves.
- Now, using the data on the area of the wall that needs to be plastered, and the flow rate of the mixture, which is indicated on the package, it is easy to calculate, how many packages do we need. So, take for example the Knauf Rotband mixture, which is packed in 30 kg bags. The manufacturer declares that the consumption per 1 m² is 8.5 kg (layer thickness 10 mm).If the wall area is 10 m², and the required middle layer is 30 mm, the calculation is simple: 8.5 kg * 3 * 10 m² = 255 kg, which means that you need to purchase 9 bags with a dry mixture. Now substitute your data and the parameters for using the plaster, and get the result, so that in the end you don’t buy too much, or then run around headlong in search of material if it is not enough.
Materials
Plaster
Types of plaster for the intended purpose
The composition of the mixture for plastering can vary significantly. So, the main types are:
- cement: although it is slowly gaining strength, but in the end it gives the highest rates of durability, reliability and strength;
- clay - most suitable for wooden surfaces;
- lime plaster more universal, but gypsum is sometimes injected into it to accelerate hardening;
- gypsum they are used on their own, but here you need to have great professionalism in order to have time to apply a layer, because it begins to harden after 30 minutes after preparation;
- combined plasters can combine several astringent components, for example, lime and cement;
- special plaster It is distinguished by the presence in the composition of some kind of additive, which is necessary to give the material specific properties.
Ready solutions for plaster
In order to prepare a mortar for plaster, you can mix all the components yourself, or purchase a ready-made mixture. The latter option is now becoming increasingly popular, and in stores you can find such mixtures:
- cement-lime consist of sand, cement, lime and various additives that make the material resistant to various types of harmful effects. Such mixtures are ideal for plastering. bricks, concrete, aerated concrete, etc. in rooms with a normal microclimate;
- cement-sand mixtures are more universal, as they are suitable for work in any conditions. In addition, there may be various additives that give frost resistance, ductility or other properties;
- gypsum plasters use when it is necessary to make the surface ideal, and the room should have a normal level of humidity and no contact with cement;
But we do not include decorative plaster known to many in our list, since it is already used for finishing, and is not suitable for leveling and correcting walls.
Self-preparation of a plaster mortar
To start preparing the stucco mortar, you need to take care of the presence of three components: water, a binder and a filler. If necessary, special additives are also used, for example, potassium nitrate will make the surface waterproof.
Since plastering is usually carried out in three layers, the composition of the solution for each layer may vary slightly. So, for the first layer, you can use less astringent, in the second primer layer a little more, and in the final final binder component should be maximized to ensure proper esthetic appearance and durability. If plastering is carried out in one layer, then the amount of binder and aggregate is chosen average.
Depending on which mixture and which components are used, their ratio in solution will be different. Here are a few examples for the most common formulations.
- If you use cement plaster in three layers, then for
the first ratio of binder and aggregate is from 1: 2.5 to 1: 4,
for a primer layer - from 1: 2 to 1: 3,
for the finish - 1: 1.5 or 1: 2; - For lime mortar ratios are similar to cement:
for spraying, the binder and aggregate are mixed in a ratio of 1: 2.5 - 1: 4,
for a primer layer - from 1: 2 to 1: 3,
for finishing - 1: 1 or 1: 2; - For cement-lime mixture You must adhere to the following rules. Per unit volume of cement used
0.3-0.5 parts of lime and 3-5 aggregates for the first layer,
0.7-1 lime and 2.5-4 aggregates - for the second,
1-1.5 lime and 2.5-4 sand - for the finish. - For clay plaster it’s still simpler, since all layers are the same in composition: 3-5 parts of aggregate are used for 1 part clay;
- Lime-clay mixture It will also bring fewer problems, since the same solution is used here: 3-5 parts of sand should be added to 1 part clay and 0.2 lime.
- Cement-clay mixture also universal for all layers: 1 part of cement accounts for 4 parts of clay and 6-12 parts of sand.
- And finally, the last solution - gypsum-gypsum. To prepare a solution
for the first layer, it is necessary to mix 1 part of lime, 2-3 parts of sand and 0.63-1 part of clay,
the ratio of lime, gypsum and sand for the second layer is 1: 0.5-1.5: 1.5-2,
and for the finish layer, 1-1.5 parts of gypsum without sand are added to 1 part of lime.
Primer
The type depends on which surface will be plastered and which binder is used in the plaster mortar. primers:
- acrylic - one of the most versatile, as it is suitable for almost all surfaces except metal, has no smell, dries quickly;
- alkyd Great for wooden surfaces, including chipboard and fiberboard. It dries a little longer - about 10-15 hours;
- phenolic It is made on the basis of varnish with various fillers, solvents and anti-corrosion pigments. It is great for metal as well as wooden surfaces;
- perchlorovinyl It is characterized by good operational properties, but it smells strongly and is toxic by constant inhalation; therefore, it is used outside the living space for treating wooden, concrete and metal surfaces.
Tools necessary for plastering walls manually
When you already have all the materials, before the plastering process itself, you need to take care of the availability of all the necessary tools:
- trowel for applying the mixture;
- a falcon for simple plastering and holding a canopy of a portion of the solution;
- scraper;
- cutting - a small triangular blade, serves to close up small cracks in the plaster;
- half-tiles - a board with a handle for applying and leveling a layer of plaster, as well as for more thorough plastering of corners;
- h-shaped rule to level the solution and control the uniformity of its application;
- grout for grouting already applied layer of plaster;
- paint roller.
Tools needed to prepare the solution
So, with what and in what proportion is necessary for the preparation of the solution, we figured out. Now you need to know what materials will be needed in order to correctly and accurately carry out the whole process:
- container for mixing all components;
- a dispenser in order to measure the volumes of all components;
- construction mixer, special nozzle for drill, trowel or any other improvised tool in order to mix the resulting solution.
Plastering
Basic rules for plastering
If you want the plastering process to proceed quickly and without problems, and so that in the end you get a high-quality surface, you need to know and perform some simple rules.
- The ideal environmental parameters for the work are as follows: temperature + 5 ... + 30 ° C, humidity - not more than 60%. It is advisable that within 3 days after completion of the work, approximately the same conditions remain in the room.
- On the packaging for purchased mixtures should be cooking instructions: they must be carefully observed.
- It is very important to wash and clean all tools well after the completion of each new stage of work.
- If the plaster is applied in several layers, then you need to wait for the previous layer to dry before applying the next.Checking the degree of readiness is simple: slightly press with a finger, and if the surface does not crumble and does not slip, then you can safely apply the next layer.
- If you need to plaster the walls in the room, it is better to start from the ceiling, and only then go to the walls themselves.
Preparation of the base: apply a primer
Before applying the first layer of plaster, you need to prime the surface. This stage is necessary to strengthen the foundation, make it more resistant to the appearance of fungus, mold, and also to make the plaster solution more evenly.
The primer is applied in one or two layers, if the base is not loose and does not absorb much moisture. Otherwise, a larger number of layers may be needed, and for walls with large differences or too smooth surfaces, it is better to attach also plaster mesh. But this is not an obligatory stage, since, for example, a brick wall does well without additional devices.
The primer is usually applied with a roller or brush, the process itself is short and simple, but ignoring it can ruin the entire appearance of the finish. So, on plaster laid on top of an unprocessed surface, spots, cracks and other defects may appear.
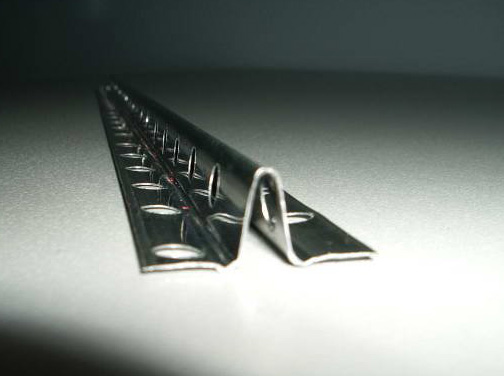
Lighthouse
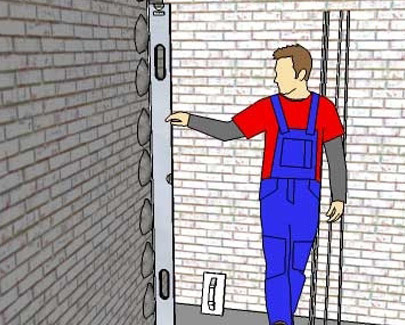 In order for the plaster layer to lie evenly and the resulting surface to be perfect, it is impossible to do without installing beacons, but you need to organize this work correctly.
Nowadays, several methods of installing beacons are common, but some of them require some skill and experience, so we will focus on the simplest, but quite effective method based on the use of a beacon profile.
So, it all starts with the fact that you need to check the verticality of the wall using a level or plumb. Then we begin to create the basis for smooth application of plaster: in the lower and upper corners of the wall we fix the dowels (it is better to use self-tapping screws for drywall walls), and we fix the fishing line on them, which should be stretched strictly vertically.
Using two vertical fishing lines stretched in level as a guideline, we begin to pull horizontal ones in the same way with dowels and level. For standard walls (2.5-3 m in height), four extended horizontal landmarks will be sufficient.
 Now we are armed with a lighthouse profile and plaster or putty. Under the fishing line, you need to form a whole series of slides from the resulting solution and press the profile into them as a rule so that it touches the fishing line, but does not lift it. First we set up vertical beacons, then horizontal, and at the end of the work all of them need to be checked again with the help of a level.
After all this, it is already possible to proceed to the preparation of the solution and to its application.
Video on installing metal beacons on threads
Beacon Installation Video
Laser Level Beacon Installation Video
Preparation of materials and preparation of plaster mix
You have already chosen the composition of the mixture that suits you best. Now the main thing is to properly prepare all the components and mix them. It would seem that it can be difficult to mix, but you need to load all the components in a certain order, and for each type of solution there are its own nuancesthat will provide the best result.
- Cement mixture mix better before adding water. It is better if sand and cement are laid out in layers and thoroughly mixed. Only then can water be added until a uniform consistency is obtained.
- Cement-lime mortar It is also prepared by mixing sand and cement, to which milk of lime is then added.
- For lime mortar they use only slaked lime, and the aggregate with water is introduced gradually - this will ensure the absence of lumps.
- If in a lime mortar need to add gypsum, then try to be efficient and do everything in no more than 5 minutes. First, it is better to prepare a gypsum solution (by adding water to the gypsum in an appropriate ratio), and already add lime to it.
- To make clay mixtureIt’s better to soak it in water in advance and knead it, getting rid of lumps.
- Ready-made store mixes they are simply poured with the required amount of water and mixed to achieve the desired consistency.
Given all these rules, you can achieve the perfect layer of plaster, which will not only be durable and without cracks, but also boast an excellent aesthetic appearance.
Stucco technique
The entire process of applying plaster can be divided into several stages, between which the necessary pauses are maintained. Usually three layers of plaster are applied, and then they are wiped - in this case the effect will be the most successful and long-lasting.
Spray
First of all, a solution of plaster with a more liquid, almost sour cream consistency called "spray" is applied to the prepared wall. It includes all the same components as in the subsequent layers, only they are more diluted.
The thickness of such a first layer may vary depending on the surface of the substrate. For wooden walls, it is better to spray with a thickness of 10 mm, and for concrete, brick and all the rest, you can do with a layer of 4-5 mm.
The whole process is simple:
- First, the prepared solution with the help of a trowel is laid out on the center of the falcon, the excess is removed in order to save material.
- Then you need to bring the falcon to the wall and begin to easily throw the composition on the walls, while you can use the trowel to make it more convenient. Gradually, the entire surface of the wall should be under such a solution.
Please note that you need to apply it from approximately the same distance, then it will turn out to be the most uniform. When the entire wall is covered with the necessary layer, remove only the most protruding parts of the plaster, while it is not necessary to level the entire surface.
Priming
After the first layer has completely hardened, you can proceed to the application of the second - soil. To be sure that the previous layer is ready for further work, you can lightly push it with your finger: the absence of a dent and crumbs indicate that you can start applying the second layer.
The soil solution is poured onto an area formed between four beacons. Then zigzag jerky movements are made by the metal rule in order to smooth the surface. The direction of movement is from top to bottom. We repeat this procedure until the surface is well smoothed and devoid of all pits and flaws. The result should be a layer that is slightly rough to the touch, but even, completely covering the beacons, being on the same level with them.
Beacon Removal
Before applying the last plaster coat - nakryvki, plaster beacons should be removed from the walland pour the remaining furrows with plaster mortar and smooth.
There is an opinion that lighthouses can not be removed, it is true only in part. The main problem that abandoned beacons create in the layer of plaster is their corrosion and subsequently emerging rust spots on the finishing coating. Proponents of leaving beacons in a layer of plaster as one of the arguments lead that the use of high-quality galvanized beacons minimizes these risks. However, these arguments are not valid, for one reason, while working with the rule, the galvanized layer of the beacons is damaged. Of course, the likelihood that rust will appear on the finishing layer increases with increasing environmental humidity depends on the quality of the lighthouses themselves, and on other factors. But in this case it is not worth hoping for a combination of favorable circumstances, and it is better to play it safe and remove the beacons from the plaster layer.
Also, the plaster layer after drying has the property to sag, and the beacons will protrude above the surface.
In what cases can lighthouses be left in stucco? Metal beacons can not be removed if it is planned to lay tiles, porcelain stoneware or other finishing materials on top of the plaster layer that do not allow rust to come out.
Video to remove metal beacons after plastering
Nakryvka
Coating is the third final layer of plaster. Its thickness should not be more than 2 mm, and it should be made perfectly. To do this, all components of the mixture are carefully sieved so that no crumbs, debris particles will lead to the formation of furrows and defects in the next stage of work - grouting.
So, the start of the coating begins by verifying that the previous layer has hardened well. Then it is moistened with water with a brush and a thin layer of solution is applied with a trowel. You need to smooth the resulting surface with the help of a half-trick, creating with its help wave-like movements from the bottom up.
Grout
Once you have finished the work of applying the plaster, you can safely proceed to the grout. There are a couple of ways, among which you can choose the most suitable:
- round: the wooden grater is pressed firmly to the surface and begin to drive it counterclockwise, cutting off any irregularities and defects with the ribs. If at the same time the coating layer has already hardened, then try to soak it a little with water and a brush so that it begins to give in to mechanical stress;
- race: the same thing is done, only with sharp, direct movements. As a result, you can get a better and smoother surface, especially when you consider that this type of grout is used with more expensive and high-quality mixes. Often such a grout is carried out after a circular, so the result can be called generally ideal.
After carrying out all these events, you can walk along the surface with a grater upholstered in felt or felt - this way you can smooth out even the smallest defects and imperfections.
Smoothing down
Smoothing down - a type of grout, which is carried out most often after the traditional grout. To do this, you need to use a wooden trowel with a rubber strip or metal gasket, depending on what kind of coating will eventually be applied to the plaster.
First, the trowel is carried out in the vertical direction, and then in the horizontal. Often this operation is also carried out after applying the last layer of plaster, even before grouting.
On this, the whole process comes to an end, and we get a surface ready for subsequent finishing. If all the actions were performed correctly, then in the near future there will be no cracks and spots.
A selection of videos on wall plastering on lighthouses
Video: Plastering Technology
Video: Master class by Mikhail Bezyaev
Video: Plaster application Volma Stroy
")
") TOP 8 manufacturers of stucco (plaster mixes)
TOP 8 manufacturers of stucco (plaster mixes) Types of dry plaster mixes: composition and ...
 Decorative plaster: types, application, painting
 7 tips for choosing warm plaster for the facade and ...
 8 ways to remove plaster from walls and ceiling
 4 ways to align walls for interior decoration
 Liquid wallpaper: properties and application
 Wall decoration with decorative artificial stone
 Non-woven wallpaper: selection, sticking and painting
 Dry mix for floor screed: 7 tips for choosing and calculating
Take out the beacons after the plaster - they rust! Checked personally :)