11 tips for choosing shapes and filling garden paths
The purpose of garden paths is well known to each of us: they serve for convenient movement around the site and are its decoration. A well-organized path will be a wonderful complement to the landscape, but to create a beautiful and original garden path, you don’t have to spend money and buy ready-made tiles in the store - you can do with cheap improvised materials and do it yourself create tiles of the size and design that is needed in a particular case. It will take only a cement mortar and an appropriate form, and it can be done with your own hands or purchased ready-made. Choose or make a mold and fill the garden path yourself uncomplicated and even interesting, and with the main nuances of this process we will try to figure it out.
No. 1. Why is it worth using fill forms?
Go to the store and choose tile or any other finished material for arrangement garden path - This is the simplest and fastest solution. Despite the huge selection of such materials, many owners of suburban areas prefer create garden paths by using molds for filling. The reason is many advantages:
 cheapness. Thanks to the use of forms, you can create an original garden path even with a minimal budget, because the simplest and most affordable materials are used;
- originality. Using home-made forms, you can create a track that will have no analogues. The shape, size and color of the elements will fully correspond to the site and its style. Thus, the forms are used not only with a limited budget, but also when it is impossible to find a finished tile with the necessary parameters;
- strength. Since the track is made of cement-sand mortar, it will be durable, reliable and withstand decent loads;
- room for imagination. Regardless of what type of mold is used, a home-made tile can be decorated in an original way with pebbles, glass, due to coloring, etc.
For originality and cheapness you have to pay your own time and effort - the process of creating a garden path using forms more durablethan using finished tiles or any other material.
No. 2. Types of forms for filling garden paths
All forms that are used to equip garden paths with their own hands can be divided into such types:
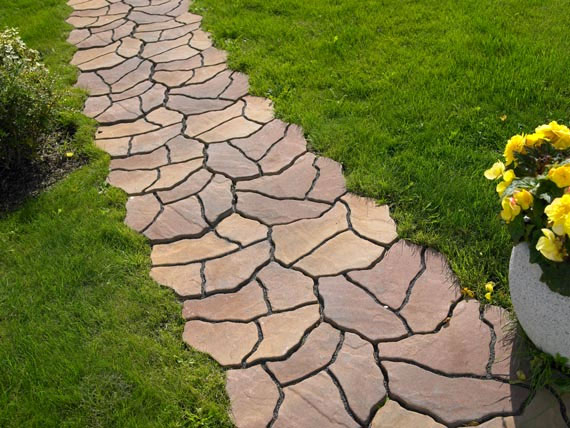
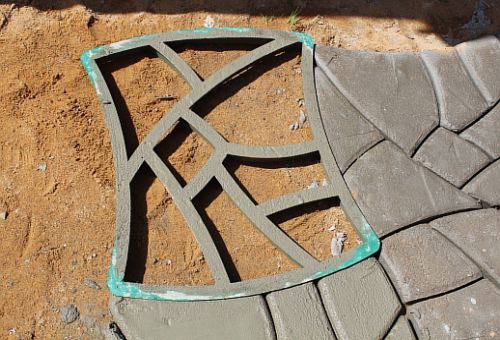
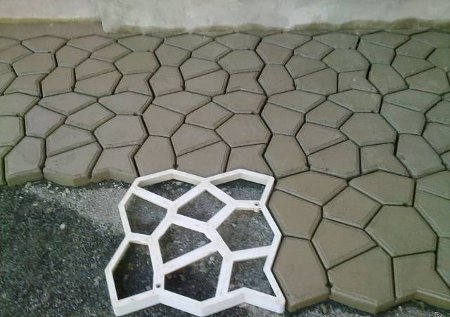
- ready-made stencils made of plastic for pouring cement mortar directly onto the prepared soil. Such forms, as a rule, are squares with a side of 50-70 cm and internal partitions. The stencil is installed in the place where the track is arranged, and then the solution is poured into it, after 20 minutes the mold is removed and installed to fill the next part of the path. The selection of such stencils is huge, the price is low, they are simple to use and allow you to quickly and easily equip a garden path;
- ready casting molds designed to fill them with a solution, after hardening of which the obtained elements can be used for mounting on a prepared for a track base, as well as ordinary tiles;
- self made molds. They are made of wood, metal, silicone, sometimes any improvised containers, such as ice cream boxes, are used. This option is the most time-consuming, but allows you to create completely unique material.
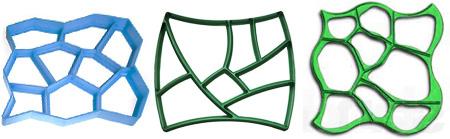
With ready-made forms everything is simple - you only need to choose the appropriate option, taking into account the size of the future path and your own preferences. Stencils can be divided into sections of different shapes, with sharp or rounded corners, they allow you to perfectly simulate a tile or stone. Molds for casting are presented in a wide variety - choosing is not a problem, but home-made molds require more careful consideration.
No. 3. How to make a shape out of wood?
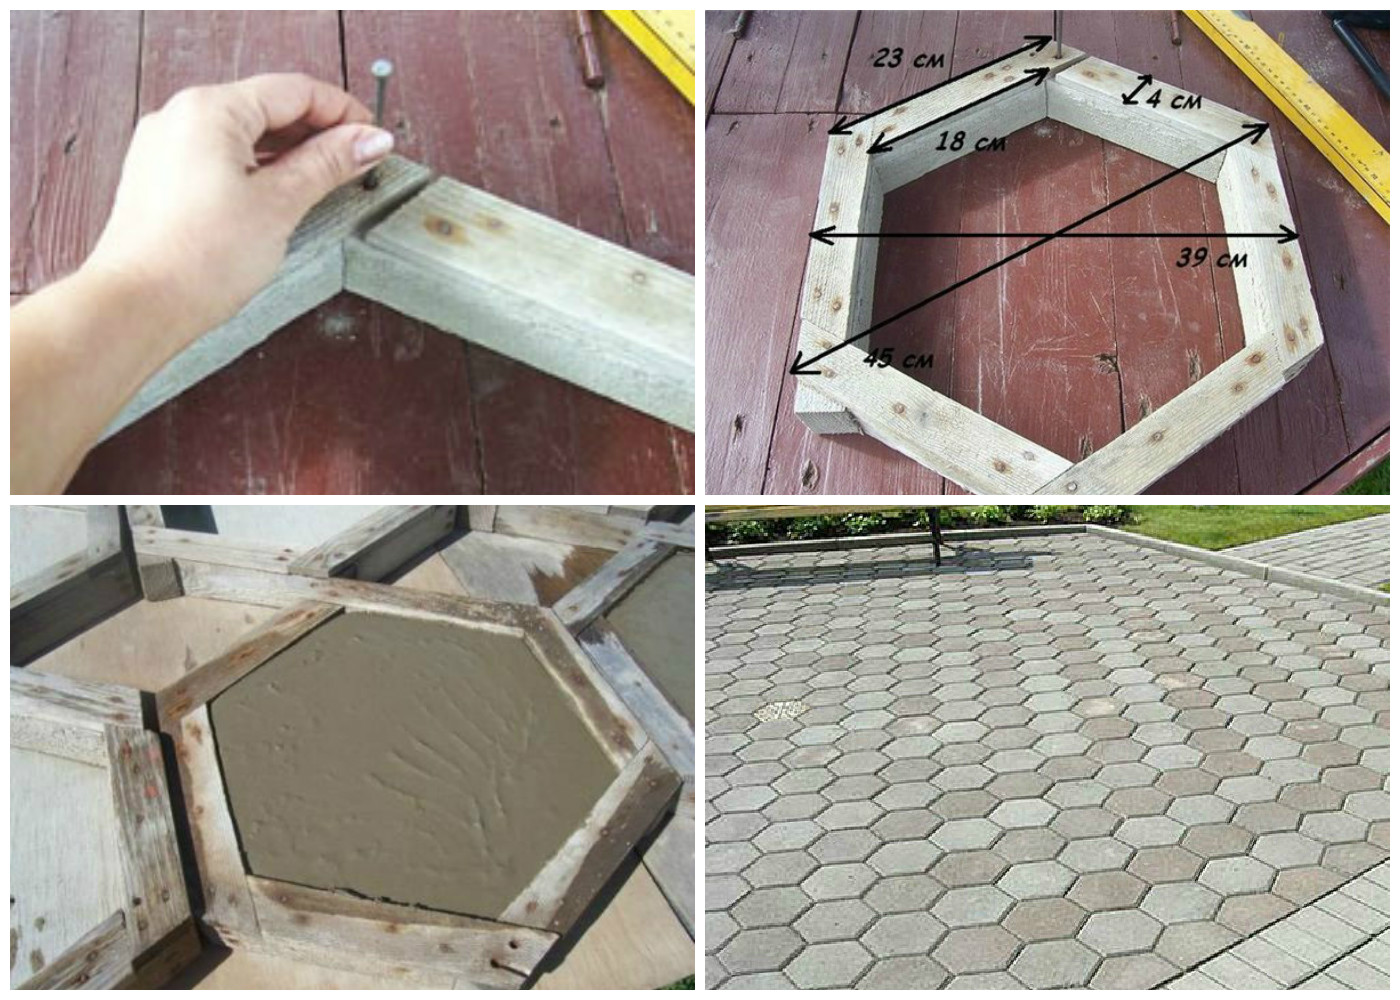
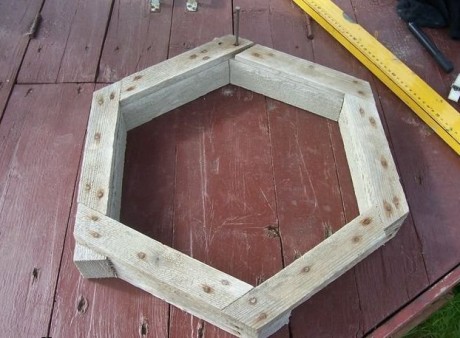
The easiest and cheapest way to use to make a mold wood blocks with a cross section of 50 mm, they are sanded and treated with an antiseptic. For a stronger connection, grooves are cut out at the ends of the bars, and outside the corners are fixed with metal corners. The size and shape of such a blank can be any: square, rectangular, triangular, trapezoidal, polygonal, etc. It all depends on the imagination, ideas and features of the garden. It is possible to divide the shape inside into several pieces of bars to cast several small tiles at once.
Bottom of the form can serve as a sheet of waterproof or laminated plywood, which is attached to the bars nails or screws. The stronger the joints in the mold are made, the more durable it will be and the more times it will be possible to fill the solution into it.
An alternative is not to nail the bottom and use the mold to fill the mortar at the location of this track element, but it is not so convenient, and the dependence on weather factors is too great, so it’s better to attach the bottom and work with the mold in any convenient place.
Made in such a simple way the mold can be used to pour cement-sand mortar into it many timesuntil the required number of elements is ready. Each time, before pouring the mortar, the walls and the bottom are lubricated with used oil or petroleum jelly so that the solidified element is easily removed from the mold. If you made a sufficiently large template, then when pouring the solution in the middle, do not forget to lay reinforcing mesh.
Number 4. How to make a mold of metal?
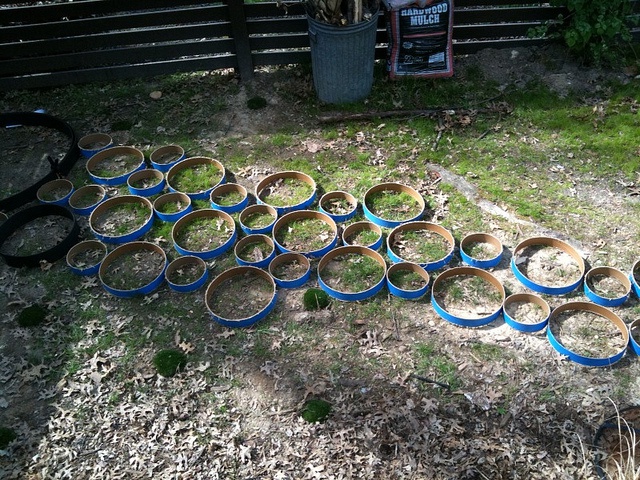
Useful for creating forms sheet metalAnd even metal hoops from an old barrel can be used, only they need to be treated with an anti-corrosion compound. From metal grinder or scissors for metal strips of the necessary width are cut that correspond to future track height: 4 cm for the pedestrian zone and 6 cm for the parking lot. It is easy to form from such strips figures of the necessary formsince the metal bends easily. It remains only to fix the workpiece by welding or metal screws.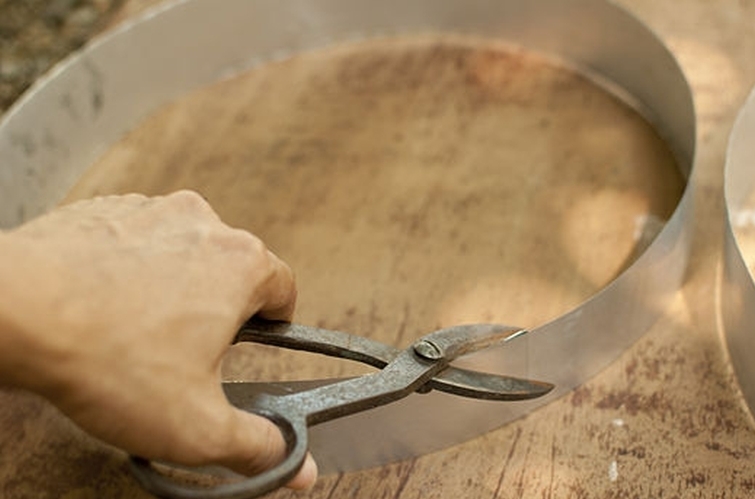
It is advisable to bend the upper edges a little with a hammer, so as not to get hurt by them during the work on pouring the mortar. Further everything, as with a wooden form. Before each use, the mold is lubricated with oil, the finished tile is removed from it after solidification, and the stencil itself can be used many times.
No. 5. Molds from improvised materials
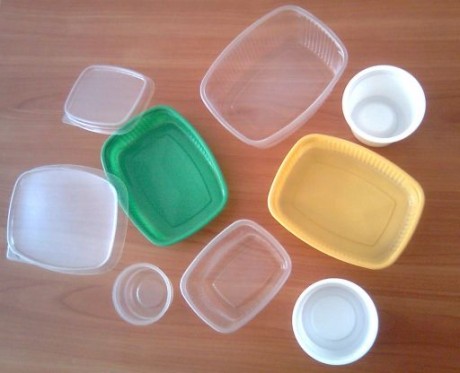
A stencil for creating elements of a garden path can be any capacity that has the necessary shape and proper strength. As a form for pouring cement-sand mixture can be used:
- kitchen containers and containers for products, for example, boxes of 1 and 1.5 kg ice cream;
- silicone baking dishes, the choice of which, without exaggeration, is huge. It is necessary to work with them with extreme caution so as not to tear the shape with a ready-made weighty concrete stone.
No. 6. How to make a mold of silicone?
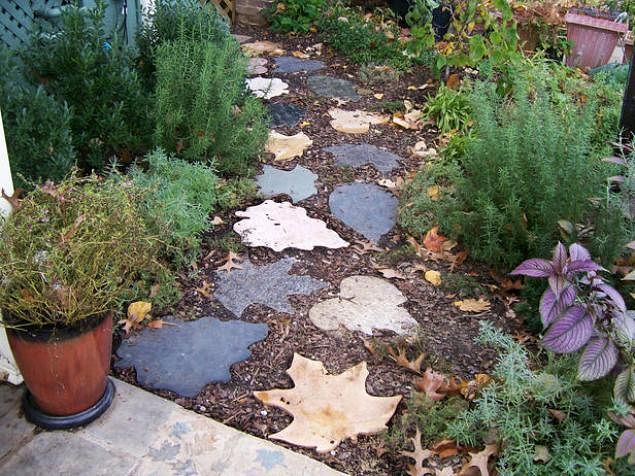
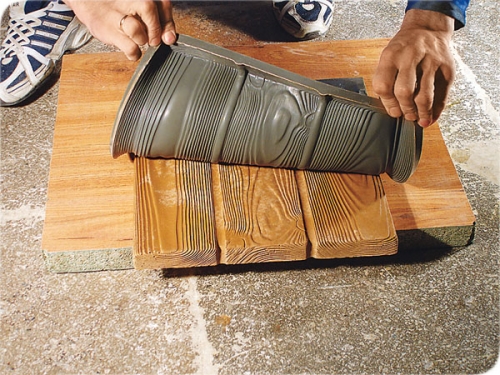
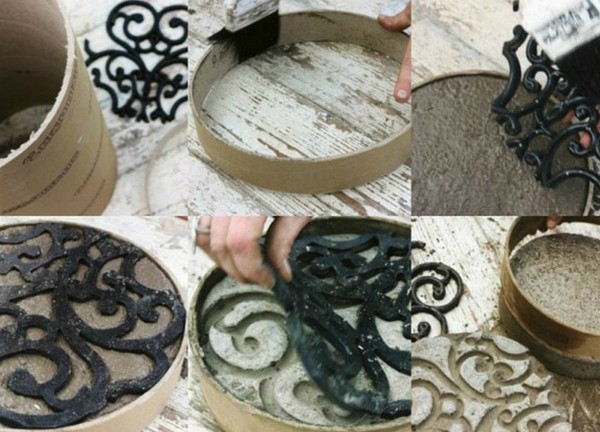
Self-creation of a silicone mold is the most time-consuming and complex method of all of these. The result is virtually the same mortar fill form as sold in the store, but it will allow cast a unique tile. As template are used large natural stonesless commonly used boards with a pronounced relief. As a result, you will get a solid strong and most accurate imitation of natural materials. To make the track look more natural, it’s better create more blanks, for which stones of different sizes and shapes will be needed.
The mold is made of two-component silicone - it is an inexpensive material that hardens at room temperature and is sold in all construction stores. Sequencing to create a form is as follows:
- formwork preparation. From the sample to the walls of the formwork, there should be approximately 2 cm on each side. You can use a box of thick cardboard, you can make the formwork of their wooden blocks and plywood according to the method described above, but with the only correction - the form must be collapsiblebut completely sealed. It should be 2-2.5 cm higher than the selected template, which in the future when filling will provide it with the necessary strength;
- formwork lubrication a thick layer of solidol, so that the hardened silicone then easily separated from the walls;
- arrangement at the bottom of the box of stone face up, it is also pre-lubricated with solid oil or oil;
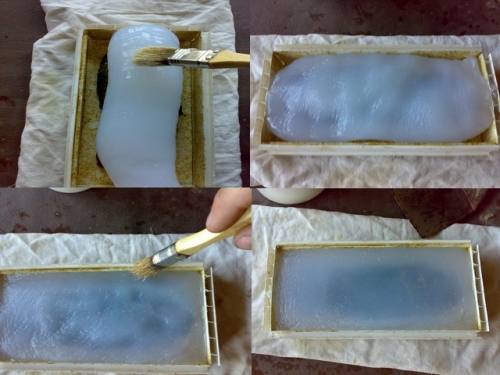
- silicone fill. To avoid the appearance of air bubbles in the mass of silicone, immediately after pouring it is sealed with a brush moistened with a solution of detergent. After this, the silicone must be smoothed out with a spatula dipped in soapy water, this is important because in a mold with an uneven base the solution will solidify unevenly;
- drying out in a dry room with room temperature, takes 2-3 weeks. After this, the formwork is removed, a stone or any other object that served as a sample is removed, and the form can be used for its intended purpose. Made according to this principle, it can withstand about 1000 pouring cycles.
Number 7. Solution preparation and pouring into molds
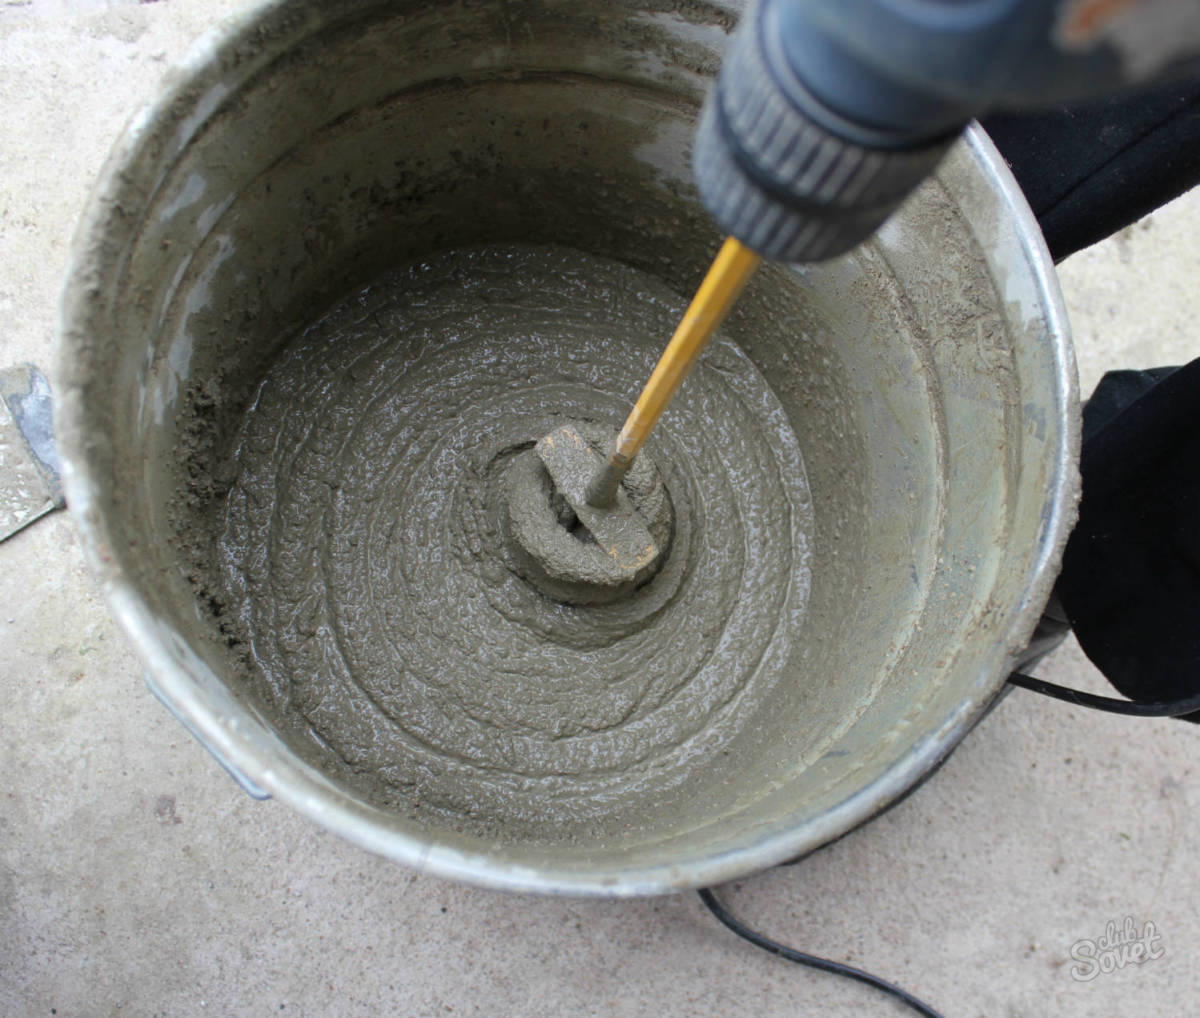
The solution for pouring into molds is prepared from cement and sand in a ratio of 1: 3water is added in such an amount as to obtain a solution of the consistency of thick sour cream: it must have sufficient fluidity to fill the form, but also not completely liquid, so that in the future the fabricated material is durable. Cement better to take stamps M300 or M400, sand suitable river or quarry. First, the cement powder is mixed well with sand, and only then water is added, mixing is carried out using a construction mixer or a special nozzle on drill. Can be used concrete mixerif there is one on the site.
Reinforcing fiber can be added to the solution; water-repellent additives will not be out of place. If you want paint the track in some color, then at this stage you can add to the mixture dye. It is advisable to prepare the solution in such an amount that will immediately be used to fill out the forms. After preparing the solution, you will have approximately 1-3 hours to fill out the prepared forms.
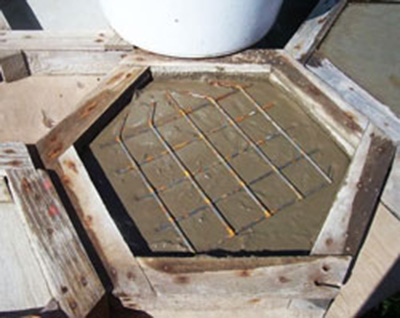
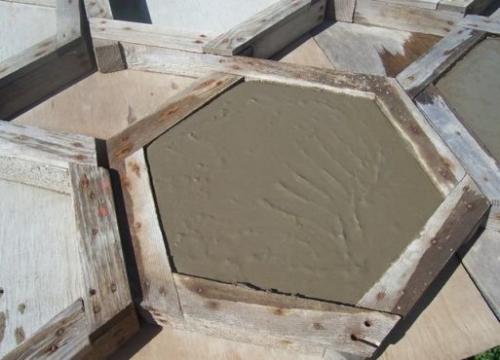
Pre-forms lubricated with used oil. Wooden and metal workpieces can be covered with plastic wrap for guarantee. The solution is carefully poured into the mold, to guarantee reinforced with metal mesh approximately in the middle. Now it remains only to wait until the mixture hardens, and do not forget 1-2 times a day wet the surface with waterto prevent cracking. After 3-4 days, the hardened material departs from the walls of the mold, and it can be carefully removed and left to harden in a cool place for 2-3 weeks to gain strength.
Number 8. Homemade tile decor options
Depending on your own preferences and features of the garden, homemade tiles can be decorated in a variety of different ways. Durable and beautiful material comes out. Here are just several ways of decor:
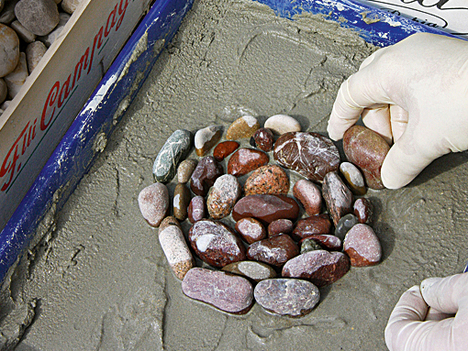
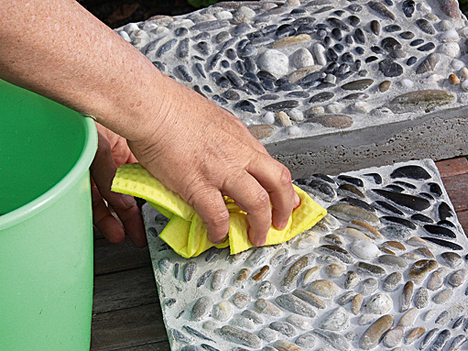
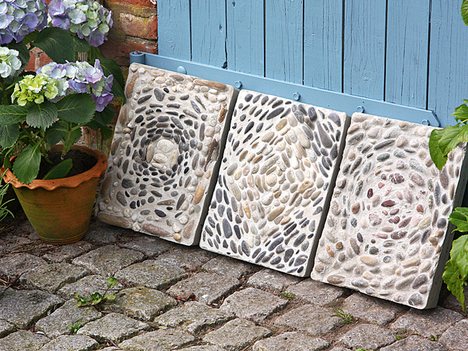
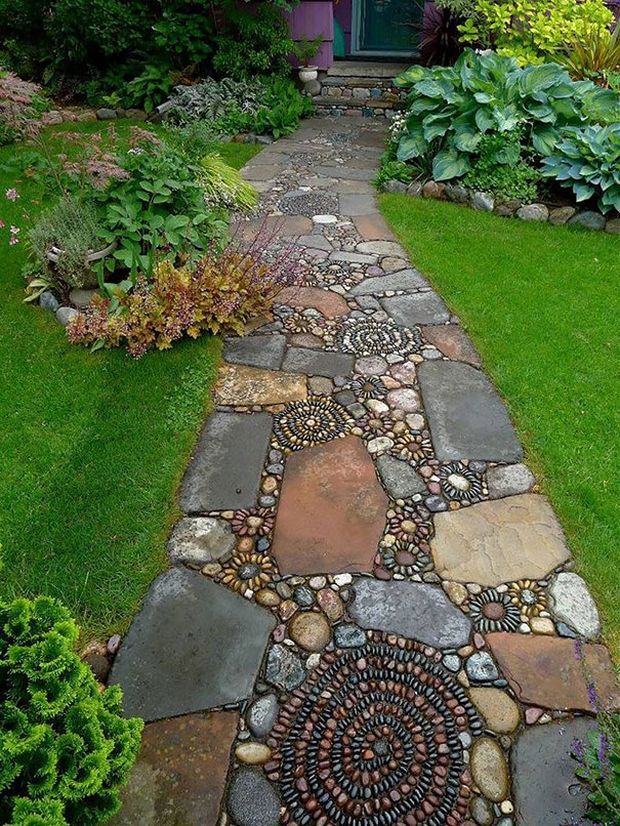
- pebble decoration or any other stones. First, the form is filled in as described above. Then, without waiting for the solution to set, stones are laid on its surface in a chaotic or strictly necessary order. If the stones are different in color and size, you get a beautiful natural pattern. All elements are recessed into the solution, since strongly protruding parts can significantly shorten the life of the material. Now it remains to wipe the surface of the stones with a damp cloth and leave the solution to solidify for several days;
-
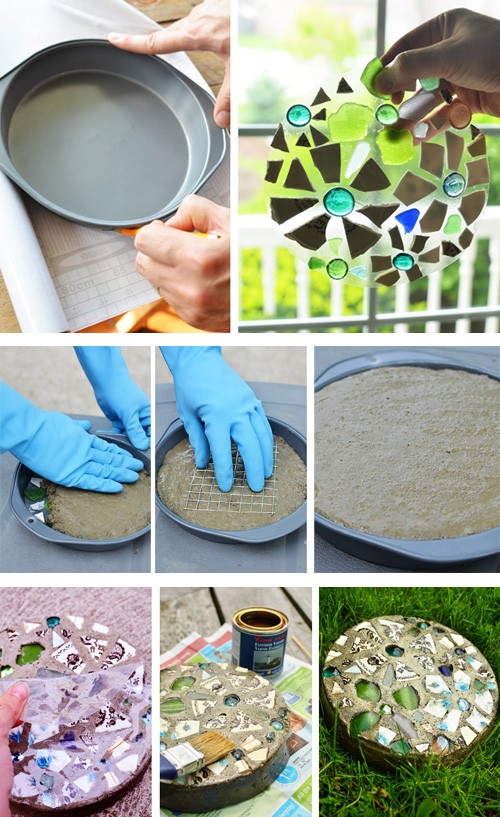
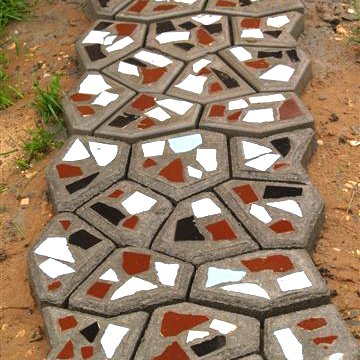
- decoration with pieces of ceramic tiles or utensils, mirrors, glass, beads, rhinestones, shells, mosaic tiles and other elements. Old unwanted utensils or ceramic tile can be previously broken into small pieces, it is better to do this by placing the material in a bag, and then break it into fragments with a hammer. All small decorative elements can be attached to the solution, as in the previous method, but the already laid-down element will be difficult to remove or move without leaving a trace. If the pattern is chaotic, it is fearless, but if you need to create the correct geometric pattern, it will be easier to lay everything in advance elements to the bottom of the form in the correct order, face down. To prevent small decorative elements from shifting from a given position, it is better to stick them on water glue to a sheet of paper that covers the bottom of the mold. Instead of paper and glue, you can use a special adhesive tape. It remains to fill the form with a solution and after a few days get the finished tile. The film easily peels off, and the paper with glue is removed, soaking in warm water;
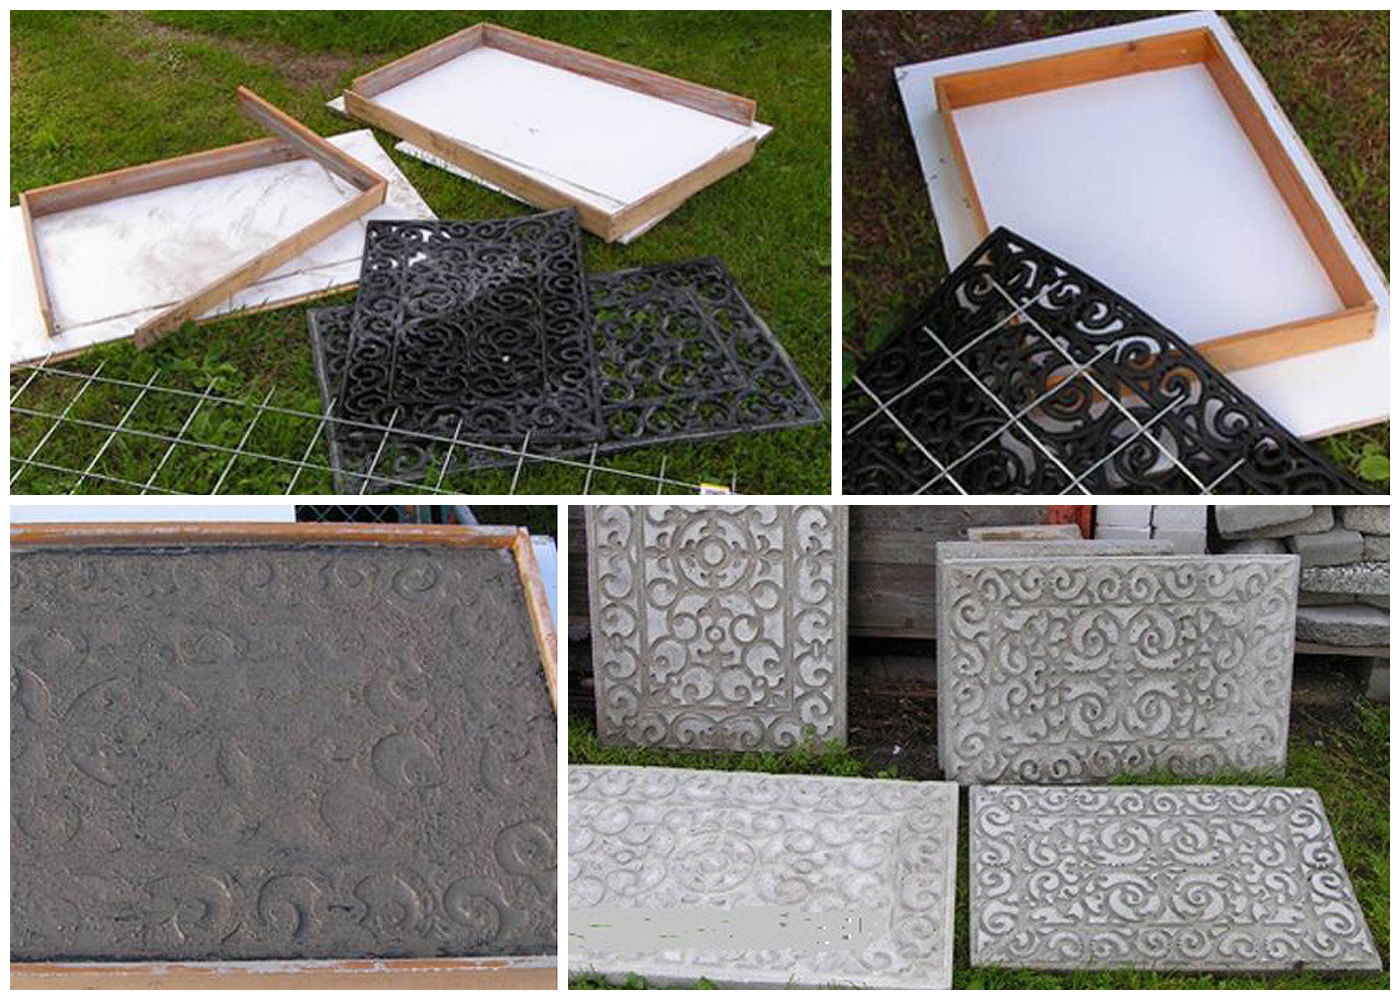
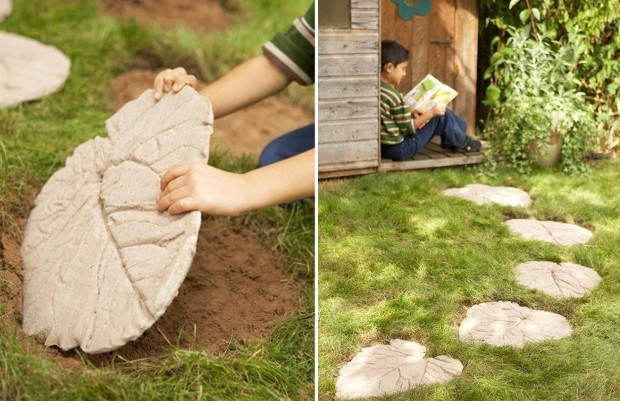
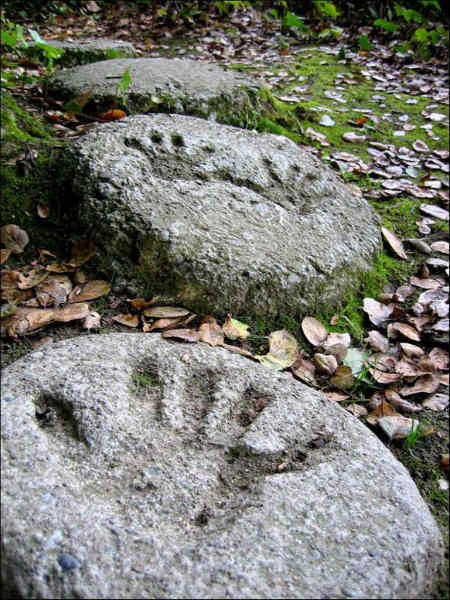
- fingerprint creation. In this case, the solution is poured according to all the rules into the form of certain sizes and parameters, and when it sets a little, you can squeeze out any prints on it. Attaching a large burdock leaffor example, you can get a noticeable relief, and if you used a metal form in the form of a sheet, the result will be excellent. Imprints can be made from cones, sticks, shells, use baby molds and even your own hands and feet, without forgetting to grease the skin with petroleum jelly. When the mold is extruded, the solution is left to solidify completely;
-
- coloring. Fully hardened and gaining strength plates can be painted in any color, create drawings, patterns. Top picture is fixed with a layer of varnish;
- other interesting tricks. From above, the surface of the slightly hardened mortar can be brushed to obtain a rough tile. Applying a small amount of yogurt or kefir to a wet solution allows you to get the effect of an aged and moss-covered surface.
No. 9. Preparing a place for a garden path
Before proceeding directly to the installation, it is necessary to carry out a set of works on the design of the track and the preparation of a place for it. I need to decide where the tracks will be on the site, what shape and width they will be, which depends on who will navigate through them. A path of 2 m wide should lead from the gate to the house, auxiliary paths can be 0.8-1 m wide, and even 0.5 m between the beds. The shape is even, slightly curved or curved. It all depends on the trajectory of movement between objects connected by tracks.
The sequence of preparatory work:
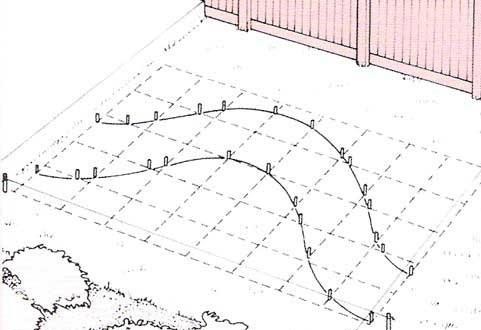
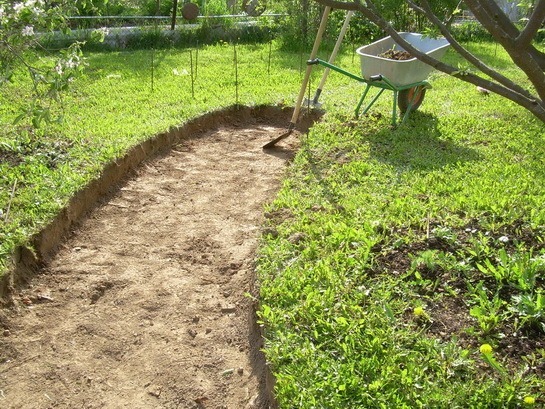
- determining the location of the track on the site. For convenience, the contours of the future track are indicated by wooden pegs driven in and at the same distance from each other and a thread stretched between them;
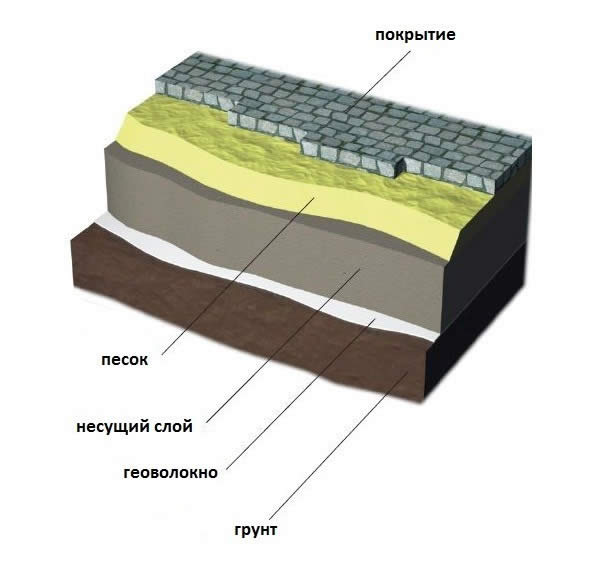
- topsoil excavation. The depth of the excavation depends on the type of soil and the nuances of arranging the track.The thickness of the tile or the layer of mortar poured into the stencils for clay soil will be 5-7 cm, for loamy soil - 10 cm. To increase the strength and durability of the track, it is necessary to create a sand cushion 10-15 cm thick. If the soil is swampy, lay a layer of gravel under the sand cushion. 5 cm thick. To understand which soil layer to choose, it is worth adding the thickness of all the necessary layers and the thickness of the tile, subtracting 2-3 cm from the result - exactly so the path should rise above the soil level;
- arrangement of pillows. At the bottom of a dug trench it is better to lay geotextile, roofing material or agrofibre so that sand with rainwater does not go into the ground. Then a layer of gravel is poured, if necessary, and sand. All layers are leveled and compacted. If necessary, install at this stage border. To do this, use either special purchased products or paving stones, monitoring it on the edge.
Further, the sequence of work depends on what is used: molds for casting tiles or stencils for pouring concrete mix into them directly onto the prepared soil.

No. 10. Installation of finished plates
It is better to lay independently poured and hardened slabs on a cement-sand mixture. Previously, the sand cushion is slightly moistened and left to dry. Meanwhile cook cement-sand mixture from sifted fine sand and cement M400 in the proportions of 1: 6 or 1: 7. Thoroughly mixed mixture is poured onto a sand cushion, the layer should be slightly higher than the planned track height - this is the reserve for tamping. The mixture is compacted and leveled. To ensure a normal rainwater runoff, it is better to provide a height difference of about 1 cm from one edge of the path to the other.
Now you can proceed to laying the tiles, focusing on stretched threads or a laid border. Elements are laid out in the necessary order, 0.5 cm gaps are made between them, then the tiles are fixed by tapping with a mallet to trim the board. The seams between the tiles are covered with a cement-sand mixture or just sand, then they are rubbed with a hard, fluffy mop. Now it remains to rinse the track with water using a hose and after 4-5 days you can safely move along it.
Paths on which no heavy load, sometimes equip with a simple recess of the tile into the soil layer. In this case, grass quietly breaks between the tiles, thereby decorating the path.
No. 11. Pouring stencils on prepared soil
If a ready-made removable form is used to give the solution the desired shape when pouring it onto the track, the process will take a minimum of time. Such forms, as a rule, consist of several cells resembling a natural stone in shape.
Work sequence:
- on the prepared sand cushion, the location of the start of casting of the first section is determined;
- the mold is lubricated with oil and installed in the required place;
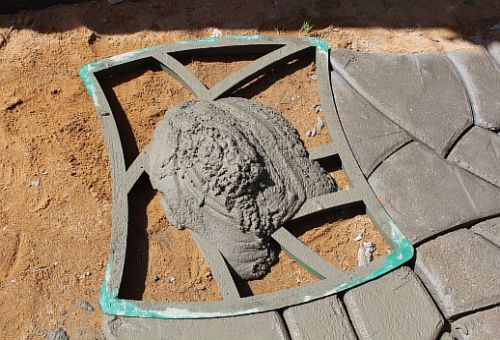
- the cells of the mold are filled with a cement-sand mold, the fittings are recessed into each cell, the solution is leveled from above with a trowel;
- the mortar can be sprinkled with dry cement and leveled to give extra strength. You can also pour dry pigment on top and smooth it with a spatula to make the surface as similar to natural stone as possible;
- after 20-30 minutes, when the solution is slightly set, the form is carefully removed and mounted next to fill the next section of the track. After 2-3 days, the solution will dry out, it is better to moisten it with a small amount of water every day.
-

In this case, you can do just one stencil, but when using 2-3 forms of work will go even faster. Decorate the surface of the trackthus made, it is possible by treating with a metal grater, extruding prints, pressing glass and other objects, or by painting a dried surface.
The creation of forms for garden paths and their filling is an interesting creative process that does not require large financial investments and even for those who do not have much experience in construction work. You can experiment as much as you like, and the result in the form of an original track will be a matter of pride and decoration of the site.

 8 garden edging options
 12 tips for laying concrete garden paths ...
 Features of the manufacture of paving slabs - TOP 5 ...
 14 options / materials to make ...
 Geotextiles for garden paths: 5 tips for choosing ...
") Tips for arranging paths in your greenhouse ...
Tips for arranging paths in your greenhouse ... 5 tips for choosing rubber tiles for tracks, ...
 How to choose paving slabs or paving stones
 12 tips for choosing garden furniture: material, size, style
 10 styles of landscape design and their characteristic features + photo